
To make hair with Geometry Nodes in Blender 5.2, add a hair curves object on a surface mesh and let a Geometry Nodes modifier generate and shape the strands: Object > Quick Effects > Quick Fur does it in one step, and the Hair Nodes in the manual let you build the same thing yourself. The Store Named Attribute node is separate: it saves the result of a field on your geometry under a name, so other nodes can read it back.
This guide follows the Blender 5.2 LTS manual: the quick route, a node-by-node hair build, where Distribute Points on Faces fits, and Store Named Attribute basics, including the domain and data type choices.
The quick way: Quick Fur
The manual's Physics introduction lists Quick Fur under Object > Quick Effects. It adds a fur setup to the selected objects. The setup is based on Geometry Nodes and is built with Hair Node Groups that come with Blender as bundled assets. Its options are Density, Length, Hair Radius, View Percentage, Apply Hair Curves, Noise and Frizz.
- Select the mesh you want to cover, then choose Object > Quick Effects > Quick Fur.
- Set Density and Length. The manual says Density is the surface density of generated hair curves, and View Percentage is a factor applied to density for the viewport.
- Add Noise or Frizz to break up combed-looking strands. Noise deforms curves with a noise texture, and Frizz uses a random vector per point.
- Use Apply Hair Curves only when you are done, since it applies the modifier that uses the Generate Hair Curves node group.
You should see strands growing from the surface. If you see nothing, check that the object has a UV map, which the next section explains.
Sources: Physics introduction
Build hair with Geometry Nodes step by step
Blender 5.2's manual has a Hair Nodes section. It groups the nodes into Generation, Guides, Deformation, Read, Utility and Write. The order below uses nodes from those pages.
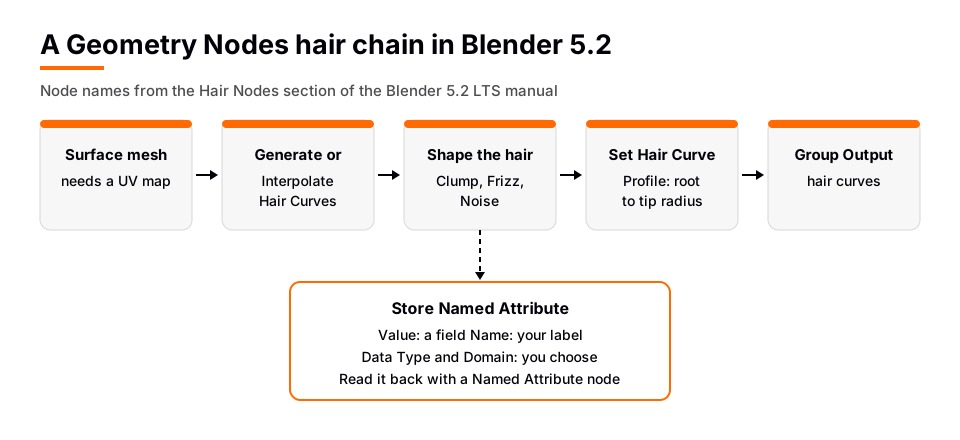
- Start with a surface mesh that has a UV map. The Generate Hair Curves page notes that the node requires valid Surface geometry or object inputs along with a Surface UV Map.
- Add an Empty Hair object. The manual's Curve Primitives page says Empty Hair adds an empty high-performance curves object, assigns the active object as the Surface, parents the new object to it and adds a Geometry Nodes modifier to deform the curves on the surface. The Fur entry beside it is the same fur setup as Quick Fur.
- Generate the strands. Use Generate Hair Curves to create curves from scratch at sampled root points. Its inputs include Hair Surface, Surface UV Map, Hair Length and Control Points; under Distribution you pick Random or Poisson Disk and set Density, Density Mask, Mask Texture, Viewport Amount and Seed. The Surface object's transforms must match the modifier object.
- Or groom guides and interpolate. Interpolate Hair Curves generates new curves from guide curves on the surface: a few guides define the shape and the node fills in density. Interpolation Guides sets how many nearest guides shape each new curve. The manual calls Duplicate Hair Curves a lighter alternative for simpler setups.
- Shape the hair. The Deformation and Guides nodes include Clump Hair Curves, Frizz Hair Curves, Hair Curves Noise, Curl Hair Curves, Braid Hair Curves, Smooth Hair Curves and Trim Hair Curves. Clump, for example, gathers nearby curves around guide curves and has a Factor from 0.0 (no clumping) to 1.0 (fully pulled to the guide).
- Set the thickness. The Set Hair Curve Profile node defines radius along each curve. Replace Radius swaps the existing radius for a new one; with it off, the new radius is multiplied with the existing value. Factor Min is the multiplier at the root and Factor Max is the multiplier at the tip, so a thin tip is a lower Factor Max.
To inspect what your nodes produce, use the Viewer node or the Spreadsheet Editor, covered on the manual's Inspection page. The Create Guide Index Map node writes an integer attribute named guide_curve_index that maps each curve to its nearest guide; Braid Hair Curves and Clump Hair Curves use that map.
Sources: Hair Nodes · Curve Primitives page
Grooming guides by hand
For hand-placed guides, use Curves Sculpt Mode. The manual says it is commonly used for hair grooming, that most brushes (such as Add Curves) need the surface set already, and that the tools use only the original mesh of the surface object and ignore its modifiers. If you change the surface topology, the Curves menu has Snap to Nearest Surface to re-attach roots.
Where Distribute Points on Faces fits
The Distribute Points on Faces node places points on the surface of the input mesh, using Random or Poisson Disk distribution, and transfers the point, corner and face attributes of the input to the new points, including vertex weights and UV maps. It also outputs Normal and Rotation and writes a stable id attribute, so points stay consistent when density changes.
Generate Hair Curves offers the same two distribution methods and points to this node's page for Poisson Disk details, so you do not need Distribute Points on Faces just to grow hair. Use it when you want points for something else, such as instancing.
Sources: Distribute Points on Faces
Store Named Attribute basics
An attribute, in the manual's words, is data stored per element in a geometry data-block, such as a number or vector on every vertex. The Store Named Attribute node stores the result of a field on a geometry as an attribute with the specified name. If the attribute already exists, its data type and domain are updated to the values you chose in the node. The manual warns that the domain and data type of built-in attributes cannot be changed.
Its inputs are Geometry, Selection (a boolean field choosing which elements get the value), Value (the field to evaluate) and Name. Its properties are Data Type and Domain. To use it:
- Place the node after the nodes that create the data you want to keep.
- Connect a field to Value, and type a Name.
- Pick the Data Type (for example Float or Integer) and the Domain. The manual's Attributes page lists the domains; for hair curves, Point means control points and the Spline domain means a whole group of connected control points, so a per-strand value belongs on the per-curve domain.
- Read it back with a Named Attribute node: type the same Name and set the Data Type to match. The Named Attribute node also has an Exists output that is true if the attribute is present.
- Verify in the Spreadsheet Editor. The manual says it shows the domains of attributes.
A concrete example from the hair pages: Interpolate Hair Curves has a Guide Index output, an integer for each curve holding the index of its main guide curve. Connect it to the Value of a Store Named Attribute set to Integer on the per-curve domain, name it something like strand_guide, and later nodes can read which guide each strand came from.
The manual compares this node to Capture Attribute: both store a field result, but Store Named Attribute uses a name while Capture Attribute uses an anonymous reference. For reusing data inside one node tree, Capture Attribute might be preferable because it avoids name conflicts. Also, 2D vectors (UV maps) and Byte Colors can only be stored with Store Named Attribute, because no sockets exist for those types.
Troubleshooting Geometry Nodes hair
- No hair appears. Check the Surface input and Surface UV Map, and confirm the surface object's transforms match the modifier object.
- Hair slides off when the mesh deforms. Generate, Interpolate and Attach have a Resting Surface option. The manual says to enable it when Deform Curves on Surface comes after them.
- Viewport is slow. Lower Viewport Amount or View Percentage; the manual says they do not affect the render.
- Stored attribute is not found. Check the Name, the Data Type and the domain you read it on.
Hair in Blender 4.x versus 5.2
Procedural hair started as bundled node group assets: a Blender Studio post from February 2023 shows them in the asset browser in Blender 3.5, and the demo files page says the Geometry Nodes hair system was first introduced in Blender 3.3 LTS. The 5.2 manual gives the nodes their own Hair Nodes section. On an older version, expect names and inputs to differ and use that version's manual.
To study finished setups, the demo files page lists two hair files: Hair Styles (CC-BY-SA, Daniel Bystedt) and Animal Fur Examples (CC0, Simon Thommes, Blender Studio). For a character to put hair on, see our list of free Blender character models.
Next, Blender Geometry Nodes covers the basics of the editor, and whether Geometry Nodes uses the CPU or GPU is worth reading before you build heavy hair.
Learn this in order with The Blender Launchpad
Hair nodes make more sense when fields, attributes and domains are familiar. The Blender Launchpad is a members app with a roadmap of hand picked, free YouTube lessons in six stages. The last stage is Geometry Nodes, and a Geometry Nodes Launchpad of eight modules is included.
It is a curated playbook, not original video lessons, with one payment and no subscription. Stage 1 assumes you have never opened Blender, and a bonus pack of 1,000+ CC0 assets, HDRIs and textures is free for commercial use.
Questions people also ask
How do you make hair with Geometry Nodes in Blender?
Use Object > Quick Effects > Quick Fur for a ready setup, or add an Empty Hair object on a surface and build with Generate Hair Curves or Interpolate Hair Curves, then shape nodes and Set Hair Curve Profile.
What does the Store Named Attribute node do in Blender?
It stores the result of a field on a geometry as an attribute with the name you give it. You choose the data type and domain, and read it back later with a Named Attribute node.
What is the difference between Store Named Attribute and Capture Attribute?
Capture Attribute gives the data an anonymous reference, while Store Named Attribute gives it a name. The manual says Capture Attribute can be better inside one node tree because it avoids name conflicts.
Do Geometry Nodes hair need a UV map?
Generate Hair Curves requires a Surface UV Map, according to its manual page, along with valid surface geometry or an object.
How we checked this
We read these pages on November 4, 2026: Blender 5.2 LTS manual pages for the Hair Nodes section (Generate, Interpolate, Duplicate, Clump, Frizz, Create Guide Index Map, Attach to Surface, Set Hair Curve Profile), Distribute Points on Faces, Store Named Attribute, Named Attribute, Attributes, Inspection, Curve Primitives, Curves properties, Curves Sculpt Mode and the Physics introduction (Quick Fur); Blender's demo files page; and Blender Studio's Procedural Hair Nodes post. We did not run Blender, so we did not test the node setups. The example that stores a Guide Index is our suggestion built from two manual descriptions, not a manual recipe.


