
Blender Geometry Nodes is a system for modifying an object's geometry with node-based operations. You add a Geometry Nodes modifier to an object, open the Geometry Node editor, and connect nodes between a Group Input and a Group Output to build, change or scatter geometry without destroying the original mesh. This guide explains the pieces and walks through a first scatter setup, using the Blender 5.2 LTS manual.
You do not need to know any code. If you can connect a node in the Shader Editor, you can connect one here, and the same skills carry over to every other node editor in Blender.
What Geometry Nodes is
The manual's Geometry Nodes introduction says the system is reached by adding a Geometry Nodes modifier and setting up the nodes in the Geometry Node editor. The node tree connected to the modifier is a Node Group. The geometry from before the modifier (the original geometry, or the result of the previous modifier) goes into the Group Input node. The group does its work and passes the result to the Group Output node, which hands it to the next modifier.
Geometry nodes can modify empties, meshes, curves, point clouds, volumes and instances. The Geometry Nodes modifier itself is supported by mesh, curve, text and volume objects. Because it is a modifier, the work is non-destructive: the base object stays as you modeled it.
Sources: Geometry Nodes introduction
The modifier, the workspace and the editor
Three things work together:
- The Geometry Nodes modifier. Add it from the Modifiers tab of the Properties editor with the Add Modifier button (or Shift+A in that tab). The manual's Geometry Nodes modifier page says it holds a Node Group, plus a list of the group's Inputs that can have their own values even if the group is shared between modifiers.
- The Geometry Nodes workspace. The manual describes the Geometry Nodes workspace as the one for procedural modeling.
- The Geometry Node editor. The editor has a Node Tree Sub-Type, Modifier or Tool. Use Modifier for the work in this guide. It also has an Add menu for new nodes, a Group tab in the Sidebar for the group's inputs and outputs, and a pin button that keeps a node group visible while you select other objects.
Modifiers run in stack order, and new ones go at the bottom. A Geometry Nodes modifier receives whatever the modifiers above it produced, so you can combine it with ordinary modifiers.
Sources: Geometry Nodes modifier page · editor
How to use Geometry Nodes: a first scatter setup
Scattering is a classic first project. This one covers instances, points and joining. Start with a plane or any mesh that has faces.
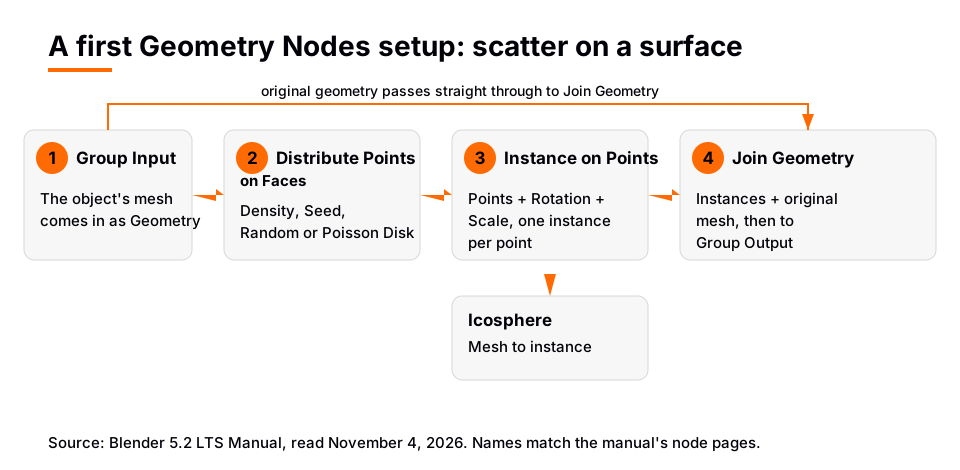
- Add the modifier. Select the mesh, open the Modifiers tab, add a Geometry Nodes modifier, and open the Geometry Nodes workspace. The node editor shows a Group Input node and a Group Output node for the group.
- Add Distribute Points on Faces. Use the editor's Add menu to place a Distribute Points on Faces node. Connect Group Input's Geometry to its Mesh input. The manual notes the input must contain a mesh with faces.
- Tune the points. Raise or lower Density, the number of points per square meter, and change Seed to reshuffle. The Distribution Method can be Random, which the manual calls the fastest, or Poisson Disk, which takes a minimum Distance Min into account.
- Add Instance on Points. The Instance on Points node adds a reference to a geometry at each point. Connect Points from the previous node to Points here. Connect the Rotation output of Distribute Points on Faces to the Rotation input to align instances with the surface. The manual warns that the Z rotation is arbitrary, so instances may spin around their own axis.
- Give it something to instance. Add an Icosphere node (a mesh primitive with Radius and Subdivisions) and connect its Mesh output to the Instance input. Set a small radius so the spheres look like pebbles.
- Keep the surface. Add a Join Geometry node, which merges separately generated geometries into one. Connect both Instance on Points' Instances output and the Group Input geometry to it, then send its output to Group Output.
You should now see spheres scattered across the surface while the plane stays visible. If you skip step 6, the output contains only the instances, because the modifier outputs whatever reaches the Group Output.
The manual describes instances as a fast way to add the same geometry many times without duplicating the underlying data. If you later need to edit each instance individually, the Realize Instances node turns them into real geometry, which the manual warns can hurt performance with many instances of complex geometry. For random variation, the manual also lists a Randomize Transforms node that applies random translation, rotation and scale to instances.
Sources: Distribute Points on Faces · Instance on Points
Fields, dashed lines and inspecting your tree
Two ideas trip up beginners.
Fields. The manual defines a field as a set of instructions that can turn an arbitrary number of inputs into a single output, calculated many times with different input data. That is how one node can give a different result for every vertex or face. Connections that come from a field socket are drawn as dashed lines, and other connections are solid.
Inspection. When something looks wrong, the manual's inspection page lists the tools: socket inspection (the value in a socket, or counts of elements for geometry), node warnings in the title, the Viewer node, which shows intermediate geometry in the Spreadsheet Editor and the viewport, and a Node Timings overlay. A node must be connected to the Group Output to log a value or a warning.
Sources: inspection page
A shortcut: the Scatter on Surface modifier
The 5.2 manual also lists a Scatter on Surface modifier in the Generate modifiers. It distributes points or instances across a mesh surface with a Selection, a Density Method (Density or Amount), a Poisson Disk option, instancing from an object, a collection or geometry, and randomization of offset, rotation and scale. Use it when you only need scattering, and build nodes when you need to control more than its options allow.
Sources: Scatter on Surface modifier
What to learn next
When people search for Blender Geometry Nodes tutorials, they usually want one of a few next steps. Each builds on this guide:
- Curves to meshes. The Curve to Mesh node turns curves into surfaces. Our post on Geometry Nodes and the Screw modifier uses it to build a spiral.
- Hair. See Geometry Nodes hair in Blender.
- Performance. Read whether Geometry Nodes uses the CPU or the GPU.
- Node groups and tools. The manual covers node groups, assets and Node-Based Tools, where you build operators you run from menus.
Learn the base skills first. Our Blender 3D modeling tutorial covers the mesh, face and normal concepts that Geometry Nodes depends on.
Learn Geometry Nodes in order with The Blender Launchpad
Geometry Nodes is easiest after the basics are solid. The Blender Launchpad is a members app with a roadmap of hand picked, free YouTube lessons in six stages, and Stage 6 is Geometry Nodes. It includes a Geometry Nodes Launchpad with eight modules, so you move through the topic in a set order instead of jumping between random videos.
Stage 1 assumes you have never opened Blender. The Launchpad is a curated playbook, not original video lessons. It is one payment with no subscription, and it includes 1,000+ CC0 assets, HDRIs and textures that are free for commercial use.
Questions people also ask
What is Geometry Nodes in Blender?
It is a system for modifying the geometry of an object with node-based operations, reached through a Geometry Nodes modifier and the Geometry Node editor. It works on meshes, curves, point clouds, volumes, instances and more.
How do I use Geometry Nodes in Blender?
Add a Geometry Nodes modifier to an object, open the Geometry Node editor, and connect nodes between Group Input and Group Output. A good first project is Distribute Points on Faces into Instance on Points.
Is Geometry Nodes hard for beginners?
It is a lot to learn, but you can start small. Wire two or three nodes, watch the result change, and use the Viewer node and socket inspection when something looks wrong.
Where can I find Blender Geometry Nodes tutorials?
The Blender Manual has a page for every node, with inputs and outputs. For a guided order, see the free YouTube lessons in stage 6 of the Launchpad roadmap above.
How we checked this
We read these pages on November 4, 2026, in the Blender 5.2 LTS manual: Geometry Nodes Introduction and index, Geometry Nodes Modifier, Geometry Node Editor, Modifiers Introduction, Workspaces, Node Groups, Fields, Instances, Inspection, Distribute Points on Faces, Instance on Points, Realize Instances, Join Geometry, Icosphere, Randomize Transforms and Scatter on Surface Modifier. We did not run Blender while writing this. The order of the six scatter steps is our own exercise design built from those pages.


