

3D modeling in Blender means starting from a simple mesh, such as a cube or cylinder, entering Edit Mode, and shaping it with a few core tools: extrude, inset, loop cut and bevel. A Subdivision Surface modifier and Shade Smooth then make it look smooth. This tutorial uses all of them to build a simple mug body.
Every tool below is named as in the Blender 5.2 LTS manual (read November 4, 2026), with its shortcut. We did not run Blender while writing, so what you should see after each step comes from the manual's descriptions. If a step looks different on your screen, check the troubleshooting section near the end.
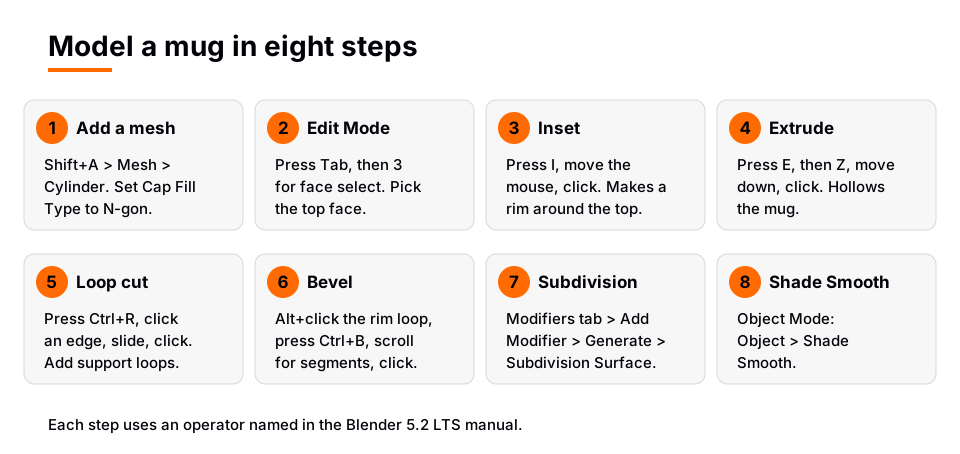
3D modeling in Blender: the workflow in one line
The manual describes mesh modeling as roughly blocking out the shape with primitives, then using tools to add detail and create more intricate parts. That is the whole tutorial. Blender gives you three main modes for it: Object Mode for creating and moving whole objects, Edit Mode for editing vertices, edges and faces, and Sculpt Mode as a clay-like alternative that we skip here.
Step 1: add a mesh
- Delete any default objects you do not want in the scene.
- In Object Mode, press Shift+A in the 3D Viewport and choose Mesh > Cylinder. The manual says primitives appear at the location of the 3D Cursor.
- Open the Adjust Last Operation panel in the corner of the viewport. The Cylinder has Vertices, Radius, Depth and Cap Fill Type.
- Raise Vertices for a smoother circle (32 is a reasonable choice for a mug), set the Radius and Depth to a mug-like proportion, and set Cap Fill Type to N-gon.
With N-gon, each end is one single face, which is what the next steps need. With Triangle Fan, each end is split into triangles and there is no single top face to select. You should now see a plain cylinder with a flat top.
Step 2: enter Edit Mode and select the top face
- Press Tab to enter Edit Mode. The manual says Tab toggles Edit Mode for objects that support it.
- Press 3 for Face select mode. The manual lists 1, 2 and 3 for Vertex, Edge and Face.
- Click the top face. It is shaded orange when selected.
If you cannot select it by clicking its surface, X-Ray may be on. The manual says that with X-Ray enabled you select a face by clicking the selection dot in its center.
Step 3: inset the top face
Press I. The manual describes Inset Faces as creating a border of faces around the selected faces, with the border thickness set by moving the mouse. Move the mouse until the rim is about as thick as a mug wall, then click to confirm. Right-click or Esc cancels.
You now have a small inner face surrounded by a ring of faces. The inner face is still selected. If you want to change the thickness later, open Adjust Last Operation and edit Thickness. Holding Ctrl while insetting adjusts depth.
Step 4: extrude the inside down
With the inner face selected, press E for Extrude Region. The manual says faces extrude along their averaged normal by default, and you can limit the move to one axis by naming it. Press Z, then move the mouse down so the face sinks into the cylinder, and click. Stop above the bottom so the mug keeps a floor.
You should see a hollow cup with an inner wall and floor. If the face moves up instead, move the mouse the other way before clicking, or type a negative value.
Step 5: add loop cuts
Press Ctrl+R for Loop Cut and Slide. The manual describes two steps:
- Move the cursor over an edge the cut should cross. A yellow line previews the cut. Click to continue.
- Move the mouse to slide the new loop, then click to create it. Right-click instead to place it at the center.
Add one loop near the top rim and one near the base. Those extra loops matter in the later steps, because the Subdivision Surface modifier rounds every edge it can, and loops close to a corner keep that corner tighter. This is general modeling practice rather than something the manual spells out. The number of cuts can be raised by scrolling during the first step, as the manual notes.
Step 6: bevel the rim
- Press 2 for Edge select mode.
- Alt+click an edge on the top rim. The manual says this selects the connected loop of edges. If Emulate 3 Button Mouse is on, double-click instead.
- Press Ctrl+B, move the mouse for the width, scroll the mouse wheel for segments, and click.
A small rounded lip appears around the rim. The full list of bevel settings is in how to bevel in Blender.
Step 7: add a Subdivision Surface modifier
- Press Tab to return to Object Mode and select the mug.
- Open the Modifiers tab in the Properties editor.
- Click Add Modifier, open Generate, and choose Subdivision Surface.
- Set Levels Viewport to 1 or 2. Render controls the level used in the final render.
The manual says the modifier splits the faces of a mesh into smaller faces, giving it a smooth appearance, so you can model a simple low-vertex mesh and still get a smooth surface. It also warns that higher levels use more memory and can make Blender hang or crash if memory is short, and not to set Viewport higher than Render.
Modifiers are non-destructive. The modifier panel header has toggles to show the result in the viewport and in the render, and Apply (Ctrl+A) makes it permanent. Do not apply it yet.
Step 8: Shade Smooth
In Object Mode, choose Object > Shade Smooth. The manual says this changes how shading is calculated across the surface, not the geometry, so the outline can still look faceted. It also notes that this is a different operation from the Subdivision Surface modifier, and shows the two combined in its subdivision examples. Object > Shade Flat reverts it.
You now have a smooth mug body. A handle, a base ring and a material are good next steps. Our Blender UV unwrap guide covers what comes after the model.
When the model looks wrong
- The shape collapsed into a blob. The Subdivision Surface level is high for a mesh with few loops. Lower the level or add loops near the edges you want to keep tight.
- Dark patches or odd shading. Faces may be flipped. In the Viewport Overlays popover, enable Face Orientation. The manual says a face shown in red on the outside is most likely oriented incorrectly. In Edit Mode, Mesh > Normals > Recalculate Outside (Shift+N) fixes it.
- Extrude moved the wrong way or in all directions. Press Z after E to lock to the Z axis, or undo and redo it.
- Nothing happens when you press a tool key. Check the mode. Inset, extrude, loop cut and bevel are Edit Mode tools.
- You cannot select the top face. Check the Cap Fill Type from Step 1, and the X-Ray note in Step 2.
Learn this in order with The Blender Launchpad
A tutorial like this teaches the tools. The harder part of learning to model is the order: what to practice first, when to move on to hard surface work, and how to avoid bouncing between random videos. The Blender Launchpad is a members app with a roadmap of hand picked, free YouTube lessons in six stages.
Stage 1 assumes you have never opened Blender, and Stage 2 is hard surface modeling. It is a curated playbook, not original video lessons, and it is one payment with no subscription. See hard surface modeling in Blender for what that stage covers, our Blender 3D modeling course guide for a longer path, and how to learn Blender software for the basics.
Questions people also ask
How do I start 3D modeling in Blender?
Add a mesh with Shift+A, press Tab for Edit Mode, and shape it with extrude (E), inset (I), loop cut (Ctrl+R) and bevel (Ctrl+B).
What should I model first in a 3D modeling Blender tutorial?
A mug, a crate or a bottle works well. Each uses the main tools on one object: one primitive, a few Edit Mode operations, then a modifier and smooth shading.
What do I need to know first for 3D modeling in Blender?
How to move around the viewport, switch between Object Mode and Edit Mode with Tab, and select vertices, edges and faces with 1, 2 and 3.
What is the difference between Subdivision Surface and Shade Smooth?
Subdivision Surface adds smaller faces so the shape is smoother. Shade Smooth only changes how shading is calculated and leaves the geometry alone.
How we checked this
We did not run Blender while writing this. We read these pages of the Blender Manual (5.2 LTS) on November 4, 2026: Mesh Primitives (Cylinder), Modeling Introduction, Selection Modes, Select Loops, Extrude Region, Inset Faces, Loop Cut and Slide, Bevel, the Subdivision Surface modifier, the Modifiers introduction, Shading (Shade Smooth and Shade Flat) and Object Modes.
The tip that loops near corners keep them tighter under subdivision is general modeling practice, not a statement from the manual. We did not confirm default values for the Cylinder, so every number above is a suggestion.


