

Hard surface modeling in Blender means building rigid, man-made objects from simple shapes with Edit Mode tools, then refining them with modifiers: Mirror for symmetry, Boolean for cuts, Bevel for edges, and Smooth by Angle or Weighted Normal for clean shading. You work in that order, and you keep the modifiers live so you can change your mind.
This guide follows the Blender Manual (5.2 LTS) and names the exact tools, panels and shortcuts. If you are new to the term, start with what hard surface modeling is. Everything below is built-in Blender, with no add-ons required.
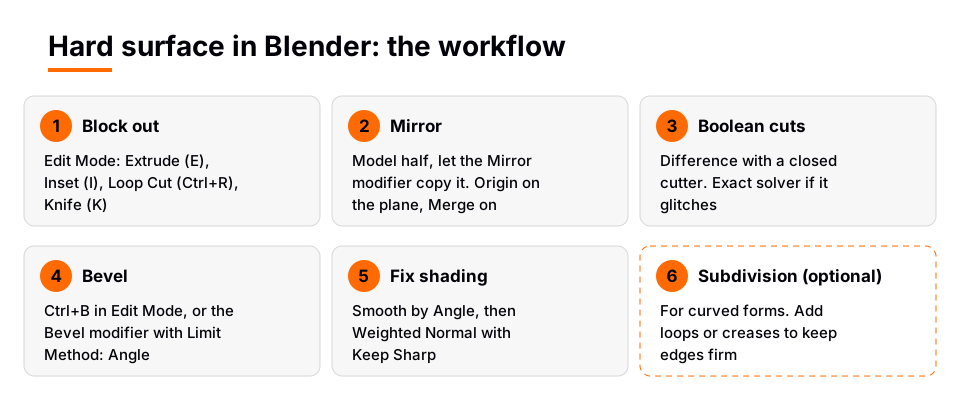
Step 1: Block out the form in Edit Mode
Start from a primitive such as a cube (Shift+A in the 3D Viewport), press Tab to enter Edit Mode, and build the big shapes first. Four tools do most of the work:
- Extrude (E). The manual says Extrude Faces creates new faces around the border of the selected faces, then lets you move them along an axis. Press X, Y or Z to lock the axis.
- Inset Faces (I). Creates a border of faces around the selection. Hold Ctrl while insetting to adjust depth.
- Loop Cut and Slide (Ctrl+R). Splits a loop of faces into parallel loops. Choose the loop, click, then slide the new loops with the mouse. Scroll the wheel to change the number of cuts.
- Knife (K). Cuts through faces along a path you click, creating new edges. Press Space or Return to apply.
After each step the mesh should still be a clean set of quads where possible. The manual notes that quadrangles deform well and are preferred for animation and subdivision modeling (Blender Manual 5.2 LTS, Mesh structure). For hard surface that matters most if you plan to use Subdivision Surface later.
Sources: Blender Manual 5.2 LTS, Mesh structure
Step 2: Model half with the Mirror modifier
Most machines are symmetrical, so model one side and let Blender copy it. In the Properties editor, open the Modifiers tab, choose Add Modifier > Generate > Mirror. The manual says the Mirror modifier mirrors a mesh along its local X, Y and/or Z axes, across the Object Origin (Blender Manual 5.2 LTS, Mirror Modifier).
- Axis: the axis perpendicular to the mirror plane. Enable more than one and you get more copies.
- Bisect: if the mesh is on both sides of the plane, it is cut and one side is kept.
- Clipping: stops vertices moving through the mirror plane when you transform them in Edit Mode.
- Merge and Merge Distance: vertices within the distance of their mirror copy are merged, which closes the seam.
- Mirror Object: use another object, usually an empty, as the mirror center.
The seam only closes if the mirror plane sits where you expect. The manual's advice is to move the object's origin onto the edge or face that is the axis: select the edge, snap the 3D Cursor to the selection, then use Set Origin > Origin to 3D Cursor.
Sources: Blender Manual 5.2 LTS, Mirror Modifier
Step 3: Cut details with the Boolean modifier
Boolean is how you cut a vent, a slot or a round hole without hand-building the topology. Add a cutter object, add Boolean to the object you want to keep, set Operation to Difference, and pick the cutter in the Object field. The manual describes Difference as cutting the source meshes out of the modified mesh, Union as adding them while removing interior faces, and Intersect as keeping only the volume inside both (Blender Manual 5.2 LTS, Boolean Modifier).
Two things save time. First, the manual says only manifold meshes are guaranteed to give proper results, so keep cutters as closed solids. Second, the Exact solver has full support for overlapping geometry but is much slower than Float. Our full guide to the Blender Boolean modifier covers every setting, and Boolean not working in Blender lists the fixes when a cut fails.
Sources: Blender Manual 5.2 LTS, Boolean Modifier
Step 4: Bevel the edges
This is the step that makes a model look real. You have two ways to do it.
- Edit Mode Bevel. Select edges and press Ctrl+B (Bevel Edges). Move the mouse to set the width and roll the wheel to set the segments. The result is permanent geometry.
- Bevel modifier. Add Bevel from the Generate group. The manual calls it a non-destructive alternative to the Edit Mode operation.
In the modifier, Segments is the number of edge loops added along the bevel, and Limit Method controls where it is applied. Angle bevels only sharp edges and leaves smooth surfaces alone. Weight uses the bevel weight you set per edge in Edit Mode (Edge > Edge Bevel Weight). Vertex Group uses weights from a vertex group. The five Width Types (Offset, Width, Depth, Percent, Absolute) are explained in how to bevel in Blender.
Step 5: Fix shading with Smooth by Angle and Weighted Normal
Beveling and booleans often leave dark smears across flat panels, because smooth shading interpolates normals over faces that should be flat. Two tools fix this.
Smooth by Angle
The manual says the Smooth By Angle modifier sets the sharpness of mesh edges based on the angle between neighboring faces. Its Angle option is the maximum angle between face normals that will be considered smooth. In Object Mode, use Object > Shade Auto Smooth to add it. The manual notes that it is pinned to be the last modifier, and that edges you marked Sharp in Edit Mode (Edge > Mark/Clear Sharp) are not smoothed unless you enable Ignore Sharpness.
Version note: in Blender 4.0 and earlier, Auto Smooth was a mesh option. The Blender 4.1 release notes say it was replaced by a modifier node group asset, which is why the 5.x workflow uses Shade Auto Smooth to add the modifier (Blender 4.1 release notes, Modeling).
Weighted Normal
The Weighted Normal modifier changes the custom normals of a mesh using selectable methods, which the manual says can make some faces appear very flat during shading. Its Weighting Mode can be Face Area, Corner Angle, or Face Area and Angle. Weight is the contrast of that bias, with 50 meaning all faces are weighted uniformly. Keep Sharp preserves edges marked Sharp, and Face Influence uses face strength values.
The Bevel modifier has a matching option. Its Face Strength setting (None, New, Affected or All) sets face strength on the faces involved in the bevel, and the manual says this can be used with a following Weighted Normal modifier that has Face Influence enabled. The Bevel modifier also has Harden Normals, which adjusts the bevel faces' normals to match the surrounding faces so those faces stay flat.
Sources: Blender 4.1 release notes, Modeling · Weighted Normal modifier
Step 6 (optional): Subdivision Surface
Subdivision Surface splits faces into smaller ones for a smooth look. The manual says it lets you create complex smooth surfaces from simple, low-vertex meshes (Blender Manual 5.2 LTS, Subdivision Surface Modifier). For hard surface it is a tool for curved forms such as rounded bodies, not for every part.
- Quick add: select the object and press Ctrl+1 (or 2, 3) to add the modifier with that many viewport levels.
- Levels Viewport and Render: keep Viewport lower for speed. The manual warns higher levels use more memory.
- Control: the manual says Catmull-Clark rounds off edges, and often this is not what you want. It lists Weighted Edge Creases (Shift+E) and extra edge loops as ways to keep edges firm.
Sources: Blender Manual 5.2 LTS, Subdivision Surface Modifier
Put the modifiers in a sensible order
The manual states that new modifiers are added at the bottom of the stack and are applied last, and that order of execution has an important bearing on the results. A common order, which is general modeling logic rather than a manual rule, is Mirror first, then Boolean, then Bevel, then Weighted Normal or Smooth by Angle last. Re-arrange them by dragging the grip icon at the top right of a modifier's header if a result looks wrong.
Two more modifiers help: Solidify gives thickness to a surface, and Array arranges copies in a line, circle or custom pattern. Both are in the Generate group.
Common problems and what to check
| Symptom | Check | Source |
|---|---|---|
| Dark smears on flat panels | Add Smooth by Angle or Weighted Normal | Manual |
| Boolean cut is wrong or missing | Closed cutter, Exact solver, normals | Manual |
| Subdivision makes the form blobby | Add edge loops or creases, or skip it | Manual |
| Bevel looks uneven | Apply object scale, check Width Type | General logic |
| Seam in the middle of a mirrored part | Origin on the plane, Merge on | Manual |
Our list of hard surface modeling tips goes through habits that prevent most of these.
Learn this in order with The Blender Launchpad
The tools above are not hard on their own. The slow part is learning which to reach for and when. The Blender Launchpad is a members app with a roadmap of hand picked, free YouTube lessons in six stages. Stage 1 assumes you have never opened Blender, and Stage 2 is hard surface modeling.
Stage 2 also uses two third-party add-ons, BoxCutter and Hard Ops, alongside Blender's own tools. The workflow in this guide is the built-in one, so you can learn it first and add them later. The Launchpad is a curated playbook, not original video lessons, and it is one payment with no subscription.
Questions people also ask
How do I start hard surface modeling in Blender?
Start from a cube, block out the large shapes with Extrude, Inset and Loop Cut, then add Mirror, Boolean and Bevel modifiers. Finish with Smooth by Angle or Weighted Normal for clean shading.
Which modifiers matter most for hard surface modeling in Blender?
Mirror, Boolean, Bevel and a normal-editing modifier (Smooth by Angle or Weighted Normal) cover most work. Subdivision Surface is optional and suited to curved forms.
Do I need add-ons for hard surface modelling in Blender?
No. The workflow above uses only tools described in the Blender Manual. Add-ons such as BoxCutter and Hard Ops are optional extras that speed up cutting, not requirements.
Should I use the Bevel modifier or Ctrl+B?
Use Ctrl+B for permanent, one-off bevels. Use the Bevel modifier when you want to change the width, segments or limit method later.
How we checked this
We read these pages on November 4, 2026: Blender Manual 5.2 LTS pages for Modifiers Introduction, Mirror, Boolean, Bevel, Subdivision Surface, Weighted Normal and Smooth By Angle modifiers, Extrude Faces, Inset Faces, Loop Cut and Slide, Knife, Bevel (Edit Mode), Edge Data (bevel weight, crease, Mark Sharp), Shading (Shade Auto Smooth) and Mesh structure, plus the Blender 4.1 modeling release notes. We did not run Blender while writing this. The suggested modifier order and the table row on uneven bevels are general modeling logic, not statements from the manual.


