

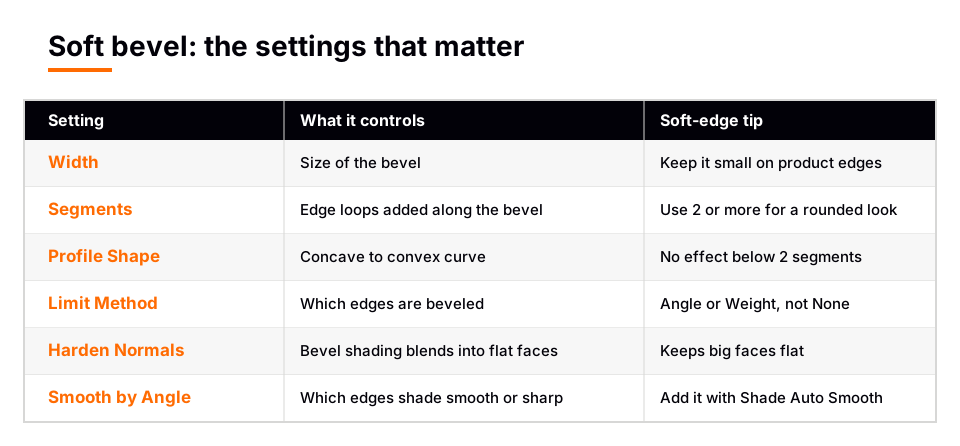
For a soft bevel in Blender, add a Bevel modifier, keep Width small, set Segments to 2 or more so the edge is actually rounded, limit it to the edges you want, and shade it smooth with Harden Normals or Shade Auto Smooth. If a bevel is not working, the cause is nearly always the Limit Method, the Width, the Segments or the shading.
That soft edge is what makes a product render look real, because it catches a thin highlight along every corner. This guide covers the settings, the shading side that most tutorials skip, a render-only alternative, and a checklist for a bevel that does nothing. It follows the Blender 5.2 LTS manual.
How to make a soft bevel in Blender
- Select the object in Object Mode.
- Open the Modifiers tab in the Properties editor, click Add Modifier, open Generate and choose Bevel.
- Affect should be Edges. The Vertices option bevels only the areas near vertices and leaves the edges unchanged.
- Set Width. This is the size of the bevel. Start small, then raise it until the highlight looks right on your closest camera. What the number means depends on Width Type, which is Offset, Width, Depth, Percent or Absolute.
- Set Segments to 2 or more. The manual defines Segments as the number of edge loops added along the bevel's face. With one segment you get a single flat cut. More segments round it.
- Set Limit Method. Angle bevels only sharp edges, and Weight bevels only the edges you marked. Leaving it on None bevels every edge.
- Fix the shading with the next section, otherwise even a good bevel can look faceted.
The Profile controls how the curve looks. With Superellipse, the Shape slider runs from concave to convex, and the manual says it has no effect if Segments is less than 2. A Custom profile lets you draw the curve instead. For a plain soft edge, the default curve and a few segments are enough.
Make it look soft: shading and normals
Geometry alone does not make a bevel look soft. The faces also have to shade smoothly into each other while the big flat faces stay flat. The manual gives you three tools.
- Harden Normals is in the modifier's Shading section. It adjusts the per-vertex face normals of the bevel faces to match the surrounding faces and leaves the surrounding normals alone. The surrounding faces stay flat, and the bevel shades smoothly into them. It needs a custom split normals attribute, and the manual says a
custom_normalattribute is created if one does not exist. - Shade Auto Smooth is in the Object menu. It adds a Smooth By Angle modifier that sets the sharpness of edges by the angle between neighboring faces, and pins it to be the last modifier. Its Angle is the maximum angle between face normals that counts as smooth. Ignore Sharpness smooths all edges, even those marked Sharp.
- Face Strength with the Weighted Normal modifier. The Bevel modifier can set face strength on the faces it creates (None, New, Affected or All), and a Weighted Normal modifier with Face Influence checked can use it.
Two related operators in the manual: Shade Smooth marks the whole object smooth and also removes any Smooth By Angle modifiers, and Shade Flat reverts to uniform face normals and removes them too.
Where did the Auto Smooth checkbox go?
Older tutorials tell you to tick Auto Smooth. The Blender 4.1 release notes say that option was replaced by a modifier node group asset. The base state of meshes is now the same as Auto Smooth on with an angle of 180 degrees in older versions, and the asset sets sharpness by the angle between faces. In current Blender, the equivalent is Shade Auto Smooth or the Smooth By Angle modifier above. The manual says Smooth By Angle is a Geometry Nodes asset included in the bundled Essentials asset library.
A render-only alternative: the Bevel node in Cycles
If you only need the soft highlight in a render, the manual describes a Bevel shader node, available in Cycles only. It rounds corners in shading without changing the geometry, using a Radius input for the width and a Samples setting for accuracy.
It has a cost. The manual calls it a very expensive shader that may slow renders by 20% even if there is a lot of other complexity in the scene, and suggests using it mainly for baking or still frame renders. It also says the Bevel modifier is the faster option when it works, but sometimes fails on complex or messy geometry. For product stills, that makes the node a useful fallback.
Bevel not working in Blender: a checklist
Go down this list when a bevel shows nothing, or the wrong thing.
- You cannot see the modifier. The modifier header has an Edit Mode toggle, a Realtime toggle for the viewport and a Render toggle. If one is off, the bevel is hidden there. Also remember modifiers are calculated from top to bottom, so the order in the stack changes the result.
- Limit Method is Weight and nothing bevels. The manual says a bevel weight of 0.0 means no bevel. By default the modifier reads the
bevel_weight_edgeandbevel_weight_vertattributes that you set in Edit Mode. Add weights to the edges, or change the Limit Method. - Limit Method is Vertex Group and edges are skipped. An edge is beveled only if both of its vertices are in the group, and a vertex with weight 0.0 gets no bevel.
- Limit Method is Angle and only some edges bevel. The manual's rule: it bevels edges where the angle of adjacent face normals plus the defined Angle is less than 180 degrees. Change the Angle until the edges you want are included.
- Affect is on Vertices. Only areas near vertices are beveled and the edges stay unchanged. Switch to Edges.
- The edge looks like a flat chamfer. Segments is 1. Raise it to 2 or more.
- The bevel is huge, tiny or uneven. Width Type changes what the number means. Clamp Overlap limits the width of each beveled edge so edges cannot cause overlapping intersections with other geometry. Loop Slide makes the bevel slide along unbeveled edges at a vertex, and the manual says turning it off can lead to more even widths.
- Corners look pinched or messy. Look at Miter Outer and Miter Inner (Sharp, Patch or Arc) and at Intersections, which controls how the mesh is built where more than two beveled edges meet. Grid Fill is the default method and Cutoff is the alternative.
- The shading looks lumpy or dark. This is a normals problem, not a geometry one. Use Harden Normals or Shade Auto Smooth from the section above.
- The geometry is complex or messy. The manual says the Bevel modifier sometimes fails on complex or messy geometry. Clean the mesh, or use the Cycles Bevel node for a render-only result.
- Edit Mode Ctrl+B does nothing. Check that edges, vertices or faces are selected before you press Ctrl+B. The full steps are in how to bevel in Blender, and the keys are in the Blender bevel shortcut guide.
When the result is right, apply the modifier with Ctrl+A to make it permanent. Skip this if you want to keep editing the bevel later.
Soft bevels for product renders
Real objects have no perfectly sharp edges, and a render shows it. A thin bevel along each corner gives the light something to catch. Keep the width small so the shape still reads as hard surface, and use the fewest segments that look smooth at your closest camera. For more on shaping those models, see hard surface modeling in Blender and hard surface modeling tips. For the render side, read about 3D product visualization.
Learn this in order with The Blender Launchpad
A bevel is one step in a longer chain: clean topology, modifiers, shading, lighting and render. Skipping a step is why a bevel can look wrong even when its settings are right.
The Blender Launchpad is a members app with a roadmap of hand picked, free YouTube lessons in six stages. It includes hard surface modeling and a stage on studio lighting and rendering in Cycles and EEVEE, and the first stage assumes you have never opened Blender. It is a curated playbook, not original video lessons, and it is one payment with no subscription.
Questions people also ask
How do I make soft edges in Blender?
Add a Bevel modifier with a small Width and 2 or more Segments, limit it with Angle or Weight, then use Harden Normals or Shade Auto Smooth so the edge shades smoothly.
Why is my bevel not working in Blender?
Check the Limit Method first. With Weight, edges without a weight get no bevel. Then check Segments, Width, Affect, the modifier visibility toggles and the modifier order.
How do I make a bevel smooth and not faceted?
Use more than one segment, then fix the shading with Harden Normals in the Bevel modifier or with Object, Shade Auto Smooth. A bevel can look faceted when normals are the problem.
How do I bevel only sharp edges?
Set the Bevel modifier's Limit Method to Angle. It bevels edges where the angle of adjacent face normals plus the Angle value is less than 180 degrees.
What replaced Auto Smooth in Blender?
Since Blender 4.1, Auto Smooth is a modifier node group asset called Smooth by Angle. Add it with Object, Shade Auto Smooth.
How we checked this
We read these pages on November 4, 2026. We did not run Blender for this article, so we could not test any bevel on a real model.
- Bevel modifier (Blender Manual 5.2 LTS)
- Bevel (Edit Mode) (Blender Manual 5.2 LTS)
- Bevel shader node (Blender Manual 5.2 LTS)
- Smooth By Angle modifier, Weighted Normal modifier and Object shading (Blender Manual 5.2 LTS)
- Introduction to modifiers (Blender Manual 5.2 LTS)
- Blender 4.1 release notes: Modeling (Auto Smooth replaced by a modifier node group asset)
The manual does not give the Bevel modifier's default Width or Angle values, so we left them out.


