
The Blender bevel shortcut is Ctrl+B in Edit Mode: select edges, vertices or faces, press it, move the mouse to set the width, scroll the mouse wheel to set the segments, and click to confirm. Shift+Ctrl+B is the bevel shortcut for vertices only.
This page is the quick reference, written from the Blender 5.2 LTS manual (read November 4, 2026). For a full walkthrough of widths, profiles and the Bevel modifier, see how to bevel in Blender.
The bevel shortcut in Blender, step by step
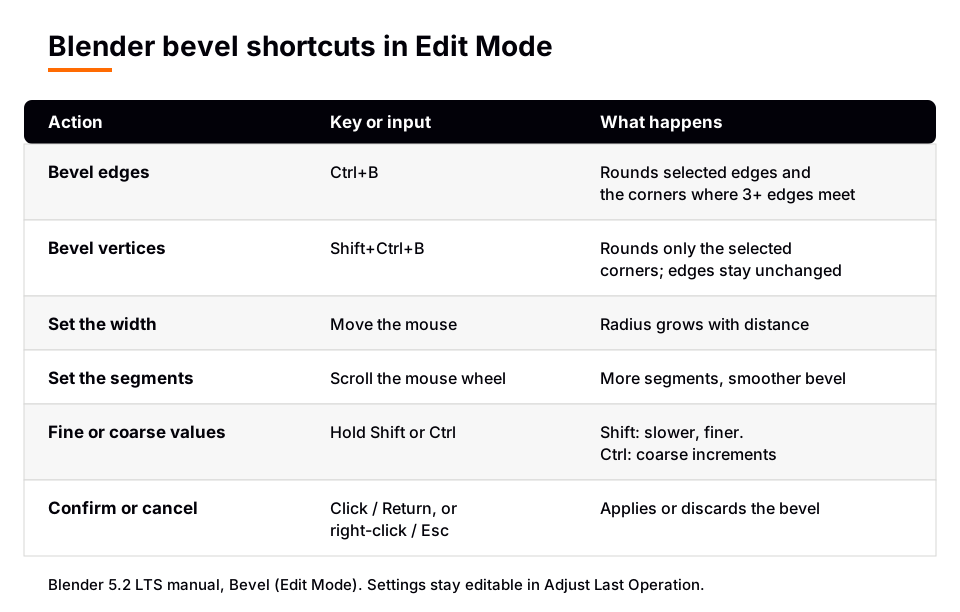
- Enter Edit Mode. Select the object and press Tab. The manual lists Edit Mode as the mode for this operator.
- Select what to bevel. The manual says to select one or more vertices, edges or faces. Press 2 for edge select mode if you want to pick edges.
- Press Ctrl+B. Per the manual this smooths both edges and corners. Use Shift+Ctrl+B to smooth only corners.
- Move the mouse. The bevel radius increases as you move.
- Scroll the mouse wheel. This sets the density of the new geometry. More segments give a smoother result.
- Confirm or cancel. Click or press Return to confirm. Right-click or press Esc to cancel.
After you confirm, the Adjust Last Operation panel lets you change the settings again with numbers.
Bevel vertices shortcut
The manual lists both operators on the same page. Edge > Bevel Edges is Ctrl+B, and Vertex > Bevel Vertices is Shift+Ctrl+B. The difference sits in the Affect option. With Affect set to Vertices, the selected vertices are beveled and the edges are left unchanged. With Edges, the selected edges are beveled, plus the vertices where three or more edges meet.
The Bevel tool in the Toolbar
The Edit Mode Toolbar lists a Bevel tool next to Inset Faces and Loop Cut, described in the manual as "Create a bevel from the selected elements." Choose it in the Toolbar when you would rather work from the tool column than the keyboard. We did not find a separate manual page for how the Toolbar version behaves in the viewport, so we do not describe its on-screen controls. The shortcut in this guide is the operator the manual documents in full.
Keys you can press while the bevel is active
While the operator is running, the current settings show at the top of the 3D Viewport and in the status bar. The manual says to press a setting's key, then move the mouse or type a number. The letters it lists are:
| Key | Setting |
|---|---|
| V | Affect (Vertices or Edges) |
| M | Width Type |
| A | Width |
| S | Segments (the wheel changes it even if it is not selected) |
| P | Profile Shape, a value from 0 to 1 |
| H, C | Harden Normals, Clamp Overlap |
| U, K | Mark Seams, Mark Sharp |
| O, I, N, Z | Miter Outer, Miter Inner, Intersection Type, Profile Type |
While moving the mouse, hold Shift to change the value more slowly for better precision, or Ctrl to snap to coarse increments. Most beginners need only the wheel and Width. The rest is there when a bevel looks wrong.
Bevel shortcut not working
- Wrong mode. The manual documents this operator for Edit Mode. Press Tab first.
- Nothing selected. The operator works on the selection, so select edges, vertices or faces before you press the keys.
- No visible change. The width may be too small to see, or too large for the geometry. Move the mouse further, or lower the width. The Clamp Overlap option prevents bevels from overshooting past neighboring faces.
- The keys do nothing. You may be using a different keymap. Use Edge > Bevel Edges or Vertex > Bevel Vertices from the header menus instead.
- You want to change it later. The Edit Mode operator changes the mesh. The manual points to the Bevel modifier as the non-destructive version, and it is added from the Modifiers tab, not a shortcut. The full bevel guide linked at the top covers it.
For rounder, wider results see soft bevels in Blender. After cutting with Booleans, bevel the new edges; the Boolean modifier guide shows how those cuts are made.
Learn hard surface modeling in order with The Blender Launchpad
Knowing the shortcut is the easy part. Knowing where bevels belong, and what to model before and after them, is what makes a hard surface model look finished. The Blender Launchpad is a members app with a roadmap of hand picked, free YouTube lessons in six stages. Stage 1 assumes you have never opened Blender, and Stage 2 is hard surface modeling.
It is a curated playbook, not original video lessons, and it is one payment with no subscription. For the wider workflow, read hard surface modeling in Blender and hard surface modeling tips.
Questions people also ask
What is the bevel shortcut in Blender?
In Edit Mode, press Ctrl+B to bevel the selected edges and corners. Move the mouse for width, scroll for segments, then click or press Return.
What is the shortcut to bevel vertices in Blender?
Shift+Ctrl+B in Edit Mode. It bevels only the selected vertices and leaves the edges unchanged.
How do I add more segments to a bevel in Blender?
Scroll the mouse wheel while the bevel is active. After confirming, you can also change Segments in the Adjust Last Operation panel.
Is there a shortcut for the Bevel modifier?
We found none in the manual. Add the Bevel modifier from the Modifiers tab with Add Modifier, then Generate, then Bevel.
How we checked this
We did not run Blender while writing this. We read these pages on November 4, 2026:
- Blender Manual (5.2 LTS): Bevel (Edit Mode edge and vertex operators), the Mesh Edit Mode Toolbar page, and the Bevel modifier overview.
We did not confirm how the Toolbar Bevel tool behaves in the viewport, or any difference between Blender 4.x and 5.x for these shortcuts, so both are left out.


