

3D product visualization is the practice of building a product as a 3D model, then rendering it into photorealistic images, animations or interactive 3D views, instead of photographing a physical sample. You model or import the product, give it physically based materials, light it, frame it with a virtual camera and render. Blender, which is free, can do every one of those steps.
This guide is for people deciding whether to learn it, hire for it or buy a tool. It explains what product visualization is, where it is used, what a workflow looks like in Blender from model to material to light to render, and what to learn first. We use only primary sources: the Blender Manual (5.2 LTS) and the official pages of the tools we name. We also say plainly what those sources do not publish.
What 3D product visualization means
You will see several names for the same work: product visualization, product 3D visualization, product rendering. The Blender Manual defines the core idea behind all of them: rendering is the process of turning a 3D scene into a 2D image. In Blender, what the render looks like is defined by cameras, lights and materials, and the manual says these are shared between the EEVEE and Cycles render engines.
Product visualization applies that process to a thing someone makes or sells. KeyShot, a commercial tool built for this job, describes its platform on its own site as one for design, engineering and marketing teams to visualize products in 3D, from early concept to final marketing image. The point of the work is the same in any tool: the image exists before, or without, a photo shoot.
Where 3D product visualization is used
KeyShot's homepage, read November 4, 2026, lists the industries it says it serves: consumer electronics, manufacturing, apparel and footwear, interior design, jewelry, packaging and product design. Its packaging page describes turning a dieline or CAD file into pack shots, e-commerce imagery and shelf scenes, and swapping labels and artwork for updated visuals. These are vendor descriptions of use cases, which is what a vendor's own page can tell you.
In practice the outputs fall into a few groups:
- Still images for product pages, ads and packaging.
- Animations such as turntables and exploded views. KeyShot's page lists these among its outputs, and Blender renders animation too.
- Design review images shown before a physical prototype exists.
- Interactive or web 3D. KeyShot's page mentions exporting to GLB, USD and interactive 3D. That is a feature of its tool, not something we tested.
What the sources do not publish
The Blender Manual, the Blender license page and the KeyShot pages we read do not publish market size, hiring numbers, salary data or conversion-rate results for product visualization, and we will not guess them. Vendor pages carry testimonials and customer counts, but those are marketing claims, not independent studies, so we do not repeat them as facts. If a blog gives you a precise percentage for how much 3D images lift sales, ask for its primary source.
The Blender workflow: model, material, light, render
The same five steps apply in most tools. Here they are with the Blender names, so you can see what you would be learning.
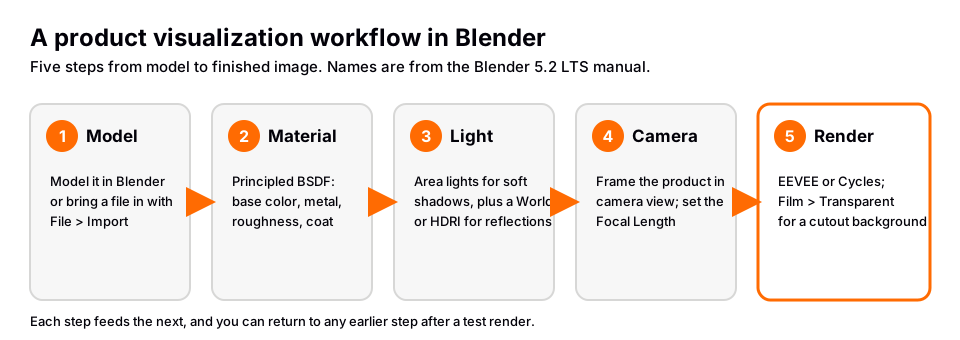
1. Model: build the product or import it
You can model in Blender, or bring a model in. The manual's File ‣ Import/Export page lists formats such as ABC, USD, OBJ, FBX, PLY and STL as examples, and says popular formats are enabled by default while others can be enabled as add-ons. Two details matter for products. The manual says OBJ has only basic geometry and material support, with no cameras or lights. And its import options include Scale and axis settings, because applications disagree about scale and which axis is up. We did not find native CAD formats such as STEP in the manual's list, so check what your CAD tool can export against the File ‣ Import menu in your Blender version.
For hard, clean product shapes, bevels matter, because real edges catch light.
2. Material: make it look like the real finish
Blender's Principled BSDF node is the main shader. The manual describes it as a node combining multiple layers that can model a wide variety of materials. It is based on the OpenPBR Surface model and has parameters compatible with the Disney and Standard Surface models found in other software. The layers include metal, diffuse, subsurface and transmission as the base, with an optional glossy coat on top, and a sheen layer for fuzz or dust. Textures painted in tools like Substance Painter can be linked to the matching inputs.
Glass and clear plastic are the hardest finishes for beginners. Our Blender glass material guide covers them.
3. Light: shape the product with light
Light does most of the work in a product image. The manual describes the Area light as a surface emitter that produces soft-bordered shadows, and says lights with larger size have softer shadows and specular highlights. The world adds environment light and reflections, and an HDRI loaded through the Environment Texture node can supply both. Poly Haven's license page says its HDRIs are CC0 and can be used for commercial work without credit. Start with Blender lighting for beginners.
4. Camera: frame like a photographer
The manual says a camera defines which portion of the scene is visible in the rendered image. In the Camera properties, Focal Length controls the amount of zoom: longer focal lengths give a smaller field of view, and shorter ones show more of the scene. In camera view the rendered image contains everything within the dashed frame.
5. Render: choose an engine and save the image
Blender includes EEVEE, a physically based realtime renderer, and Cycles, a physically based path tracer. The manual says Cycles will always provide more physically accurate renders than EEVEE, and that EEVEE can still produce high quality final renders. To use Cycles, select it as the render engine, and enable compatible devices in Preferences ‣ System ‣ Cycles Render Devices for GPU rendering. For catalog images on a plain background, Film ‣ Transparent renders the background transparent so you can composite the product over another one. The steps to a first render are in how to render in Blender.
Blender compared with a dedicated visualization tool
Blender is a general 3D program. Tools such as KeyShot are built only for rendering existing models. The table compares what each one's own pages say, not our opinion of quality.
| Question | Blender | KeyShot (its own pages) |
|---|---|---|
| Cost to start | Free software under the GNU GPL | Offers a free trial. We do not quote prices |
| Commercial use of your images | The license page says your artwork is yours and can be used commercially | Check its license terms |
| Typical workflow | Model or import, texture, light, render | Import your model, drag and drop materials, set up lighting and cameras |
| Modeling inside the tool | Yes, full modeling tools | Its pages describe importing models from CAD and 3D tools |
The practical difference is scope. Blender covers modeling, texturing, lighting, rendering and animation in one program, so there is more to learn but fewer tools to buy. A render-only tool narrows the learning, but you still need the model from somewhere. For a fuller comparison, see 3D product visualization software and 3D rendering for product visualization.
What to learn, in order
- Blender basics. Navigation, selecting, moving objects, and the Properties editor. Everything else depends on it.
- Modeling for products. Clean hard surface forms, bevels and booleans.
- Materials and UVs. The Principled BSDF, image textures and PBR maps.
- Studio lighting. Area lights, world lighting and HDRIs, plus reflections that suit the material.
- Camera and render settings. Focal length, EEVEE versus Cycles, resolution and output.
- Optional extras. Animation for turntables and Geometry Nodes for repeated patterns.
That is a sensible order: you cannot judge a material until you can light it, and you cannot light until you can model and view the scene.
Should you learn it, hire it or buy a tool?
If you need a handful of images once, hiring an artist or using a render-only tool on a model you already have is probably faster. If you will produce visuals repeatedly, or want to work as an artist, learning Blender is a free way to get the full skill set, because the license page says there is no cost to use it for any purpose and your artwork is yours. The cost is your time: product visualization rewards patience with lighting and materials, and the first images usually look flat. We do not know how long this takes you, and no primary source gives a fair average.
Learn this in order with The Blender Launchpad
The Blender Launchpad is a members app with a roadmap of hand picked, free YouTube lessons in six stages: Blender basics, hard surface modeling, UV and PBR texturing, studio lighting and rendering with Cycles and EEVEE, animation, and Geometry Nodes. Those stages follow the same order as the workflow above.
Stage 1 assumes you have never opened Blender. The bonuses include niche and portfolio building, LinkedIn branding, and 1,000+ CC0 assets, HDRIs and textures that are free for commercial use. It is a curated playbook, not original video lessons, and it is one payment with no subscription.
Questions people also ask
What is 3D product visualization?
It is making photorealistic images, animations or interactive views of a product from a 3D model instead of a photo of a sample. The workflow is model, material, light, camera and render.
Is product 3D visualization the same as product rendering?
The terms overlap. Rendering is the final step that turns the scene into an image, while visualization usually covers the full job, including the model, materials and lighting.
Can Blender do product visualization?
Yes. Blender includes modeling tools, the Principled BSDF for materials, light objects and the EEVEE and Cycles render engines, so one program covers the whole workflow.
Can I use Blender renders commercially?
Blender's license page says what you create is your sole property and is free for you to use as you like, including commercially. Check the license of any assets you use, such as HDRIs.
How we checked this
We did not run Blender for this guide. We read these pages on November 4, 2026, and wrote only what they state:
- Blender Manual (5.2 LTS): Rendering Introduction, Cycles, EEVEE, Principled BSDF, Light Objects, Cameras, Importing and Exporting Files and the Cycles Film settings.
- Blender license page (blender.org).
- KeyShot homepage, its packaging page and its 3D rendering page: vendor statements, cited as such.
- Poly Haven license.
We could not find a primary source for market size, salaries or sales impact of product visualization, so this guide gives none. The learning order is our suggestion, not something the manual states.


