
To render in Blender, make sure your scene has an active camera, choose a render engine (EEVEE or Cycles) in Render Properties, set the image size in Output Properties, and press F12 (Render > Render Image). The picture appears in a render window, and you save it with Image > Save As, because Blender does not save still renders automatically.
Rendering is the process of turning a 3D scene into a 2D image, as the Blender Manual puts it. This guide walks through your first render step by step, using the menu and panel names from the Blender 5.2 LTS manual, then covers what to do when the result is black, noisy, cropped or too slow.
Render in Blender in 6 steps
You need a scene with something to look at. If you just opened Blender, the startup scene already has what a render needs: the manual lists a cube, a light and a camera, where the camera "is used as the point of view for rendering." You can follow along with that cube.
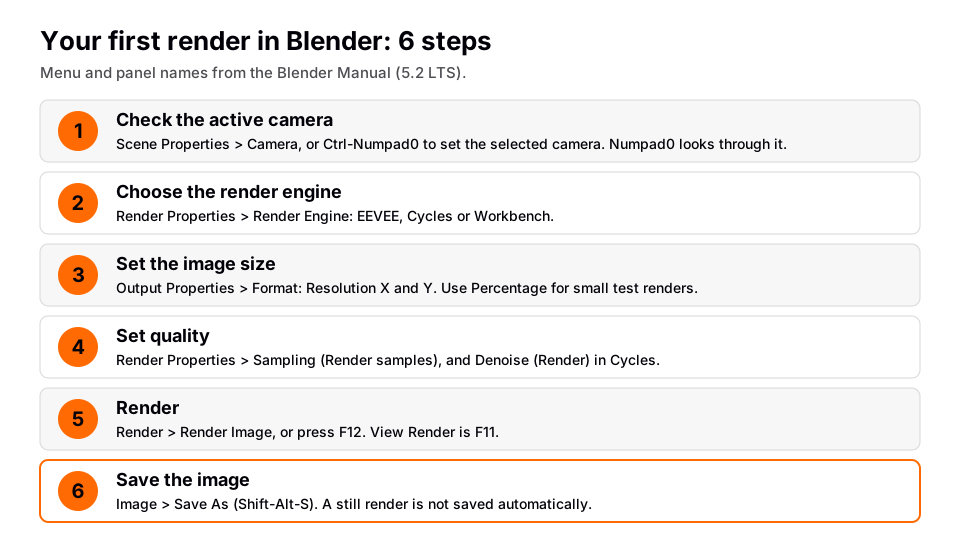
Step 1: check the active camera
A render shows what the active camera sees. The manual says the rendered image will contain everything within the dashed frame in Camera view, and that the active camera is the one used for rendering.
- Hover over the 3D Viewport and press Numpad 0 to look through the active camera (menu: View > Cameras > Active Camera).
- Frame your subject inside the dashed rectangle. You should see the cube sitting inside it.
- If there is no camera, or you added a second one, select the camera you want and press Ctrl+Numpad 0 (View > Cameras > Set Active Object as Camera). You can also pick it in Properties > Scene > Camera.
To add or position a camera first, see how to add a camera in Blender.
Step 2: choose a render engine
Open the Properties editor, click the Render Properties tab and set Render Engine. The manual lists three: EEVEE (real-time rasterization), Cycles (path tracing) and Workbench (a basic engine for layout, modeling and previews). Its comparison says Cycles is typically used for final renders and photorealism, while EEVEE is fast and suits previews, animation and stylized work.
| Engine | Type, per the manual | Use it for |
|---|---|---|
| EEVEE | Real-time rasterization | Fast renders, previews, animation |
| Cycles | Path tracing | Final renders, photorealism |
| Workbench | Basic rasterization | Modeling and layout previews |
For a first render, use the one already selected or pick EEVEE. If you are deciding between them for a project, read EEVEE vs Cycles. The manual advises choosing the engine early, since switching can change available settings and how materials look.
In Cycles, the Device setting in the Render panel chooses CPU or GPU Compute. The manual says GPU Compute is often faster and that CPU mode is compatible with all Cycles features.
Step 3: set the image size
Open the Output Properties tab and find the Format panel. Resolution X and Resolution Y are the width and height in pixels. Percentage scales the render relative to those values, which the manual recommends for small test renders that keep the same proportions as the final image.
Two more Format options help while testing. Render Region renders only a portion of the view instead of the entire frame, and Crop to Render Region trims the image to that region instead of leaving a transparent surround. Leave the Aspect X and Y values alone unless you are targeting non-square pixels.
Step 4: set quality (samples and denoising)
In Render Properties, open the Sampling panel. For Cycles, Render (Max) Samples is the number of paths traced per pixel in the final render; the manual says a higher number gives a cleaner image at the cost of a longer render time. Time Limit stops rendering when the limit is reached, and 0 disables it.
Cycles also offers two ways to save time:
- Noise Threshold (adaptive sampling): when the checkbox is enabled, Cycles stops sampling areas that are already clean. The manual says typical values range from 0.1 to 0.001, and lower values mean better quality with longer renders.
- Denoise (Render): enable it to run a denoiser on the final image. The Denoiser options are Automatic, OpenImageDenoise and OptiX. The manual says Automatic uses GPU-accelerated denoising if supported and prefers OpenImageDenoise over OptiX.
In EEVEE, the Sampling panel has a Render section with a single Samples value, the number of samples used in the final render. The manual explains that EEVEE's anti-aliasing is sample based: more samples reduce aliasing at a cost to performance.
Start low, render, and only raise the numbers if the result is noisy. For a deeper speed guide, see how to optimize Cycles renders.
Step 5: render the image (F12)
Choose Render > Render Image from the top bar, or press F12. Per the manual's Render menu, this renders the active scene at the current frame. The image appears in the render window. When it finishes, it is held in the render buffer only.
Where the render shows up depends on a preference. Under Preferences > Interface > Temporary Editors, Render In can be Keep User Interface (the render computes in the background), Maximize Area, Image Editor or New Window. If you cannot see your render, choose Render > View Render (F11), which shows the Render window and switches back when you press it again.
That is the whole render. Now keep it.
Step 6: save your render
- In the Image Editor showing Render Result, open the Image menu.
- Choose Save As (Shift+Alt+S).
- Pick a folder, a name and a format. PNG is a safe default for on-screen use; the manual suggests OpenEXR if you intend to composite or color grade, and JPEG when file size matters more than quality.
- Confirm the save and check that the file exists in that folder.
The manual is explicit that animation renders are saved automatically while still renders are not. If you want the details on paths, formats and the temporary folder, read where Blender renders are saved.
Render an animation instead of a still
Animation uses the same camera, engine and quality settings. Set the frame range, choose an image format such as PNG in the Output panel, and use Render > Render Animation (Ctrl+F12). The manual recommends rendering to an image sequence first rather than directly to a video, since a failed video render can leave an unplayable file; you can restart an image sequence from the last good frame. After rendering, Render > View Animation (Ctrl+F11) plays the result. Full steps are in how to render an animation in Blender.
Why the render looks wrong
- Black or empty image. Check that Scene Properties > Camera has a camera set and that it points at your subject in Camera view. In Cycles, the manual describes light paths bouncing until they reach a light source such as a Light object, an emissive mesh or the world background, so a scene with no light source and a black world has nothing to illuminate it.
- Cropped or the wrong shape. The render contains what is inside the dashed camera frame at the Resolution X and Y you set. Re-frame in Camera view and re-check the Format panel.
- Noisy (grainy) image. Raise Render (Max) Samples, lower the Noise Threshold, or enable Denoise (Render). The manual recommends at least Albedo as the denoiser's Passes input, since None can blur out details.
- Only part of the frame rendered. The Render Region option in the Format panel is on. Turn it off to render the full frame.
- Too slow. Lower Percentage for tests, use Render Region, try GPU Compute in Cycles or switch to EEVEE for previews.
- Cannot find the file. A still render is only in Render Result until you use Image > Save As.
Learn this in order with The Blender Launchpad
A first render is easy. A render that looks good needs a camera angle, lights and materials that work together, and that part is where most people stall. The Blender Launchpad is a members app with a roadmap of hand picked, free YouTube lessons in six stages: Blender basics, hard surface modeling, UV and PBR texturing, studio lighting and rendering in Cycles and EEVEE, animation, and Geometry Nodes.
Stage 1 assumes you have never opened Blender, so you do not need to know any of the terms in this post to start. It is a curated playbook rather than original video lessons, which means the lessons stay free and you follow them in a tested order instead of searching for the next video. There are also three bonuses: niche and portfolio building, LinkedIn branding, and 1,000+ CC0 assets, HDRIs and textures free for commercial use. It is a one-time payment with no subscription.
Questions people also ask
How do I render with Blender?
Set an active camera, choose EEVEE or Cycles in Render Properties, set Resolution X and Y in Output Properties, press F12, and save with Image > Save As.
What is the shortcut to render in Blender?
F12 renders the current frame (Render > Render Image). Ctrl+F12 renders the animation, and F11 shows the Render window.
How do I render on Blender if my scene is slow?
Lower the Percentage in the Format panel, use a Render Region, reduce samples, enable denoising in Cycles, or use EEVEE. In Cycles you can also try Device > GPU Compute.
What does render mean in Blender?
Rendering turns your 3D scene, with its camera, lights and materials, into a 2D image or a sequence of images.
Why can't I find my render after closing Blender?
Still renders are not saved automatically. Save the image from Render Result with Image > Save As before you close it.
How we checked this
Blender Manual (5.2 LTS), read November 4, 2026: Rendering introduction, Render Engines, Output properties (Output and Format panels), Rendering Animations, Cycles Render settings and Sampling, EEVEE Sampling, Cameras, Camera View, Startup Scene, Scene properties, Preferences > Interface (Temporary Editors), the Topbar Render menu, Image Editor Editing Images and Supported Image Formats. We did not run Blender or time any render, so no render times are given.


