
To put the camera where you are looking in Blender, frame the shot in the viewport and choose View ‣ Align View ‣ Align Active Camera to View, or press Ctrl+Alt+Numpad 0. To keep the camera attached to the view while you orbit, pan and zoom, press Numpad 0 for camera view and tick Camera to View in the Sidebar's View tab.
Both fix the same problem, but they work differently, and people mix them up. This guide explains each one with the exact menu names and shortcuts from the Blender 5.2 LTS manual, shows what you should see, and covers the mistakes that make the camera jump somewhere unexpected. Moving the camera with G and R is already covered in how to move the camera in Blender, so we focus here on the view-based tools.
Snap, lock or look through: which one do you need?
Three different actions are all described as "camera to view". Pick the one that matches your goal.
| You want to | Use | Shortcut |
|---|---|---|
| Look through the camera | View ‣ Cameras ‣ Active Camera | Numpad 0 |
| Teleport the camera to your current view, once | View ‣ Align View ‣ Align Active Camera to View | Ctrl+Alt+Numpad 0 |
| Move the camera by navigating, continuously | Sidebar ‣ View ‣ View Lock ‣ Camera to View | None listed in the manual |
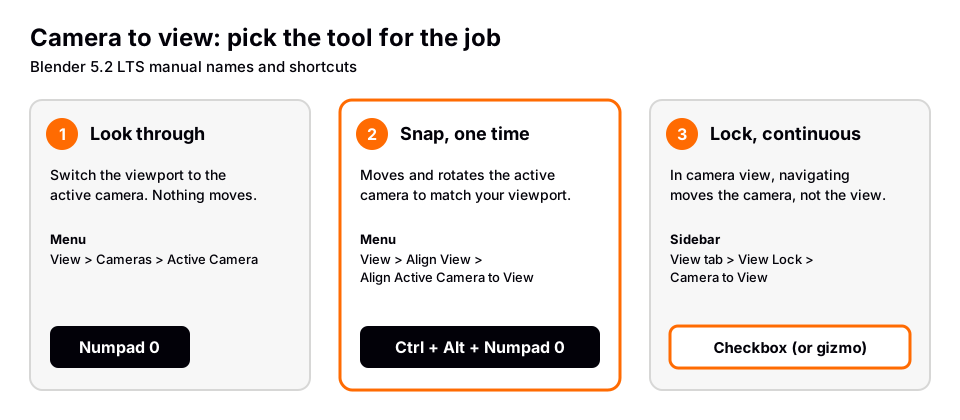
The word "teleport" that many people search for is not a Blender term. The manual's name for it is Align Active Camera to View, and it is the first method below.
Know which camera is the active camera
Both tools act on the active camera, the one used for rendering. If your scene has one camera, you can skip this section. The manual says the active camera is normally defined at the scene level, so it is the same in all 3D Viewports. If the camera you want is not the active one, select it in Object Mode and press Ctrl+Numpad 0 (View ‣ Cameras ‣ Set Active Object as Camera). Blender also switches the viewport to that camera. The active camera is drawn with a solid triangle above it, and you can also set it in the Scene tab of the Properties editor.
One exception: the Sidebar's View tab has a Local Camera checkbox. When it is on, that 3D Viewport has its own active camera, separate from the scene's. If the camera moves but the render does not change, check this option.
Method 1: Snap the camera to your view with Align Active Camera to View
- Frame the shot with the normal viewport. Orbit with MMB drag, pan with Shift+MMB and zoom with the wheel until the subject looks right from where you are.
- Open the menu. In the 3D Viewport header choose View ‣ Align View ‣ Align Active Camera to View. The shortcut is Ctrl+Alt+Numpad 0.
- Check the result. Press Numpad 0. You should now look through the camera at the same composition you framed.
The manual describes the operator as moving and rotating the active camera so that it matches the current viewport position and orientation. It calls this the common step after framing a composition in the viewport. It is a one-time move, unlike the lock in Method 2, which keeps the camera attached to the view.
The manual only says position and orientation. Settings such as focal length live in the Camera properties, so change them there if the framing is off.
Align Active Camera to Selected
The same menu has Align Active Camera to Selected. It moves the active camera without changing its orientation so that the selected objects are centered in the camera frame. Use it when the angle is already right and you only need the subject centered.
Method 2: Lock the camera to the view
Locking changes how navigation behaves. The manual states that, with the lock enabled and the viewport in camera view, navigating the viewport moves the camera instead of the view.
- Look through the camera. Press Numpad 0. The camera frame appears as a dashed outline, and everything inside it ends up in the render.
- Open the Sidebar. Press N with the mouse over the viewport and click the View tab.
- Find the View Lock panel. Tick Camera to View. The manual calls this option Lock Camera to View. It says the camera becomes glued to the view, and that the camera frame is outlined with a red dashed line.
- Navigate. Orbit, pan and zoom with the usual controls. The camera follows every move, so you can frame by eye.
- Untick the box when you are done. With the lock on, an accidental scroll or orbit moves the camera.
The manual adds that the lock can also be toggled using the navigation gizmo while you are in camera view, which is quicker than reopening the Sidebar.
What the other View Lock options do
The same panel has settings that are easy to confuse with the camera lock:
- Lock to Object makes an object the point of interest, so the view orbits around and zooms toward it. The manual says this option is not available when you are viewing the scene through the active camera.
- To 3D Cursor makes the 3D Cursor the point of interest. It is only available when Lock to Object is not active.
- Rotation prevents changes to the orientation and perspective of the 3D Viewport.
Also in the Align View menu, View Lock to Active centers the view on the active object and keeps orbiting around it, and View Lock Clear removes that lock. They affect the viewport only, not the camera object.
If the camera is parented to something
The manual has a hint for this case. If the camera is parented to an object, enable Camera Parent Lock in the camera's properties. Viewport navigation then transforms the camera's root parent instead of the camera itself. Without it, navigation moves only the camera, which may not be what you want if the parent is meant to carry it.
Method 3: Fly or walk the camera into place
If orbiting feels clumsy in a large scene, use first-person controls. The manual says that when you start Fly or Walk navigation from camera view (Numpad 0), the camera moves along with you. Start it from View ‣ Navigation, or press Shift+` to start your preferred one. In Walk mode, W, A, S and D move you, LMB confirms the new view, and Esc or RMB returns to where you started.
Shortcuts in one place
| Action | Menu | Shortcut |
|---|---|---|
| Look through the active camera | View ‣ Cameras ‣ Active Camera | Numpad 0 |
| Make the selected object the active camera | View ‣ Cameras ‣ Set Active Object as Camera | Ctrl+Numpad 0 |
| Snap the active camera to the view | View ‣ Align View ‣ Align Active Camera to View | Ctrl+Alt+Numpad 0 |
| Center the camera view in the area | View ‣ Cameras ‣ Frame Camera Bounds | Home |
| Show the camera frame at output size | View ‣ Navigation ‣ Zoom Camera 1:1 | None listed |
While in camera view you can also select the camera by clicking its dashed frame, as long as the camera object is not hidden. That helps when you want to use G and R for fine adjustments after snapping, as covered in the camera movement guide.
Why the camera does not go where you expect
- The wrong camera moved. The tools act on the active camera, not on whichever camera you selected. Select the one you want and press Ctrl+Numpad 0. If you use Local Camera, check which camera that viewport owns.
- Nothing happens when you orbit with the lock on. Make sure you are in camera view. The manual describes the lock as applying when looking through a camera.
- The camera keeps jumping while you work on the scene. The lock is still on. Untick Camera to View, or toggle it from the gizmo.
- Lock to Object is greyed out. The manual says it is unavailable when viewing the scene through the active camera. Leave camera view first.
- Align seems to do nothing. Press Numpad 0 afterward to look through the camera and confirm that it now matches your framing. If it does not, check that the camera you expect is the active one.
- The camera moves back after you change the frame. It may be keyframed or constrained. Those override a manual placement, and the move-camera guide explains how to check.
When the framing is settled, the next step is output. See how to render in Blender for the first render, and how to add a camera in Blender if your scene has no camera yet.
Learn camera work in order with The Blender Launchpad
Camera tools make more sense once you have seen a whole scene come together: a model, a material, a light and a camera. The Blender Launchpad is a members app with a roadmap of hand picked, free YouTube lessons in six stages, from Blender basics through hard surface modeling, UV and PBR texturing, studio lighting and rendering with Cycles and EEVEE, animation and Geometry Nodes.
Stage 1 assumes you have never opened Blender, so navigation and camera view come before anything advanced. It is a curated playbook rather than original video lessons, and it is a one-time payment with no subscription.
Questions people also ask
How do I teleport the camera to the current view in Blender?
Frame the shot in the viewport, then choose View ‣ Align View ‣ Align Active Camera to View, or press Ctrl+Alt+Numpad 0. The active camera moves and rotates to match your viewport. Press Numpad 0 to look through it.
How do I lock the camera to the view in Blender?
Press Numpad 0 for camera view, press N, open the View tab and tick Camera to View in the View Lock panel. Navigating then moves the camera instead of the view. The manual says you can also toggle it with the navigation gizmo.
What is the shortcut for camera to view in Blender?
Ctrl+Alt+Numpad 0 runs Align Active Camera to View. Numpad 0 looks through the active camera, and Ctrl+Numpad 0 sets the selected object as the active camera. The manual lists no default shortcut for the Camera to View lock itself.
Why does my camera move when I orbit the viewport?
The Camera to View lock is on and you are in camera view. Untick it in the Sidebar's View tab, or switch it off with the gizmo.
How we checked this
We did not run Blender for this guide. We read these Blender Manual (5.2 LTS) pages on November 4, 2026, and wrote only what they state:
- Camera View: active camera, Frame Camera Bounds, Zoom Camera 1:1, Camera Navigation.
- Align View: Align Active Camera to View, Align Active Camera to Selected, View Lock to Active, View Lock Clear.
- 3D Viewport Sidebar: the View panel, Local Camera and the View Lock options.
- Fly/Walk Navigation and Cameras.
We could not confirm from the manual pages that pressing N opens the Sidebar, or any default shortcut for the Camera to View lock, so we describe those generally. The manual does not say what happens to camera settings such as focal length when you snap the camera.


