
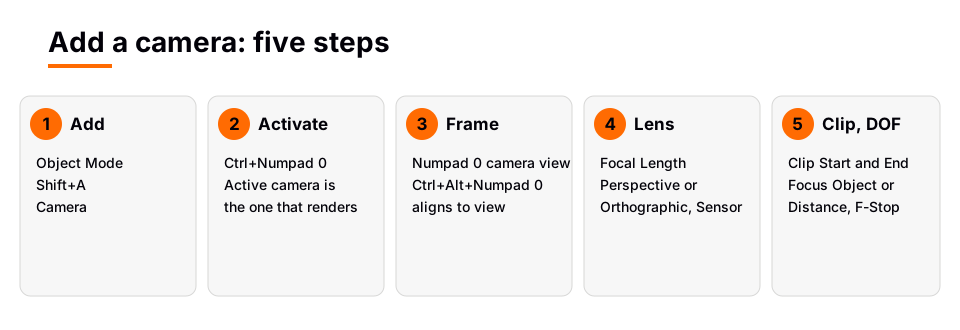
To add a camera in Blender, switch to Object Mode, press Shift+A in the 3D Viewport and choose Camera. Then make it the active camera with Ctrl+Numpad 0 (View then Cameras then Set Active Object as Camera), because the active camera is the one used for rendering.
That gets a camera into the scene. A good product render also needs the right lens, sensor and clipping values, and a view you can frame and check. This guide covers each step and each setting in the Camera properties, and answers the common searches for Blender camera controls and camera view. It follows the Blender 5.2 LTS manual.
How to add a camera in Blender, step by step
- Stay in Object Mode. The manual lists the Add menu under Object Mode, with the shortcut Shift+A.
- Open the Add menu. Use Add in the 3D Viewport header, or press Shift+A with the mouse over the viewport.
- Choose Camera. The manual describes it as the virtual camera used to determine what appears in the render. A camera object appears in the scene.
- Make it active. With the camera selected, press Ctrl+Numpad 0. The manual says this sets the current active object as the active camera and switches to camera view. The active camera is drawn with a solid triangle above it.
If you do not have a numeric keypad, use the menu path View, then Cameras, then Set Active Object as Camera. The manual also says you can set the active camera in the Scene tab of the Properties editor. A scene starts with one camera by default, and you can add more. Only the active one renders unless you bind cameras to times in an animation.
Blender camera view: look through the camera
The camera view shows the scene from the active camera. The manual says the rendered image contains everything inside the dashed frame. These commands help you check it:
- Enter camera view. Numpad 0, or View, Viewpoint, Camera.
- Frame the camera bounds. Home in camera view centers the frame and fits it to the area (View, Cameras, Frame Camera Bounds).
- Zoom Camera 1:1. View, Navigation, Zoom Camera 1:1 makes the camera frame the same size as the output resolution, so you see how large objects will be in the render.
- Select the camera. While in camera view, click the dashed frame, as long as the camera object is not hidden.
The viewport display options also help. In the Camera properties, the Viewport Display panel has Passepartout, which darkens the area outside the camera's view, and Composition Guides such as Thirds and Center. Safe Areas are mainly for broadcast framing.
Blender camera controls: placing the camera
There are three fast ways to put the new camera where you want it. The manual's section on camera positioning describes them, and each is covered in depth elsewhere.
- Align Active Camera to View. Frame your composition in the normal viewport, then press Ctrl+Alt+Numpad 0. The manual says the active camera moves and rotates to match the viewport. See Blender camera to view.
- Lock Camera to View. In the Sidebar's View tab, View Lock has Camera to View. Enabled in camera view, navigating moves the camera instead of the view, and the frame is outlined with a red dashed line.
- Transform keys. Select the camera and use G to move and R to rotate. In camera view with the camera selected, R rotates around the camera's local Z axis, which is a roll. The manual gives G then the middle mouse button for a dolly.
For the full list, including fly and walk navigation, see how to move the camera in Blender.
Camera properties that matter for product renders
Select the camera and open the Camera tab in the Properties editor. The manual's settings page covers every panel. For product work, these are the ones to check.
Lens type and focal length
The Lens panel offers Perspective, Orthographic, and, in Cycles only, Panoramic and Custom. The manual says Perspective matches how you see things in the real world: distant objects look smaller and parallel lines converge. With Orthographic, objects always appear at their actual size regardless of distance and parallel lines stay parallel. The only setting that applies there is Orthographic Scale.
In Perspective, Focal Length controls how much of the scene is visible. The manual says longer focal lengths give a smaller field of view (more zoom), and short ones show more of the scene at once. Lens Unit switches between millimeters and field of view as an angle. The manual shows 35 mm and 210 mm examples, but names no single best value for product shots, so test a few and compare.
The Shift values adjust the vanishing points. The manual says horizontal lines stay horizontal with a lens shift, but get skewed if you rotate the camera, which is useful for keeping a product's edges square.
Sensor size and sensor fit
The Camera panel holds the physical camera body settings, and you can pick a preset to match a real camera. Sensor Fit sets how the sensor fits your output dimensions: Auto calculates a square sensor from the larger Resolution dimension, while Horizontal and Vertical let you set Width or Height by hand, with the other calculated from the resolution's aspect ratio. The manual calls the size settings an alternative way to control field of view. Match them to a real camera and lens only if you need that, for example in motion tracking.
Clip Start and Clip End
Clip Start and End set the interval in which objects are directly visible. The manual notes that objects outside this range still influence the image indirectly, because further light bounces are not clipped. If your product vanishes when you move close, or the far part of a scene disappears, adjust these values. The manual adds that for viewport rendering, limited clipping distances ensure enough precision, while ray traced renders do not suffer from this as much. Turn on Show Limits in the Viewport Display panel to see the clip range on the camera.
Depth of field
To blur the background behind a product, use the Depth of Field panel and set a focal point. Focus Object locks the focus to an object, which deactivates the distance value. Focus Distance sets it by number, and the manual says you can hover over the field and press E to pick a point in the viewport. Under Aperture, the F-Stop defines the amount of blur, and lower values give a stronger depth of field effect.
Set the output size to match the frame
The frame shape comes from the render resolution, not the camera object. In Output Properties, the Format panel has Resolution X and Y. Right-click the resolution fields and choose Swap Dimensions to switch between landscape and portrait. The Percentage slider scales the final size, which the manual says is handy for small test renders with the same proportions. When you are ready, F12 renders the active camera. The full process is in how to render in Blender.
Why the new camera does nothing
- Render looks from the wrong place. The new camera is not the active camera. Select it and press Ctrl+Numpad 0.
- Cannot see the camera. It may be outside the visible view or hidden in the Outliner. Check Visibility settings.
- Moving the view moves nothing. Without Lock Camera to View, navigation moves only the viewport. Use Align Active Camera to View to snap the camera there.
- Product is cropped. Check Resolution, Focal Length and Orthographic Scale, then use Home to frame the bounds.
Learn this in order with The Blender Launchpad
Camera setup sits inside a larger workflow of lights, materials and render settings. The Blender Launchpad is a members app with a roadmap of hand picked, free YouTube lessons in six stages, including studio lighting and rendering for Cycles and EEVEE. Stage one assumes you have never opened Blender, so the camera basics come with their context.
It is a curated playbook, not original video lessons, and it is one payment with no subscription. For where this fits in a client workflow, see 3D product visualization.
Questions people also ask
How do I add a camera in Blender?
In Object Mode, press Shift+A and choose Camera. Press Ctrl+Numpad 0 to make it the active camera and look through it.
What are the Blender camera controls?
Select the camera and use G to move and R to rotate, or enable Lock Camera to View in the Sidebar so navigating moves the camera. Ctrl+Alt+Numpad 0 snaps the active camera to your current view.
How do I see the Blender camera view?
Press Numpad 0, or use View, Viewpoint, Camera. The dashed frame shows what the render will contain.
Can I have more than one camera in Blender?
Yes. A scene has one camera by default but can have several, and the active one renders. You can also bind cameras to points in an animation for jump cuts.
How we checked this
We did not run Blender for this guide. We read these pages on November 4, 2026, and wrote only what they confirm:
- Blender 5.2 LTS manual, read November 4, 2026: Cameras, Camera View, Align View, Object Types, Sidebar and Output Format.
We could not confirm the exact starting location or rotation of a newly added camera in the manual, so we do not state it. The Add menu entry and shortcut come from the Object Types page.


