
To make a Blender render higher quality, change five things: the image size (Resolution X and Y, with Percentage at 100% or higher), the sample count or Noise Threshold, denoising, the color management View, and a lossless output format such as PNG or OpenEXR. Higher quality has two meanings here, a sharper and larger image and a cleaner, better-looking one, and each setting below affects one or the other.
This guide goes through each setting with the panel and property names from the Blender 5.2 LTS manual, says what the manual claims for it, and then lists why a render can still look soft, noisy or washed out. It does not repeat the speed-focused advice in how to optimize Cycles renders in Blender. This one is about the opposite case, when you want the best result and can wait.
Which settings control Blender render quality
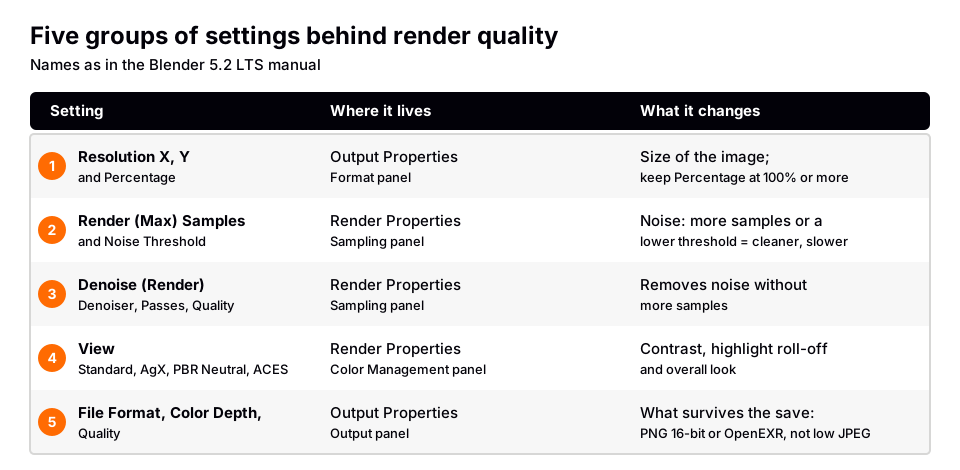
The figure is the whole map. The next sections take the settings in order, then cover what still goes wrong. Everything here applies to a still image (F12) and to each frame of an animation. If you have never rendered, start with how to render in Blender and come back.
Step 1: set the resolution and Percentage
- Open Output Properties and find the Format panel.
- Set Resolution X and Y. The manual defines these as the number of pixels horizontally and vertically in the image.
- Check the Percentage slider. The manual says it reduces or increases the size of the rendered image relative to the Resolution values, and is meant for small test renders that keep the proportions of the final image. For the final render, make sure it is not set below 100%.
- Check Render Region. When it is on, Blender renders only a portion of the view instead of the whole frame, and Crop to Render Region then crops the result to that size.
You should see the output size you expect in the render window. Two warnings from the manual are worth keeping in mind. First, Aspect X, Y exists for non-square pixels on older televisions, and the manual says you must use the correct pixel aspect ratio to prevent re-scaling, which lowers image quality. Keep both values equal for screens. Second, if you render a video, some codecs do not work with arbitrary dimensions, so stick with common sizes.
More pixels do not make a render cleaner. Cycles counts its samples per pixel, so a bigger image has more pixels to trace and takes longer at the same settings. Raise resolution when you need detail or print size, and raise samples when you see noise.
Step 2: raise samples or lower the Noise Threshold
In Cycles, open Render Properties and the Sampling panel.
- Render (Max) Samples is the number of paths traced per pixel in the final render. The manual says a higher number gives a cleaner image at the cost of a longer render time.
- Noise Threshold turns on adaptive sampling, which stops sampling pixels that have become less noisy than the threshold. The manual gives typical values from 0.1 to 0.001, with lower values meaning better quality and longer renders. Setting it to 0 makes Cycles pick a value based on the total sample count.
- Min Samples is the least a pixel receives before adaptive sampling applies. At 0, Cycles chooses a value from the Noise Threshold.
- Time Limit stops the render when the time runs out, even if the sample count has not been reached. Zero disables the limit. If a render looks noisier than your sample count suggests, check that this is zero.
In EEVEE, the Sampling panel has Render > Samples. The manual explains that EEVEE uses temporal anti-aliasing, so more samples reduce aliasing at a cost in performance. The Shadows settings help too: Rays sets rays per light, and higher values reduce the noise from random shadow sampling, while Steps gives softer shadows at a higher cost. Which engine suits the job is covered in Blender EEVEE vs Cycles.
Step 3: turn on denoising and set it up
Denoising removes noise without more samples. In the Cycles Sampling panel, find the denoising options and enable Denoise (Render). The manual lists these controls:
- Denoiser: Automatic uses GPU accelerated denoising if supported and prefers OpenImageDenoise over OptiX. OpenImageDenoise is Intel's AI denoiser, and the manual says it typically provides the highest quality. OptiX is NVIDIA's AI denoiser and needs an NVIDIA GPU configured in the Cycles Render Devices preference.
- Passes: None, Albedo, or Albedo + Normal. The manual says more passes generally give a better result and recommends at least Albedo, because None can blur out details, especially at low sample counts.
- Prefilter (OpenImageDenoise only): None keeps the most detail but assumes noise-free input passes. Fast is blurrier. Accurate usually gives more detail than Fast at a higher processing cost.
- Quality (OpenImageDenoise only): High gives the highest quality at the cost of time, Balanced sits between, and Fast is described as ideal for the viewport.
- Use GPU: faster than the CPU but needs extra GPU memory. The manual says you can disable it for large scenes that need the memory.
The manual also notes that with the Denoising Data render pass enabled, you can denoise in the compositor with the Denoise node instead. Denoising works best on a render that already has a sensible sample count, so treat it as a finishing step and not a replacement for samples.
Light bounces and the pixel filter
Two smaller Cycles settings affect the look. In Light Paths, the manual says the Total maximum bounces should be set to the maximum for best quality, with lower values used for faster rendering, and that 0 bounces gives direct lighting only. Transmission shaders such as glass usually need the most bounces, according to the manual's noise reduction guide.
In the Film panel, the Pixel Filter blurs the image slightly to avoid aliasing. Blackman-Harris is described as the default filter with a good balance between smoothness and detail. Lower Width values give crisper renders and higher values are softer. If your render looks soft, check the width before you blame the samples.
Sources: noise reduction guide
Step 4: choose the color management View
The same render can look flat or punchy depending on the View in the Color Management panel of Render Properties. The manual describes views as different ways to see the same image on the same display, and lists these:
| View | What the manual says | Fits |
|---|---|---|
| Standard | No extra conversion besides the display conversion | Non-photorealistic work, video with a baked-in look |
| AgX | Improves on Filmic, more photorealistic, 16.5 stops of dynamic range | Photorealistic renders |
| Khronos PBR Neutral | Matches sRGB base colors in materials as faithfully as possible | Product photography |
| ACES 1.3 and 2.0 | Film and TV standard transforms | Photorealistic results |
The manual marks Filmic as deprecated and superseded by AgX. It describes Raw as intended for inspecting an image and not for final export, and False Color as a heat map of intensities that helps you expose an image properly. Next to the view you will also find Look, Exposure (in stops, applied before the color space conversion), Gamma and White Balance.
The manual's Film page points out that the Exposure in the Color Management panel works on the view transform, while the Exposure in the Film panel works on the data. If a render is too dark or too bright, fix the lights or the Film exposure first, and keep the color management exposure for the final tweak.
Step 5: save in the right format
The last step can undo all the others. In Output Properties > Output, File Format decides which options appear (Color, Color Depth, Compression or Quality). The manual's list of supported formats gives the depths below, and a rule of thumb for choosing.
| Format | Bit depth per channel | Manual's advice |
|---|---|---|
| PNG | 8 or 16 | On-screen output, or encoding into video |
| OpenEXR | Float 16 or 32 | Compositing or color grading |
| JPEG | 8 | On-screen use where file size matters and quality loss is acceptable |
For a quality render, use PNG at 16 bit or OpenEXR. The manual says higher bit depths reduce color banding and improve precision, at the cost of file size and memory. For JPEG, the Quality slider sets lossy compression, where 100% preserves full quality at a larger file size. The manual also warns against post-processing a lossy file, because compression artifacts may become visible.
One more setting: Save As Render in the image save dialog applies the view and display transform for display formats like PNG. For an EXR it uses the default render output color space instead. If an EXR looks different outside Blender, that is expected, and the manual's View as Render option shows it the way the render looked. For video, the manual recommends rendering an image sequence first and encoding afterward. Where saved files end up is covered in where Blender saves renders.
Why the render can still look wrong
- Soft or small. Percentage below 100% gives a smaller image. A wide Pixel Filter, Denoise Passes set to None, or Prefilter set to Fast are the settings the manual links to softer or blurrier results.
- Noisy even at high samples. A Time Limit that stops the render early, or a scene where light is hard to reach. The manual describes path guiding for scenes lit through small openings, and says it is available on the CPU only.
- Flat or washed out. A View that does not suit the scene, or Raw selected. Try AgX, or Khronos PBR Neutral for product shots.
- Banding in smooth gradients. An 8-bit file. Save 16-bit PNG or OpenEXR.
- Only part of the frame rendered. Render Region is on.
- Good in Blender, worse in the saved file. A lossy JPEG with Quality under 100%, or a view that was not applied to an EXR.
If none of these explain it, the cause is usually the scene and not the settings. Flat lighting and plain materials stay flat at any sample count. For that side of quality, see Blender lighting.
Skip the node wiring with the Material & Lighting Vault
Render settings control how cleanly Blender computes a picture. They do not make the lighting or the materials better. The Material & Lighting Vault is a Blender 5.2+ extension (the Metalight tab in the N panel) for that part. You select your objects, and one of its 200 lighting setups measures them and builds itself around them. The setups come in 19 categories and are tuned for Cycles, which suits the sample and denoise settings above.
It also includes 1,690 procedural materials that work in Cycles and EEVEE and need no UVs by default, 267 studio lights, and 67 weathering presets such as rust, moss and edge wear that work on any material, including your own. The license covers personal and commercial use. It is a tool, not a course.
If you would rather learn where every one of these settings lives and why, The Blender Launchpad is a members app with a roadmap of hand picked, free YouTube lessons, including a stage on studio lighting and rendering in Cycles and EEVEE. It is a curated playbook and not original video lessons.
Questions people also ask
How do I increase render quality in Blender?
Set Percentage to 100% or higher in Output Properties > Format, raise Render (Max) Samples or lower the Noise Threshold in Sampling, enable Denoise, choose a suitable View in Color Management, and save as PNG or OpenEXR.
Does a higher resolution make a Blender render better?
It makes the image larger and can show more detail, but it does not remove noise. Cycles counts samples per pixel, so a larger image needs more render time at the same settings.
Should I use PNG or EXR for the best quality?
The manual recommends OpenEXR for compositing or color grading and PNG for on-screen output or video. Both can hold more than 8 bits per channel, which reduces banding.
Do more samples always give a better render?
More samples give a cleaner image, but with a Noise Threshold set, adaptive sampling stops on pixels that are already clean. A Time Limit above zero can also stop a render before the sample count is reached.
How we checked this
We did not run Blender for this guide. We read these pages on November 4, 2026, and wrote only what they confirm:
- Blender Manual (5.2 LTS), read November 4, 2026: the Format and Output panels, Cycles Sampling, Light Paths, Film, EEVEE Sampling, Displays and Views and Supported Image Formats.
We could not confirm the default View or the default Denoise state of a fresh scene from these pages, so we do not state them. The manual says AgX supersedes Filmic, so older tutorials may show Filmic. We did not compare the 4.x and 5.x manuals, so use the version selector on the manual page if you run an older build.


