
Blender lighting comes from two places: light objects you add to the scene, and the world that surrounds it. To add a light, press Shift+A in the 3D Viewport, choose Light, and pick a type: Point, Sun, Spot or Area. Then set its Power, Color and size in the Object Data tab of the Properties editor.
This guide covers lighting in Blender from the ground up: what each light does, which settings control brightness, softness and color, how the world and an HDRI fit in, how shadows behave, and a simple three-point setup you can copy. It follows the Blender 5.2 LTS manual. If you use an older version, switch the manual's version selector to match, because some options differ between releases.
How to add lighting in Blender: your first light
- Open an area that shows light. In the 3D Viewport press Z and choose Rendered. A new scene is dark until it has a light or a world color, so this shows you every change as you make it.
- Add the light. Press Shift+A, choose Light and pick a type. The manual lists the Add menu as the place to create new objects, and Light is one of the object types.
- Open its settings. With the light selected, open the Object Data tab in the Properties editor. The manual gives this as the location of the light settings (and the Shader Editor's Sidebar, Options tab).
- Set the basics. Type defines the light type. Color is the tint of the emitted light. Power (or Strength for a Sun) sets how bright it is.
- Move and aim it. Use G to move and R to rotate, like any object. Watch the Rendered view update.
A light is not visible in the render itself, as the manual notes. If you want a glowing panel to show in the frame, use an object with an emission shader instead.
The four Blender light types
All four share Type, Temperature, Color and Exposure. They differ in shape and in how the light travels. Here is what the manual says about each, with a typical use.
| Type | What it does (per the manual) | Typical use |
|---|---|---|
| Point | An omnidirectional point of light that radiates the same amount in all directions. Intensity decays with distance. | A light bulb, a candle, a small lamp |
| Sun | Constant intensity from one direction, from infinitely far away. Its location does not affect the result, only its rotation. | Open daylight |
| Spot | A cone-shaped beam from the tip of the cone, in a given direction. | A focused pool of light on a subject |
| Area | Light from a surface, such as a TV screen, a window or a neon tube. Produces shadows with soft borders. | Soft studio light, window light |
For product shots and portraits, Area lights are the usual first choice, because the manual describes their soft shadow borders as the opposite of point-like lights, which give sharp borders. For an outdoor scene, a Sun plus the world sky is the simplest start.
Area light shapes
An Area light has a Shape: Rectangle, Square, Disk or Ellipse. Square and Disk use a single Size, while Rectangle and Ellipse use Size X and Size Y. The manual's tip is to match the shape to what you simulate: a rectangular area light in a window, a horizontal one for neon tubes, or a square one for a TV screen.
Spot light beam shape
A Spot has an Angle, the size of the outer cone, from 1 to 180 degrees. A small angle gives a narrow, focused beam. Blend controls the inner cone and the softness of the edge: 0.0 gives very sharp edges, and larger values blur them. Turn on Show Cone to see the cone in the viewport. The manual points out that Blend and Angle only control the beam's edge, not the softness of shadows cast inside it.
Power, color and exposure
Power is the brightness control. The manual says higher values increase the intensity, and that negative values can be set but should be avoided for predictable results. For Point, Spot and Area lights, power is in Watts. For a Sun, the Strength value is in Watts per square meter when Normalize is on.
These are radiant Watts, not the electrical Watts printed on a bulb. The manual gives a table of typical values for matching real lights, such as 0.05 W for a candle and 2.1 W for an 800 lumen LED bulb, both as Point lights. For a Sun it lists 1000 W/m2 for a clear sky, 500 for a cloudy sky and 200 for an overcast sky. The manual warns that these values can look much brighter or dimmer than you expect, because your eyes adapt and a render engine does not. To compensate, it suggests adjusting Exposure in Render ‣ Film.
Color and temperature
Color is a tint. Temperature is a blackbody value in Kelvin for natural emission colors, so low values are warm and high values are cool. The manual adds a point worth remembering: the color of a light changes how bright it looks. At the same power, a green light looks brightest, red darker and blue darkest, so you may need to compensate by hand.
Exposure and Normalize
The light's own Exposure multiplies its intensity by 2 to the power of the exposure, which lets one slider cover a wide range. Normalize is on by default, which keeps the total power the same when you change the light's size or shape. Turn it off and a bigger light emits more light, which is useful when resizing a light should also make it stronger.
Size controls softness: shadows in Blender
The size of a light sets how soft its shadows are. A Point or Spot light has a Radius, and when it is larger than zero, light is emitted from a sphere of that radius. The manual states that lights with larger size have softer shadows and specular highlights. For a Point light it adds that a larger light also looks dimmer, because its power is spread over a larger area. An Area light's softness comes from its Size. A Sun uses Angle, its apparent size as an angular diameter.
The rule to remember: bigger light, softer shadow. A small light gives crisp, dramatic shadows.
Engine settings that affect shadows
- EEVEE: the Shadow panel offers Jitter for soft shadows (the manual says it has a high performance impact), Overblur and Filter to reduce artifacts, and Resolution Limit. A higher Resolution Limit uses less memory at the cost of shadow quality. If you see the error "Shadow buffer full", the manual suggests raising the Shadow Pool Size or the Resolution Limit on some lights, or disabling shadow casting on some lights.
- Cycles: in the light's Settings, Cast Shadow can be disabled so objects do not block that light, which can speed up rendering. Multiple Importance Sample reduces noise for area lights and sharp glossy reflections.
To dig into shadows from environment lighting, see HDRI shadows in Blender.
World lighting and HDRI
The world is the light that surrounds the scene. In the World tab, Surface panel, the manual says the only shader accepted is the Background node, with a color input and a strength factor for the intensity of the light. A plain gray world gives even, shadowless fill. A sky or an image gives direction and color.
- HDRI. For image based lighting, the manual says to use the Environment Texture node, not the Image Texture node, so the image is mapped correctly. A high dynamic range image keeps the sun and bright lights at their real brightness. Our full walkthrough is in Blender HDRI: load, rotate and light a scene.
- Sky Texture. A procedural alternative. The manual says the Single and Multiple Scattering skies are very bright by default, so lower the scene Exposure under Color Management.
Cycles and EEVEE treat the world differently. According to the manual, EEVEE stores the world contribution in an internal Light Probe and counts it as indirect lighting, while Cycles counts it as direct lighting, so EEVEE's world lighting is less precise. If you add a world Volume shader, the manual warns that the world surface shader and sun lights will have no effect, because the background is assumed infinitely far away.
For a deeper comparison of the two engines, see EEVEE vs Cycles.
A simple three-point lighting setup
Three-point lighting is a long-standing studio convention, not a Blender feature, so the manual does not describe it. It is still a reliable way to light a single subject. Everything below uses the light types explained above.
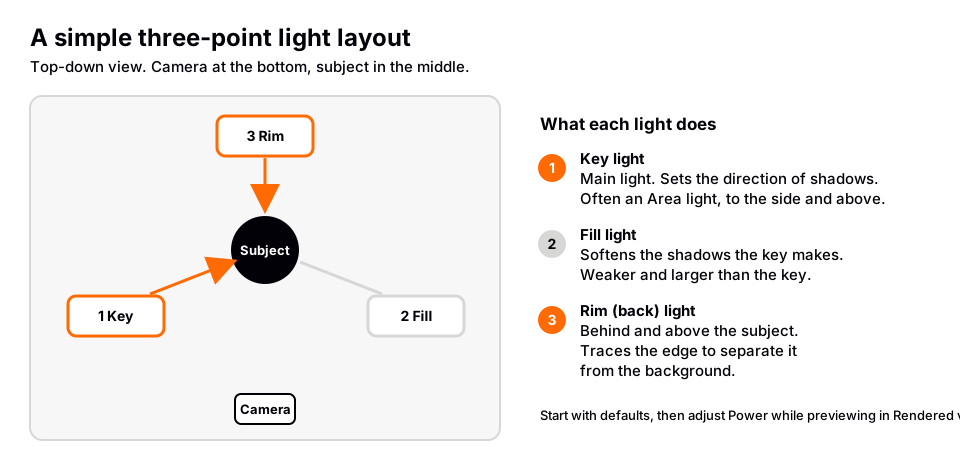
- Add the key light. Add an Area light to one side of the camera and above the subject. Aim it at the subject. Raise Power until the subject is clearly lit, and enlarge Size for softer shadows. This light decides where shadows fall.
- Add the fill light. Add a second Area light on the opposite side. Make it weaker than the key so the shadows lighten without disappearing. A larger size here keeps it soft.
- Add the rim light. Place a third light behind and above the subject, aimed toward the camera side. It brightens the edges and separates the subject from the background. A Spot works well for a narrow rim, and an Area also works.
- Check the world. If shadows are too black, raise the world Strength slightly instead of brightening every light.
- Look through the camera. Judge the picture from the camera, not the viewport. If you need to line the camera up first, press Numpad 0 to look through it.
The ratios are a starting point you adjust by eye, not rules from the manual. For a studio scene built step by step, see a studio lighting scene in Blender.
Light only what you want
The manual's Light Linking lets a light illuminate only chosen objects, and shadow linking controls which objects block it. Its example is a rim light that lights only a character and is not blocked by anything in the scene. Set it up from the light's Shading panel in the Cycles or EEVEE settings.
Lights in Cycles and EEVEE
Lights, cameras and materials are shared between the two engines, though the manual notes some features only work in one. Two examples from the light settings pages:
- In Cycles, lights can be defined with shader nodes, using an Emission shader connected to a Light Output node. The manual says EEVEE uses simplified light models and ignores light shader node trees.
- Cycles area lights have Spread: larger values give soft shadows, and smaller values simulate a gridded softbox.
When you are ready to produce the final image, how to render in Blender walks through the render settings and saving.
Why your Blender lighting looks wrong
- The scene is black. No light and a black world. Add a light or raise the world color, and check you are in Rendered view.
- Everything is blown out. The Power is too high, or you copied the real-world values from the manual's table. Lower the Power, or adjust Exposure under Render ‣ Film.
- Harsh shadows. The light is too small. Raise the Radius, Size or Angle, or move the light closer.
- A sun light does nothing. A world Volume shader is present. The manual says the world surface and sun lights are then ignored.
- Noisy renders in Cycles. Small, bright lights and area lights can be noisy. The manual suggests Multiple Importance Sample for area lights, and portals for interiors.
Skip the guesswork with the Material & Lighting Vault
Building a rig by hand means placing, aiming and sizing every light, then repeating it for each new object. The Material & Lighting Vault is a Blender 5.2+ extension that does the measuring for you. You select your objects, and one of its 200 lighting setups measures them and builds itself around them. The setups come in 19 categories and are tuned for Cycles.
It also includes 267 studio lights, such as softboxes, beam profiles, gobos and colored light textures, so you can add a shaped light to your own scene without building the geometry. Everything lives in the Metalight tab in the N panel. The Vault includes 1,690 procedural materials and 67 weathering presets that work on any material, and its license covers personal and commercial use. It is a tool, not a course.
If you would rather learn the craft in order, The Blender Launchpad covers studio lighting and rendering in Cycles and EEVEE as stage four of six, with hand picked, free YouTube lessons. It is a curated playbook rather than original video lessons.
Questions people also ask
How do I add lighting in Blender?
Press Shift+A in the 3D Viewport, choose Light, and pick Point, Sun, Spot or Area. Then set Power, Color and size in the Object Data tab, and preview with Z then Rendered.
What are the types of lights in Blender?
There are four: Point, Sun, Spot and Area. Point radiates in all directions, Sun gives parallel daylight, Spot makes a cone, and Area emits from a surface with soft shadows.
Why is my Blender light not working?
Check that you are in Rendered view, that the light's Power is above zero, and that no world Volume shader is blocking sun lights. In Cycles, also check that the light is not excluded by light linking.
How do I make shadows softer in Blender?
Increase the light's size: Radius for Point and Spot lights, Size for Area lights, and Angle for Sun lights. Larger lights produce softer shadows.
Is an HDRI better than lights?
Neither is better. An HDRI gives realistic ambient light and reflections quickly, and lights give you control over shadows and highlights. Many scenes use both.
How we checked this
We did not run Blender for this guide. We read these Blender Manual (5.2 LTS) pages on November 4, 2026, and wrote only what they state:
- Light Objects: common settings, Point, Spot, Area and Sun lights, Power of Lights.
- World Environment and Light Linking.
- EEVEE light settings, Cycles light settings, EEVEE world settings and Sky Texture node.
- Object Types, for the Add menu.
The three-point layout is a general studio convention that the manual does not cover, and the power ratios are our suggestions, not manual values. We could not confirm the exact submenu entries under Add ‣ Light from the manual pages, nor differences between Blender 4.x and 5.x light settings, so we name the manual version above.


