
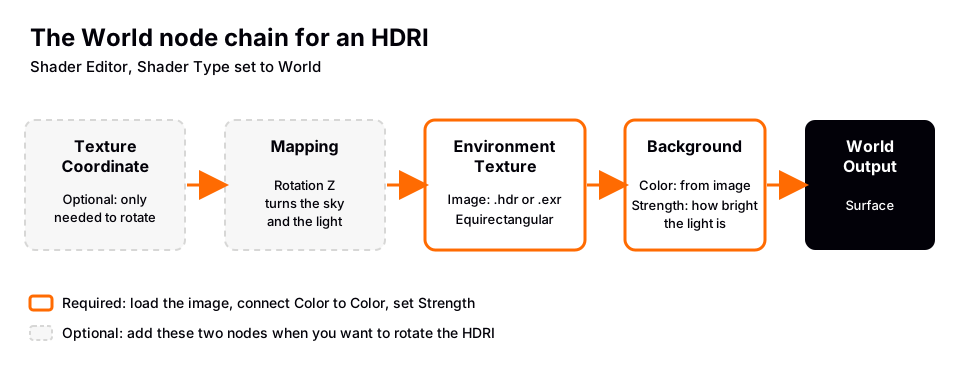
A Blender HDRI is a high dynamic range image of a real place that lights your scene and shows up in its reflections. To use one, open the Shader Editor, set Shader Type to World, add an Environment Texture node, load a .hdr or .exr file, and connect its Color output to the Color input of the Background node.
This guide covers the steps, and also what most tutorials skip: which file format to download, how to preview an HDRI without touching the world, how to rotate it, how to hide it from the final image, and why an HDRI sometimes looks flat or noisy. Everything below follows the Blender 5.2 LTS manual and Poly Haven's own pages.
What a Blender HDRI is and why it lights so well
An HDRI (high dynamic range image) stores brightness values far beyond what a normal photo can hold. Poly Haven, a free HDRI library, describes the purpose of an HDRI as providing realistic lighting and reflections for a 3D scene. The key detail is that the sun and other bright sources keep their real brightness. If those areas are clipped, Poly Haven notes, the lighting the HDRI produces in a 3D scene will be incorrect.
In Blender the image does not sit in the scene like an object. It is wrapped around everything as the world, and the manual describes the environment as very distant, so objects never interact with it. Each pixel acts as a tiny light shining toward your scene from that direction. That is why one image gives you sky color, soft shadows, a sun direction and reflections at the same time.
Sources: describes the purpose of an HDRI
How to use an HDRI in Blender (5.x)
You need a .hdr or .exr file. If you do not have one yet, jump to the Poly Haven section below and come back.
- Open the Shader Editor. Change any area to the Shader Editor, or switch to the Shading workspace.
- Set Shader Type to World. The Shader Type dropdown in the header offers Object, World and Line Style. Choose World. You now edit the node tree of the world, not the material of the selected object.
- Find the Background node. The manual says the Background node is the only shader the world's surface accepts. It has a Color and a Strength input and feeds the World Output.
- Add the Environment Texture node. Press Shift+A, open Texture, and pick Environment Texture. According to the manual, dragging an image file into the Shader Editor while you edit the World creates this node for you.
- Load the image. Click Open on the node and choose your .hdr or .exr file. Leave Projection on Equirectangular, the format of a typical HDRI. The other option, Mirror Ball, is for photos of a mirror ball.
- Connect the nodes. Drag from the Color output of the Environment Texture to the Color input of the Background node.
- Check the result. Press Z in the 3D Viewport and choose Rendered. The sky should appear behind your objects and light them.
Use the Environment Texture node, not the Image Texture node. The manual states that the environment node is the one that maps the image correctly for image-based lighting. With nothing plugged into its Vector input, the image is mapped as an environment with the Z axis as up.
For a shorter, step-only version, see how to add an HDRI in Blender.
Preview an HDRI without changing the world
Material Preview shading renders with EEVEE and an HDRI environment so you can judge materials quickly. Press Z and choose Material Preview, then open the shading dropdown next to the mode buttons. With Scene World switched off, you can set a substitute environment:
- HDRI Environment picks the map that lights the viewport.
- Rotation turns it around the Z axis. World Space Lighting keeps the light fixed instead of following the camera.
- Strength sets the light intensity.
- World Opacity and Blur change only how the HDRI looks as a viewport background. The manual says Blur does not change how the light is diffused.
These are viewport settings, so they do not light your final render. To light the final image you still need the Environment Texture in the World shader. If you switch Scene World on, Material Preview uses your world instead.
Rotate and brighten an HDRI
Strength is the brightness control. Raise Strength on the Background node to brighten the whole scene and lower it to darken it. Rotation moves the sun and the reflections without moving your objects.
- Add a Texture Coordinate node and a Mapping node with Shift+A.
- Connect the Texture Coordinate output to the Mapping Vector input, and the Mapping Vector output to the Environment Texture Vector input.
- Change Rotation Z on the Mapping node. The highlights and shadows swing around the scene.
The Mapping node has a Vector Type. According to the manual, Texture applies the inverse transform so the texture moves the way the numbers suggest, while Point moves it opposite to the transform. If rotation feels backwards, check that setting. The full walkthrough is in how to rotate an HDRI in Blender.
Blender 3D HDRI file formats and resolutions
The file format decides whether the HDRI can light a scene properly. Blender's manual describes the formats you will meet:
| Format | What the manual says | Right for lighting? |
|---|---|---|
| Radiance HDR (.hdr) | Float data, default color space linear | Yes |
| OpenEXR (.exr) | Float at 16 or 32 bits per channel | Yes |
| JPEG | 8-bit only, lossy | Background only |
An 8-bit JPEG cannot store a sun that is far brighter than white, so it gives dull, low-contrast light. Poly Haven's HDRI pages offer EXR and HDR downloads. The page we checked (Kloofendal 48d Partly Cloudy) lists resolutions from 1K to 16K and describes the asset as unclipped.
Start with 1K or 2K while you work, since lighting does not need a huge file. Resolution matters most when the HDRI is visible in the frame or in sharp reflections. For those final renders, move to 4K or 8K. Poly Haven's Blender add-on imports at 1K by default for quick previews and lets you switch to higher resolutions later.
Where to get free HDRIs: Poly Haven
Poly Haven's license page says its HDRIs, textures and models are CC0. You may use them for any purpose, including commercial work, with no credit required, and you may redistribute them. Its HDRI catalog is sorted by category, and two are worth knowing:
- Studio: described as purpose-built lighting setups. A natural fit for product shots.
- Pure Skies: edited sky-only HDRIs with the ground removed, so there is no location, only sky, time of day and weather. Useful when you want your own ground plane under a clean sky.
Poly Haven also has a Blender add-on that pulls its assets into the Asset Browser, HDRIs included. Its page describes it as a paid product for now. Downloading from the website and loading the file yourself, as in the steps above, needs no add-on.
Sources: license page · HDRI catalog · Blender add-on
Hide the HDRI background and keep the lighting
Often you want the HDRI's light and reflections but not a picture of a parking lot behind your product. You have two options.
- Transparent film. In Render Properties, open Film and enable Transparent. The manual says the background renders transparent so you can composite over another one. Save as PNG or EXR to keep the alpha. Your objects are still lit by the HDRI. See how to render a transparent background in Blender.
- Ray Visibility trick (Cycles). The Cycles manual suggests a Mix node using the Is Camera Ray blend factor to separate the background the camera sees from the background that lights the scene. You can show a plain color to the camera and the HDRI to everything else. Adding Is Glossy rays makes the HDRI show up in reflections too.
HDRI in Cycles and EEVEE
Both engines read the same World node setup, but each has its own settings.
Cycles. In the World properties, Settings then Surface has a Sampling option with None, Auto and Manual. Auto and Manual turn on multiple importance sampling, which favors the brighter parts of the background. The manual says this reduces noise at the cost of possible fireflies, and recommends it for image textures with small bright areas such as a sun. Map Resolution sets the importance map's detail: higher values catch small features but use more memory. Cast Shadow lets the world background block light and cast shadows.
EEVEE. The current manual lists a Sun group in the World settings. Threshold sets the maximum world light value stored in the light probe, and the excess is converted into a sun light, which reduces light bleeding from very bright sources. Angle is the apparent size of that extracted sun, and Use Shadow lets it cast shadows. A Threshold of zero disables the extraction. The Light Probe panel has a Resolution for the stored world light. These options come from the Blender 5.2 LTS manual. Older 4.x releases may differ, so use the version selector on the manual page if you run an older build.
Want crisper, more directional shadows from an HDRI? The EEVEE sun extraction and the Cycles sampling settings are the two levers. We cover this in HDRI shadows in Blender.
Why your HDRI looks flat, dark or noisy
- Nothing changes when you load it. The Environment Texture is not connected to the Background node's Color, or the Shader Type is still set to Object. Check the header dropdown.
- The scene is too dark or too bright. Change Strength on the Background node. Do not edit the image.
- Flat, shadowless light. Some HDRIs are overcast skies, which give soft light by nature. Pick one with a visible sun, or a Studio HDRI with strong light panels.
- The image looks stretched or wrapped oddly. It is not an equirectangular image, or Projection is wrong. Mirror ball photos need Mirror Ball.
- The background looks blurry. You are probably using a 1K or 2K file as a visible background. Switch to a higher resolution for the final frame.
- Grain from a small bright sun. In Cycles, set Sampling to Auto and raise the render samples.
- Dull reflections. You may have used an 8-bit JPEG. Use .hdr or .exr.
Skip the guesswork with the Material & Lighting Vault
An HDRI gives you one lighting condition per file, and you still have to find a good angle and add lights for the product. The Material & Lighting Vault is a Blender 5.2+ extension that works the other way around. You select your objects, and one of its 200 lighting setups measures them and builds itself around them. The setups come in 19 categories and are tuned for Cycles. It also has 267 studio lights, including softboxes, beam profiles, gobos and colored light textures, so you can add a shaped light next to your HDRI instead of hunting for a better HDRI.
It lives in the Metalight tab in the N panel, and comes with 1,690 procedural materials plus 67 weathering presets that work on any material. The license covers personal and commercial use. Use your HDRI for environment and reflections, then let a setup supply the controlled key and fill. It is a tool, not a course.
If you are still learning where each of these settings lives, The Blender Launchpad walks through studio lighting and rendering in order, using hand picked free lessons. Its bonuses include 1,000+ CC0 assets, HDRIs and textures that are free for commercial use.
Related reading: Blender lighting.
Questions people also ask
What is an HDRI in Blender?
It is a high dynamic range panorama of a real place, loaded in the World shader through an Environment Texture node. It lights the scene and appears in reflections. The sun and bright lights keep their real brightness, so shadows and highlights look natural.
How do I add an HDRI in Blender?
Set the Shader Editor's Shader Type to World, add an Environment Texture node with Shift+A, open your .hdr or .exr, and connect its Color output to the Background node's Color input. Press Z and choose Rendered to see it.
Are Poly Haven HDRIs free for commercial use?
Yes. Poly Haven licenses its HDRIs under CC0, and its license page says you can use them for any purpose without credit. Read the license page yourself before a client project, as terms can change.
Which HDRI format should I use in Blender 3D?
Use .exr or .hdr. Both store float data, so bright sources stay bright. A JPEG is 8-bit, so it cannot light a scene realistically.
How we checked this
We did not run Blender for this guide. We read these pages on November 4, 2026, and wrote only what they confirm:
- Blender Manual (5.2 LTS), read November 4, 2026: Environment Texture node, Background node, World lights, Cycles World settings, EEVEE World settings, Film settings, Mapping node, viewport shading, Shader Editor and image formats.
- Poly Haven, read November 4, 2026: license page, HDRI catalog, the Kloofendal 48d Partly Cloudy asset page, the Blender add-on page and the blog post on creating high quality HDRIs.
We could not confirm differences between Blender 4.x and 5.x for the EEVEE world settings, so we name the manual version above.


