
To rotate an HDRI in Blender, add a Texture Coordinate node and a Mapping node in the World shader, feed the Mapping node's Vector output into the Vector input of the Environment Texture node, and change Rotation Z. The sky, the sun and the reflections turn while your objects stay where they are.
That covers the final render. If you only want to turn the HDRI in the 3D Viewport's Material Preview, use the Rotation setting in the shading popover instead. Both are below, following the Blender 5.2 LTS manual. For loading and lighting with an HDRI in general, see our Blender HDRI guide.
How to rotate an HDRI in Blender (Mapping node)
Start with an HDRI already working in the World shader. If it is not, follow how to add an HDRI in Blender first.
- Set Shader Type to World in the Shader Editor header, so you are editing the world and not a material.
- Add a Texture Coordinate node. Press Shift+A and find Texture Coordinate.
- Add a Mapping node the same way. The manual describes it as a node that transforms the input vector by translation, rotation and scaling.
- Connect the nodes. Texture Coordinate into the Mapping Vector input, then the Mapping Vector output into the Environment Texture Vector input.
- Change Rotation Z on the Mapping node. Watch the viewport in Rendered shading: the highlights and shadows swing around the scene as the value changes.
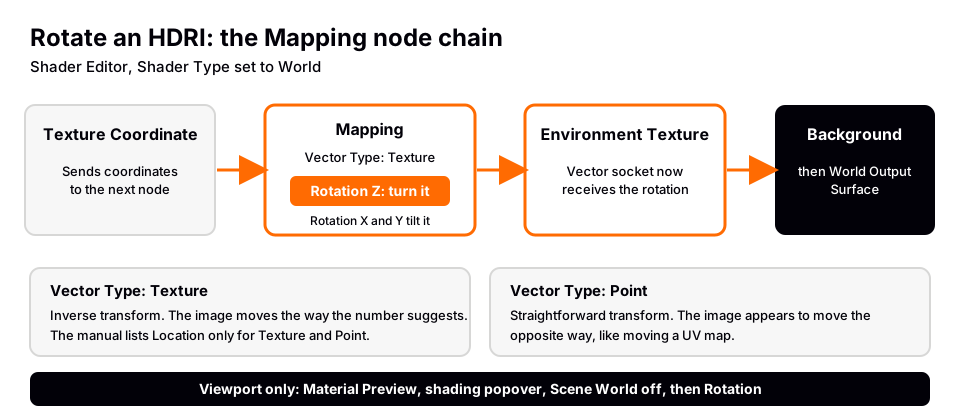
Which Texture Coordinate output should you use? The manual does not pin one down for the World. Its Texture Coordinate page lists Generated as automatically generated coordinates, and says Reflection is useful for environment maps. The manual's Sky Texture page says that node falls back to Generated coordinates when its Vector socket is unconnected. We could not run Blender to compare, so connect Generated first, and if the image looks wrong, try Reflection.
The Mapping node's Rotation input has X, Y and Z values, applied in XYZ order. For a normal HDRI you will spend nearly all your time on Z, because the Environment Texture node treats Z as up. X and Y tilt the whole sky and move the horizon, which you rarely want.
Rotation going the wrong way? Check Vector Type
The Mapping node has a Vector Type, and the manual says the node applies the transformation differently for each one:
| Vector Type | What the manual says | Effect on an HDRI |
|---|---|---|
| Texture | Inverse transformation; the evaluated texture moves as you would expect | Numbers behave as they read |
| Point | Straightforward transformation, like moving a UV map; the texture appears to move the opposite way | Sky turns the opposite way |
| Vector, Normal | Vector uses a Point transform with zero translation; Normal is for normals | Not for rotating a sky |
If a positive Rotation Z moves the sun in the direction you did not expect, switch the Vector Type between Texture and Point, or type a negative value. Note that the manual lists the Location input only for the Texture and Point types.
Blender rotate HDRI in the viewport (Material Preview)
Material Preview shading renders the viewport with EEVEE and an HDRI environment, which is useful for checking how a model looks under different light. Press Z to open the shading pie menu and choose Material Preview, then open the shading popover next to the mode buttons.
- Switch Scene World off. While it is on, Material Preview uses your world instead.
- Pick an HDRI Environment.
- Change Rotation, which the manual describes as the rotation of the environment on the Z axis.
- Turn World Space Lighting on if you want the rotation fixed and not following the camera.
This does not change your render. The manual describes these settings as the way Blender builds a substitute world for the viewport when Scene World is off, so they are not part of your own World node tree. Set the same angle with the Mapping node when you are happy with it. The manual does not list a mouse shortcut for turning the HDRI in the viewport, so we do not give one here; use the Rotation field.
Why the HDRI will not rotate
- Nothing happens when you change Rotation Z. The Mapping node's Vector output is not connected to the Environment Texture's Vector input. With nothing connected there, the image is mapped as an environment with Z up and nothing turns it.
- You edited the wrong node tree. Make sure Shader Type says World. A Mapping node in an object's material does not turn the sky.
- The viewport is in Material Preview with Scene World off. It is then showing the viewport HDRI, so your node tree has no effect there. Switch Scene World on, or use Rendered.
- The scene tilts instead of turning. You changed Rotation X or Y. Reset them to 0 and use Z.
- The shadows turn but look too soft or too hard. That is the HDRI, not the rotation. See HDRI shadows in Blender.
Skip the guesswork with the Material & Lighting Vault
Rotating an HDRI is a way to find a good angle for a single product or model. The Material & Lighting Vault is a Blender 5.2+ extension that finds the angle for you in a different way: select your objects and one of its 200 lighting setups measures them and builds itself around them. The setups come in 19 categories and are tuned for Cycles. You can still use an HDRI for the environment and reflections and let a setup supply the key and fill. For a wider look at that approach, see our guide to a studio lighting scene in Blender.
It also has 267 studio lights, including softboxes, beam profiles, gobos and colored light textures, in the Metalight tab in the N panel. The license covers personal and commercial use, and it is a tool, not a course. To learn the lighting and render settings in order, The Blender Launchpad is a curated roadmap of free YouTube lessons with a stage on studio lighting and rendering, and its bonuses include 1,000+ CC0 assets, HDRIs and textures free for commercial use.
Questions people also ask
How do I rotate an HDRI in Blender?
Add Texture Coordinate and Mapping nodes in the World shader, connect them to the Environment Texture's Vector input, and change Rotation Z on the Mapping node.
Blender rotate HDRI: can I do it without nodes?
Only in the viewport. In Material Preview, switch Scene World off and use Rotation in the shading popover. The final render needs the Mapping node.
Which Mapping node Vector Type should I use to rotate an HDRI?
Texture is the easiest to reason about because the manual says it moves the image the way the numbers suggest. Point moves it in the opposite direction.
Does rotating the HDRI move my objects?
No. The manual says the world is rendered as if it is very distant, with no two-way interaction between objects and the environment. Rotating it changes only where the light and reflections come from.
How we checked this
We did not run Blender for this guide. We read these pages on November 4, 2026, and wrote only what they confirm:
- Blender Manual (5.2 LTS), read November 4, 2026: Mapping node, Texture Coordinate node, Environment Texture node, Sky Texture node, World lights, Viewport Shading and Node Editors (Add menu).
We could not confirm from the manual which Texture Coordinate output to use for the World, the default Vector Type of a new Mapping node, the direction a positive Rotation Z turns the sky, or a mouse shortcut for rotating the HDRI in the viewport, so the post leaves them out or says so. We could not confirm differences between Blender 4.x and 5.x for these steps.


