

Flat lighting in Blender means an image with no visible shading: no highlights, no shadows, just the base colors. The fastest way is Workbench's Flat lighting option. For a final render in EEVEE or Cycles, connect an Emission shader at Strength 1.0 to the material's Surface, which the manual says makes the object show exactly its Color input.
This guide covers both routes, a third route using soft even lights for a flat photographic look, and what the Holdout node does, since people often confuse it with a flat look. All settings come from the Blender 5.2 LTS manual. The phrase "flat lighting" means two things, and we separate them below.
What flat lighting means in Blender
Artists use the term in two ways, and they need different tools.
- Shadeless or flat shading. The surface shows its color with no lighting calculation at all. Used for icons, UI renders, color-ID passes, technical diagrams and flat 2D-style looks.
- Flat, even lighting. Real lights arranged so the subject is lit evenly with low contrast and soft shadows. Used for catalog-style product shots and portraits.
The first is a shading choice, covered by methods 1 and 2 below. The second is a lighting layout, covered by method 3.
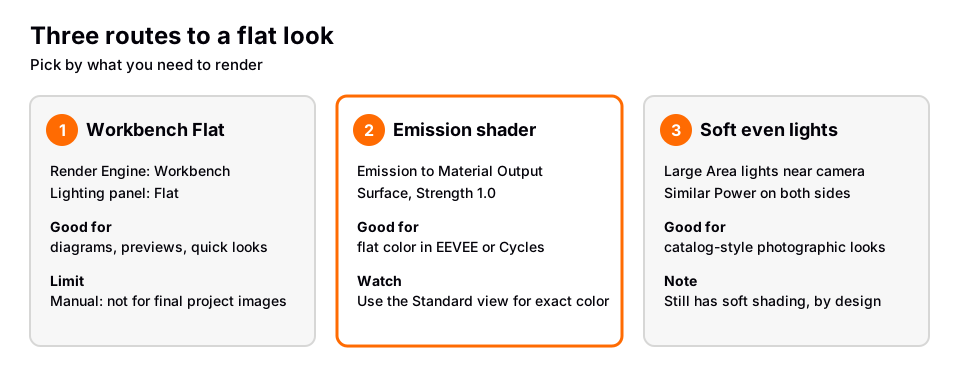
Method 1: Workbench Flat lighting
Workbench is Blender's fast engine for modeling and previews, and its Lighting panel has a Flat option. The manual says that in Flat, objects are shaded in a flat color, without any highlights or shadows. It also notes that Workbench does not use the lights of the scene.
- In Render properties, set Render Engine to Workbench.
- Open the Lighting panel and choose Flat. The other options are Studio and MatCap.
- Choose how objects get their color. The Workbench page says it supports random colors per object, materials, color attributes and textures, and the manual's Object Color page lists the options.
- Press F12 to render.
For the 3D Viewport, the same choice exists in the Shading popover: in Solid shading, the Lighting setting offers Flat, Studio and MatCap. The manual describes Flat there as not calculating any lighting and rendering the base color of the scene.
One limit matters: the manual says Workbench is not intended to render final images for a project, though you can select it as the render engine. Use it for diagrams, quick looks and previews. For final-quality flat color with materials, use the next method.
Method 2: Emission shader for a shadeless look
Blender has no single "shadeless" checkbox for EEVEE or Cycles. The manual's Emission node page gives the equivalent: for materials, a Strength of 1.0 ensures the object in the image has the exact same color as the Color input, that is, makes it "shadeless".
- Select the object and open the Shader Editor with the object's material.
- Add an Emission node with Shift+A.
- Set its Color (or plug an image texture into it) and leave Strength at 1.0.
- Connect the Emission output to the Surface input of the Material Output node. The manual says the Emission output can also go to the Volume input.
- Press Z and choose Rendered to check it.
The surface now ignores the lights and shows its Color flat. Two things can still change what you see.
- The color view. The manual lists several views in Color Management. Standard does no extra conversion besides the one for the display, and the manual says it is often used for non-photorealistic results. Tone-mapped views such as AgX or the ACES options adjust colors, so a flat color may not match the swatch you picked. If you need the exact color, check the view setting.
- Light from the object. The Cycles light settings page lists any object with an emission shader as a way lighting reaches the scene. In Cycles, an emissive object can light its neighbors, so a flat-colored object may tint what is next to it. The manual's Emission page also notes that emission shaders on meshes are measured in Watts per square meter.
The same technique makes toon-style flat colors. Our Blender toon shader guide goes further when you want some shading steps instead of none.
Method 3: flat, even lighting with real lights
If you want a photographic flat look, you light the subject evenly instead of removing shading. The manual does not describe a "flat lighting" setup, so the guidance here is general lighting practice built on settings the manual does describe.
- Add Area lights in front of the subject, close to the camera. The manual says the area light produces shadows with soft borders.
- Make them large with Size (or Size X and Size Y). The manual says larger lights give softer shadows.
- Balance two lights of similar Power on either side of the camera, so no side falls into shadow. Raise Spread if you want more diffuse light, since the manual says larger values give soft shadows.
- Check Rendered view and lower any harsh highlights by moving lights away from shiny surfaces.
For the full set of light types and settings, read our Blender lighting guide.
What the Holdout node does (it is not a flat look)
The manual describes the Holdout node as creating a "hole" in the image with zero alpha transparency, which is useful for compositing. It has no inputs and no properties. Use it when part of a flat or shaded render should disappear so another image can show through.
- Plug the Holdout output into the Surface input of the Material Output on the object you want to remove.
- Save in a format that keeps alpha, such as PNG or EXR, and enable Film then Transparent if you want the rest of the background transparent as well. The Cycles Film page says Transparent renders the background transparent for compositing.
Holdout does not make an object flat. It removes it from the image, like a mask. See how to render a transparent background in Blender for the full alpha workflow.
Why your flat look is not flat
| Symptom | Likely cause | Fix |
|---|---|---|
| Still shaded in Workbench | Lighting is set to Studio or MatCap | Choose Flat in the Lighting panel |
| Emission looks brighter than the swatch | Strength is above 1.0 | Set Strength to 1.0 |
| Color looks washed out or shifted | A tone-mapped view such as AgX is active | Try the Standard view |
| Object tints neighbors | Emission lights the scene in Cycles | Expected behavior; keep objects apart or accept the tint |
| Nothing appears at all | Holdout is on the Surface | Replace it with Emission |
Learn this in order with The Blender Launchpad
Flat looks sit at the meeting point of lighting, shaders and render settings, which are three stages of a longer path. The Blender Launchpad is a members app with a roadmap of hand picked, free YouTube lessons in six stages. Stage 1 assumes you have never opened Blender, and a later stage covers studio lighting and rendering in both Cycles and EEVEE.
It is a curated playbook, not original video lessons. It is one payment with no subscription, and its bonuses include 1,000+ CC0 assets, HDRIs and textures that are free for commercial use. If you want to compare engines first, read EEVEE vs Cycles in Blender.
Questions people also ask
How do I make flat lighting in Blender?
For a no-lighting look, set the render engine to Workbench and choose Flat in the Lighting panel. For EEVEE or Cycles, plug an Emission shader at Strength 1.0 into the material's Surface.
Is there a shadeless option in Blender?
Not as a checkbox in EEVEE or Cycles. The manual says an Emission shader with Strength 1.0 makes the object show exactly its Color input, which it calls "shadeless".
Can I use Workbench Flat lighting for final renders?
You can select Workbench as the render engine, but the manual says it is not intended to render final images for a project. It suits diagrams and previews.
How do I remove shadows in Blender?
Flat or shadeless shading removes them for the object's own surface. In Cycles you can also turn off Cast Shadow on a light, which the manual says stops objects between the light and the subject from blocking its light.
How we checked this
We did not run Blender for this guide. We read these pages on November 4, 2026:
- Blender 5.2 LTS Manual: Workbench (index and Lighting), Viewport Shading, Emission node, Holdout node, Displays and Views (Color Management), Light Objects, Light Settings (Cycles) and the Cycles Film settings.
The "flat, even lighting" layout in Method 3 is general lighting practice, not a manual statement. We could not confirm Workbench's menu label for the Color options beyond what the Workbench index page says, so we describe them generally.


