
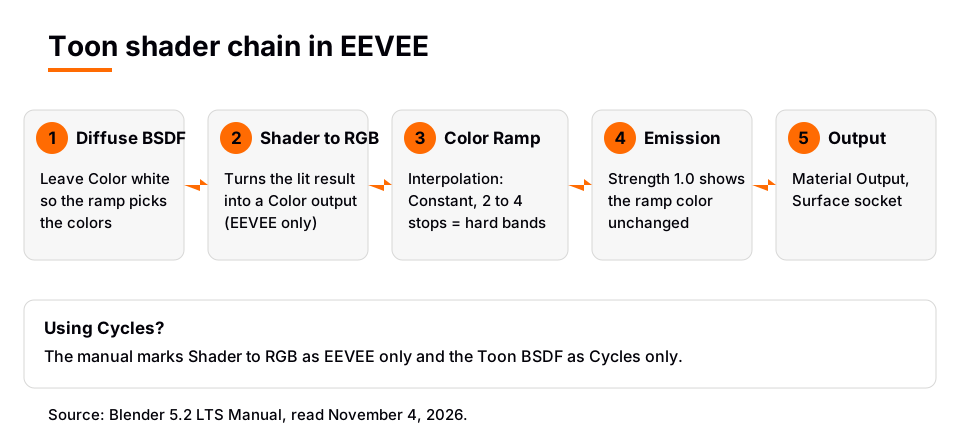
A toon shader in Blender turns smooth lighting into a few flat bands of color. In EEVEE you build one with a Diffuse BSDF, a Shader to RGB node and a Color Ramp set to Constant interpolation, then send the ramp into an Emission shader. The Blender Manual describes exactly this idea on its Shader To RGB Node page: a color ramp on the output of a diffuse BSDF makes a flexible toon shader.
The catch is the render engine. The manual marks Shader to RGB as EEVEE only. If you render with Cycles, you use the Toon BSDF instead, and this guide covers both, plus outlines with Freestyle. Everything below comes from the Blender 5.2 LTS manual.
Sources: Shader To RGB Node page
What a toon shader does in Blender
A normal Blender material blends light across a surface in a smooth gradient. A toon shader (also called cel shading) replaces that gradient with hard steps, such as one color for shadow and one for light. Blender has no single "toon" switch for EEVEE. You build the effect from nodes, which is why the same method also answers searches for a "blender 3d toon shader".
The manual says the Shader to RGB node is typically used for non-photorealistic rendering, to apply extra effects on the output of BSDFs. It is the node that makes the toon look possible, because it hands you the shaded result as a plain color you can edit.
Make a toon shader in EEVEE, step by step
- Set the engine. In the Properties editor, open the Render tab and set the Render Engine to EEVEE. Shader to RGB is documented as EEVEE only.
- Open the Shader Editor. The manual lists the Shading workspace among the default workspaces. Select your object and make sure it has a material. The Shader Editor shows the material as a node tree.
- Add a Diffuse BSDF. Use the editor's Add menu to add a Diffuse BSDF. Leave its Color white for now, so the ramp decides the final colors. You will replace the material's existing Surface link in step 8.
- Add Shader to RGB. Add a Shader To RGB node (it sits with the color nodes in the manual). Connect the Diffuse BSDF's BSDF output to its Shader input. Its Color output is the surface color computed from the BSDF and the lighting.
- Add a Color Ramp. Add a Color Ramp node and connect Shader to RGB's Color output to the ramp's Factor input. Factor 0.0 gives the leftmost color of the ramp and 1.0 gives the rightmost, so dark colors go on the left and light colors on the right.
- Switch to Constant. In the ramp's Color Interpolation menu, choose Constant. The smooth gradient becomes hard steps.
- Add and color the stops. Use the plus button to add a stop, or Ctrl+click in the ramp. Select a stop, set its Position with the slider and its color with the Color field. Two or three stops is a good start: shadow, mid-tone, light.
- Add an Emission shader. Connect the Color Ramp's Color output to a new Emission node's Color input, then connect Emission to the Material Output's Surface input. With the Strength at 1.0, the manual says the object in the image has the same color as the Color input, which makes it "shadeless". That keeps your chosen band colors unchanged.
You should now see flat bands on the object that move as you rotate a light. If the bands are in the wrong places, drag the stop positions. If you want evenly sized bands, the ramp's Tools menu has Distribute Stops from Left, which the manual says is mostly useful with Constant interpolation.
Why the Color Ramp must be Constant
The manual's Color Ramp widget page describes a gradient of color stops, calculated as the interpolation between stops with the method you choose. The RGB methods are B-Spline, Cardinal, Linear, Ease and Constant. Constant interpolation is the one that avoids a smooth blend between stops, which is the whole point of a toon look.
Two other controls matter here:
- Color Mode. RGB blends by mixing each channel; HSV and HSL convert first and then mix.
- Stop count. Each stop adds one band. More stops move you back toward a smooth gradient, so keep it small for a clear cartoon look.
Sources: Color Ramp widget page
What breaks with Shader to RGB
The manual is direct about the cost: using this conversion breaks the PBR pipeline and makes results unpredictable with ambient occlusion, contact shadows, soft shadows and screen space refraction. It also warns that some effects need several samples to converge, and arbitrary changes to a noisy input may not convert to a smooth result.
Its warning box adds that any BSDF upstream of a Shader to RGB node is invisible to these effects:
- Screen Space Reflection
- Subsurface Scattering
- Alpha Clip and Alpha Hashed blend modes
It also says the node does not give expected results in render passes. In practice, if a toon material looks wrong, first try turning off the effect you suspect and compare. Keep toon materials simple: a Diffuse BSDF into the node, and nothing exotic upstream.
Toon shader in Cycles: the Toon BSDF
Because Shader to RGB is EEVEE only, the Cycles route is different. The manual lists a Toon BSDF marked Cycles only, described as a shader for diffuse and glossy materials with cartoon light effects. Its main controls are:
| Control | What the manual says | Use it to |
|---|---|---|
| Color | Color of the surface | Set the base color |
| Size | 0.0 to 1.0, an angle of reflection from 0 to 90 degrees | Make the lit area bigger or smaller |
| Smooth | An angle over which the transition from full to no reflection happens | Soften or sharpen the band edge |
| Component | Diffuse or Glossy | Base the effect on diffuse or on glossy reflection |
Connect the Toon BSDF to the Material Output's Surface input. For help choosing between the two engines, see EEVEE vs Cycles in Blender.
Sources: Toon BSDF
Add outlines with Freestyle
Toon shading is usually paired with ink lines. The manual describes Freestyle as an edge and line based non-photorealistic renderer that uses mesh data and Z-depth to draw lines on selected edge types. The manual's own Shader to RGB example is titled "Simple toon shading with Shader to RGB and Freestyle".
- Turn it on. Check the Freestyle box in Properties > Render > Freestyle.
- Open the settings. Freestyle settings are in Properties > View Layer > Freestyle. Set the Control Mode to Parameter Editor Mode, which uses line sets and line styles instead of Python.
- Pick edge types. In the Freestyle Line Set panel, choose at least one edge type, such as Silhouette or Crease. Silhouette draws lines where the surface normal turns away from the camera. Crease uses the view map's Crease Angle.
- Style the line. A line style controls color, alpha and thickness. Set the Base Color and Base Thickness there.
The manual lists known limitations: it is memory demanding, only faced mesh objects are supported, no edges are detected at face intersections, results have no Z depth, and panoramic cameras are not supported. If you enable the As Render Pass option, Freestyle lines render as a pass you combine with the image using an Alpha Over node. For more on line-based looks, read our guides to the Blender outline shader and the Blender anime shader.
Sources: Freestyle
If the toon look is wrong
| Symptom | Likely cause | Fix |
|---|---|---|
| Shader to RGB is missing or does nothing | Render engine is Cycles | Switch to EEVEE, or use the Toon BSDF |
| Band colors do not match the ramp colors | Emission Strength is not 1.0, or Diffuse Color is not white | Set Strength to 1.0 and Diffuse Color to white |
| Smooth gradient, no bands | Color Ramp is not on Constant | Change Color Interpolation to Constant |
| Reflections or subsurface missing | Upstream BSDFs are invisible after Shader to RGB | Keep the material to a plain Diffuse BSDF |
| No outlines | Freestyle off, or no edge type selected | Enable Freestyle and pick an edge type in the Line Set |
Learn this in order with The Blender Launchpad
A toon shader is a small project built from bigger skills: shader nodes, how lighting changes a surface, and what EEVEE and Cycles can and cannot do. The Blender Launchpad is a members app with a roadmap of hand picked, free YouTube lessons in six stages. Stage 3 covers UV and PBR texturing, and stage 4 covers studio lighting and rendering in both Cycles and EEVEE, which is where the engine choice in this guide matters.
Stage 1 assumes you have never opened Blender. The Launchpad is a curated playbook rather than original video lessons, it is one payment with no subscription, and it includes 1,000+ CC0 assets, HDRIs and textures that are free for commercial use. For the node basics behind this post, start with Blender material nodes.
Questions people also ask
How do I make a toon shader in Blender?
Set the engine to EEVEE, connect a Diffuse BSDF to Shader to RGB, then to a Color Ramp set to Constant, then to an Emission shader and the Material Output. Add stops to the ramp to control the bands.
Does the toon shader work in Cycles?
Not the Shader to RGB method, which the manual marks EEVEE only. In Cycles, use the Toon BSDF, which the manual marks Cycles only.
Is there a built-in 3D toon shader in Blender?
The manual lists a Toon BSDF for Cycles, and describes the Shader to RGB plus Color Ramp approach for EEVEE. Blender has no single toon switch for both engines.
How do I add outlines to a toon shader in Blender?
Enable Freestyle in the Render properties, choose edge types in the View Layer's Freestyle Line Set panel, and set the line color and thickness in the line style.
How we checked this
We read these pages on November 4, 2026, in the Blender 5.2 LTS manual: Shader To RGB Node, Color Ramp Node, Color Ramp Widget, Diffuse BSDF, Emission, Toon BSDF, Shader Editor, Workspaces, Freestyle Introduction, Freestyle Render Properties, View Layer Freestyle, Line Set, Line Style Color and Thickness. We did not run Blender while writing this. The advice to keep the Diffuse Color white and to use two or three stops is general shading practice, not a statement from the manual.


