
Blender material nodes are small boxes that you link together in the Shader Editor to describe how a surface looks. Texture and color nodes produce values, a shader node such as the Principled BSDF turns those values into a light-reacting surface, and the Material Output node hands the result to the renderer. The manual says Cycles and EEVEE both define materials with these node trees.
This guide explains shader nodes for beginners: how to open the Shader Editor, what sockets and links are, why a shader is not a color, which nodes you need first, the shortcuts that make node work fast, and where Cycles and EEVEE differ. It follows the Blender 5.2 LTS manual.
What are Blender material nodes?
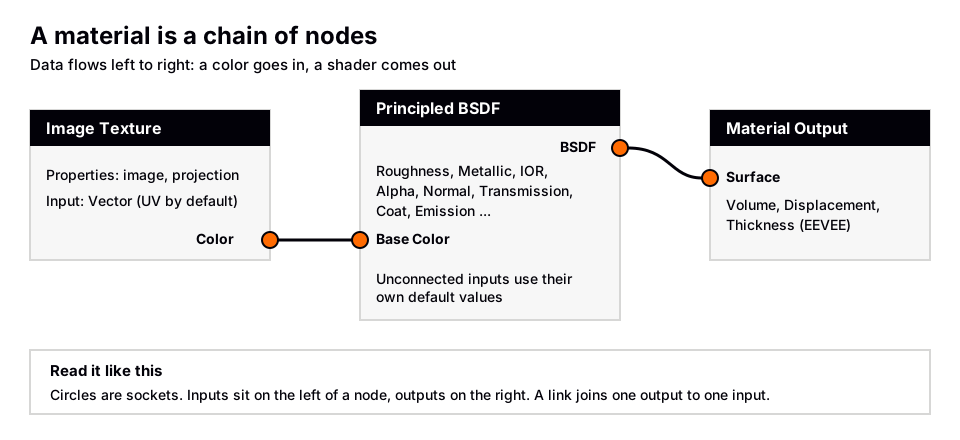
A material is a node tree. The manual's shader introduction says materials, lights and backgrounds are all defined using a network of shading nodes, and that these nodes output values, vectors, colors and shaders. You build a material by adding nodes and connecting an output of one to an input of another.
The manual divides a material into three parts: the surface (how light interacts with the outside), the volume (the inside, for smoke or fog, or combined with a surface for something like cloudy glass) and displacement (changing the surface shape or normals). The Material Output node has an input for each one: Surface, Volume and Displacement. It also has a Thickness input, used only by EEVEE.
How to open the Shader Editor in Blender
The Shader Editor is where material nodes live. The manual says the default Shading workspace has a Shader Editor plus a 3D Viewport that can be set to Material Preview or Rendered shading, so you see changes live.
- Select an object and open the Material Properties tab. Click New if there is no material.
- Switch to the Shading workspace. The Shader Editor shows the active object's material nodes.
- Press Z in the 3D Viewport and choose Material Preview or Rendered to see the result.
The Properties editor and the Shader Editor are two views of the same material. The manual says materials can be created in either one. Edits in one appear in the other.
The Shader Editor header
- Shader Type picks what you edit: Object (the active object's material), World (the background) or Line Style (Freestyle).
- Slot chooses the active material slot on the object, and the selector beside it changes the material in that slot.
- Pinned keeps the current material visible even when you select something else.
- The Sidebar has an Options panel with the same settings as the Material tab, so you can edit the whole material without leaving the editor.
Nodes, sockets and links
Every node has a title, optional properties and sockets. The title can be overridden with a Label, and a toggle on the left of the title collapses the node (H). Sockets are the little colored circles on each side: inputs on the left, outputs on the right. A link joins an output to an input.
The manual says each socket is color-coded by data type.
| Socket color | Type | Meaning |
|---|---|---|
| Bright green | Shader | Used for shaders in Cycles and EEVEE |
| Yellow | Color | Color information |
| Light gray | Float | A single number |
| Dark blue | Vector | Coordinates and normals |
Every input except the green shader input has a default value you can edit directly when nothing is connected. When you link something in, that field disappears. Mute a link with Ctrl+Alt+right mouse drag and the field becomes visible again, as the manual describes.
Some types convert on their own. A float connected to a color socket works, and a color connected to a float is turned into its gray equivalent. The manual warns that data can be lost once a conversion happens. It also says a color, float or vector linked to a Shader socket becomes an Emission result.
Why a shader is not a color
This is the idea beginners miss most. The manual says the output of all surface and volume shaders is a shader, which describes the lighting interaction, not the color of the surface. Shader nodes come in four kinds: BSDF (reflection, refraction and absorption), Emission, Volume and Background.
Because of that, the only operations the manual allows on shaders are mixing and adding them with the Mix Shader and Add Shader nodes. You cannot run a Math node on a shader. The Mix Shader takes two shaders and a Factor: at zero it uses the first shader entirely, at one the second.
The manual adds a physical warning. For materials to work well with global illumination, they should be energy conserving. If colors stay in 0.0 to 1.0 and shaders are combined only with the Mix Shader, that is automatically true. Colors above 1.0 or the Add Shader can break it, so be careful.
The first nodes to learn
You do not need most of the node list. The manual's shader node index groups nodes into Input, Output, Shader, Texture, Color, Vector and others. These are the ones to start with.
- Principled BSDF. The manual calls it a node that combines multiple layers into a single easy-to-use node, based on the OpenPBR Surface model. It covers metal, diffuse, subsurface and transmission, with optional coat, sheen, emission and thin film layers. Plastic, glass, metal and cloth all start here. See the glass material guide and the metal material guide.
- Material Output. Receives the shader on its Surface input and passes it to the renderer. Its Target property chooses which render engine the input shaders are used for; by default shaders are shared between Cycles and EEVEE.
- Image Texture. Loads a picture. If its Vector input is unconnected, it uses the active UV map. How to add a texture in Blender walks through it.
- Noise Texture. A procedural texture with Scale, Detail, Roughness and Distortion. If Vector is unconnected it uses Generated coordinates. Procedural textures need no image file.
- Texture Coordinate. Outputs coordinate systems for the Vector input of texture nodes.
- Mix Shader and Mix Color. Mix Color (the manual's Mix node) mixes floats, vectors or colors with a factor; in color mode it has blend modes such as Multiply, Overlay and Screen.
- Fresnel and Layer Weight. Angle-based weights, typically used as the factor of a Mix Shader.
The manual notes that texture nodes default to Generated coordinates, except Image Texture, which defaults to UV coordinates.
Build a simple material with nodes
- Start with the Principled BSDF connected to Material Output › Surface. If that link is missing, drag the BSDF output to the Surface input.
- Press Shift+A with the mouse over the Shader Editor to open the Add menu. Add a Noise Texture from the Texture category.
- Drag from its Factor output to the Roughness input of the Principled BSDF. Factor is a plain number, so it fits Roughness directly. (Linking the Color output works too: the manual says a color becomes its grayscale equivalent when it goes into a float socket.)
- Adjust Scale and Detail on the Noise Texture and watch the viewport update.
- Add another node by dragging a link from a socket and dropping it on empty space. The manual says this opens a search menu of compatible nodes, and confirming adds and connects the node.
You should see the surface roughness vary in a cloudy pattern. If nothing changes, check that the link ends on the Roughness input, and press Home over the Shader Editor to frame all nodes so none is hiding off screen.
Shortcuts that speed up node work
| Action | Shortcut | Notes from the manual |
|---|---|---|
| Add node | Shift+A | Or the Add menu in the header |
| Move, rotate, scale | G, R, S | Rotate and scale apply to multiple selected nodes |
| Insert node on a link | Drag it over the link | Hold Alt to toggle auto attach |
| Duplicate | Shift+D | New node sits exactly on top of the original |
| Delete | X or Delete | Ctrl+Delete deletes and reconnects |
| Mute node | M | Links pass through; they show red |
| Cut links | Ctrl+right mouse drag | Draw across the links |
| Swap node type | Shift+S | Reconnects sockets by name and type |
| Collapse node | H | Ctrl+H hides unconnected sockets |
| Frame all nodes | Home | Numpad period frames the selection |
The manual recommends arranging nodes so data flows left to right, top to bottom. For big setups, press Ctrl+G to Make Group. A node group has a green title bar and works like a function: you expose only the inputs you need. The manual says to avoid placing a Material Output inside a group, so the group stays reusable.
Do nodes work the same in EEVEE and Cycles?
Mostly. The manual says EEVEE shares the same material node system as Cycles, but not all features are supported, and its limitations page notes that all BSDFs use approximations, so there will always be small differences. Some utility nodes are not yet compatible with EEVEE. Individual inputs are tagged Cycles Only on their manual pages, for example anisotropy and thin film on the Principled BSDF. If a setting has no effect in your EEVEE render, check for that tag. For choosing an engine, see EEVEE vs Cycles.
The Light Path node tells a shader what kind of ray it is being executed for (camera, shadow, diffuse, glossy and so on). The manual says it is particularly useful for non-physically-based tricks, and several of its outputs are Cycles only. Most beginner materials do not need it.
Common beginner mistakes
- Nothing happens when you link. Check that you used an output on the left node and an input on the right node, and that the type makes sense.
- The material is plain gray in render. The Principled BSDF is not connected to Surface on the Material Output.
- Two Material Output nodes. Each has a Target. Make sure the one for your render engine is the one you edit.
- Texture looks wrong on a data input. Roughness or Metallic maps need the image's Color Space set to Non-Color, as shown in the texture guide linked above.
- Hidden duplicate nodes. The manual warns that a duplicated node lands exactly on the original, so you may not see it. Move it to check.
For a broader walk through, read Blender material basics. Shader nodes are separate from Geometry Nodes, which the manual says are for procedural modeling rather than materials.
Skip the node wiring with the Material & Lighting Vault
Understanding nodes is worth it, but you do not have to wire every material from scratch. The Material & Lighting Vault is a Blender 5.2+ extension (the Metalight tab in the N panel) with 1,690 procedural materials: 1,000 core materials in 32 categories plus 690 Pro. They work in Cycles and EEVEE and need no UVs, using object coordinates by default, with a Use UV option if you prefer. The set totals about 64 MB.
It also includes 67 weathering presets (rust, moss, snow, soot, cracks, edge wear) that work on any material, including your own node setups. The license covers personal and commercial use, without redistribution. It is a tool, not a course.
Learn this in order with The Blender Launchpad
If you want a path through all of Blender, The Blender Launchpad is a members app with a roadmap of hand picked, free YouTube lessons in six stages, from Blender basics to UV and PBR texturing, studio lighting and rendering, animation and Geometry Nodes. Stage 1 assumes you never opened Blender. It is a curated playbook, not original video lessons, with one payment and no subscription.
Questions people also ask
What are material nodes in Blender?
They are boxes linked together in the Shader Editor that define a material. Texture and color nodes make values, shader nodes like the Principled BSDF turn them into a surface, and the Material Output sends it to the renderer.
How do I open the Shader Editor in Blender?
Switch to the Shading workspace. The manual says it includes a Shader Editor and a 3D Viewport set up to preview materials.
What are shader nodes in Blender?
Shader nodes output a shader, which describes how light is reflected, refracted, absorbed, emitted or scattered. The Principled BSDF, Glass BSDF, Emission and Volume nodes are examples.
What is the difference between the Shader Editor and the Material Properties tab?
They are two views of the same material. The Shader Editor shows the node graph, while the Properties editor shows the same nodes as panels.
Can I use the same nodes in Cycles and EEVEE?
Yes for most nodes, but not all. Some inputs are marked Cycles only in the manual, and EEVEE has its own limits.
How we checked this
We did not run Blender for this guide. We read these pages on November 4, 2026, and wrote only what they confirm:
- Blender Manual (5.2 LTS), read November 4, 2026: Shader Editor, Shader Nodes introduction and index, Materials introduction, Surfaces, Principled BSDF, Mix Shader, Material Output node, Image Texture, Noise Texture, Texture Coordinate, Fresnel, Layer Weight, Light Path, Nodes introduction, Node Editors, Node Parts, Editing Nodes, Node Groups and EEVEE Limitations.
We could not confirm the exact editor-type menu path for turning another area into a Shader Editor, so we describe the Shading workspace only. We also could not confirm differences between Blender 4.x and 5.x for these editors.


