
To add a texture in Blender, give the object a material, open the Shader Editor, add an Image Texture node, click Open to load your image, and connect the node's Color output to the Base Color input of the Principled BSDF. The image then wraps the object using its UV map.
That covers a single color texture. A realistic surface usually needs more maps (roughness, normal, sometimes metallic), the right color space for each, and a UV map that fits. This guide shows how to add a texture in Blender step by step, how to apply a texture without UVs, how to scale and move it, and why a texture shows up gray, black or stretched. It follows the Blender 5.2 LTS manual.
How to add a texture in Blender: the basic steps
- Select the object. It needs a UV map for this method. If the mesh has none, see how to UV map in Blender.
- Create a material. Open the Material Properties tab in the Properties editor and click New. The manual says that without a material, the render shows a default gray even if a texture appears in the viewport.
- Open the Shading workspace. It gives you a Shader Editor showing the material's nodes. The Principled BSDF is the shader node you will connect textures to.
- Add an Image Texture node. Press Shift+A with the mouse over the Shader Editor, open Texture, and pick Image Texture.
- Load your image. Click Open on the node and choose a file. If you leave the node with no image, the manual warns the render is black.
- Connect it. Drag from the node's Color output to the Principled BSDF's Base Color input.
- Look at it. Press Z in the 3D Viewport and choose Material Preview or Rendered.
You should now see the picture on the surface. If the shape looks stretched, cut off or repeated, the cause is almost always the UV map, covered below. If you want to paint the texture yourself instead of loading one, read how to texture paint in Blender.
How to apply a texture in Blender: UV, box or generated
The Image Texture node has a Vector input that decides where the image lands on the surface. The manual says that if you leave it unconnected, the node uses the object's active UV map. That is the right default for most models. You have two other routes.
- Use the UVs (best). Unwrap the mesh so each face has a place in the image. Our guide to UV unwrapping in Blender covers seams and unwrap options. For a controlled result, add a Texture Coordinate node and connect its UV output, or use a UV Map node to pick a specific map.
- Quick test with Generated. The manual calls the Generated output of the Texture Coordinate node the quick way. It makes automatic coordinates from the mesh's undeformed bounding box. Good for a fast look, not for a final model.
- Box projection, no UVs. On the Image Texture node, set Projection to Box. It projects along the axis closest to the surface normal, and the Blend value softens the seams where the projections meet. Use it for rocks and rough ground that do not need exact placement.
The node's Projection list offers four modes: Flat (a unit square, made for UVs), Box, Sphere (planets and organic shapes) and Tube (a bottle label, for example). Pick the one that matches the shape of the object.
Image Texture node settings that matter
- Interpolation controls how the image is scaled. The options are Linear, Closest (no smoothing, useful for pixel art), Cubic (smoother) and Smart, which is for OSL in Cycles.
- Extension decides what happens outside the 0 to 1 image area: Repeat tiles it, Extend repeats the edge pixels, Clip makes it transparent, and Mirror flips each repeat.
- Color Space says how the file's values are read. The manual says to use Non-Color for data maps such as bump or alpha, and available options depend on the active OpenColorIO config.
- Alpha sets how the file's transparency is read.
- Outputs are Color (the RGB values) and Alpha (the transparency channel).
For a transparent texture such as a leaf or a decal, connect the Alpha output to the Principled BSDF's Alpha input. The manual says this is the usual setup.
How to texture in Blender with full PBR maps
One color image looks like a printed sticker. Real materials add maps that tell the shader how rough, shiny and bumpy the surface is. Add one Image Texture node per map and wire each to the matching Principled BSDF input. The manual describes the relevant sockets: Base Color, Metallic (0.0 is a dielectric, 1.0 a fully reflective metal), Roughness (0.0 is a sharp reflection, 1.0 is diffuse-like), Normal and Alpha.
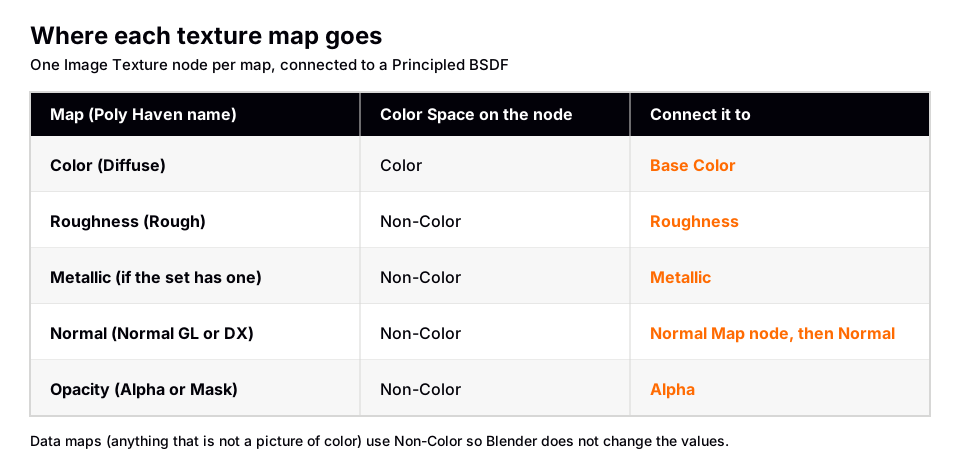
For the normal map, do not connect the image straight to the Normal socket. Add a Normal Map node, connect the image's Color to the Normal Map node's Color, and connect the node's output to the Principled BSDF Normal input. The manual says a tangent space normal map needs the image set to Non-Color, and the node's UV Map should match the UV map used for the image. Strength sets how strong the effect looks.
The fast way: Node Wrangler
Wiring five maps by hand is slow. The Node Wrangler add-on does it for you. Enable it in Preferences then Add-ons by searching for Node Wrangler. Then select the Principled BSDF node, press Shift+Ctrl+T (Add Principled Setup) and choose all your texture files at once. The manual says it adds the Image Texture nodes, loads the images, sets the appropriate color space, and connects them. It finds each texture's type from the file name, so keep the names that came with the download. The add-on only works in the Shader Editor.
Scale, tile and move the texture
If the texture looks too big, too small or sits in the wrong place, add a Mapping node between the coordinates and the image: Texture Coordinate (UV) to Mapping Vector, then Mapping Vector to the Image Texture Vector.
The Mapping node has Location, Rotation and Scale. Its Vector Type matters: Texture moves and scales the texture the way the numbers suggest, while Point acts like transforming a UV map, so scaling up makes the texture look smaller. To tile a small image across a large surface, scale up the coordinates and make sure Extension on the Image Texture node is Repeat.
Where to get textures to add
Poly Haven publishes its textures under CC0. Its license page says you can use them for any purpose, commercial work included, without credit. On a texture page we checked (Rocky Terrain 02) the maps listed were AO, AO/Rough/Metal, Diffuse, Displacement, Mask, Normal (DX), Normal (GL), Rough and Spec. Each came as EXR, JPG and PNG, in 1K, 2K, 4K and 8K. The page also offered Blend, glTF and MaterialX downloads.
Two practical notes from that list. First, the set includes both a DX and a GL normal map, and the page does not explain the difference. If your bumps look inverted when you light them from the side, try the other one. Second, Poly Haven's Blender add-on has a Fix Texture Scale button that sets the mapping scale from the texture's known dimensions and your mesh's surface area. For more sources, see free Blender textures.
Sources: license page · Blender add-on
Save or pack the image
Blender stores a link to the image file, not a copy of it. The manual gives two options: keep the image as a separate file, so you can swap it or edit it in another program, or pack it into the .blend file so the project stays in one piece. If you move a project to another computer and the textures go missing, the links broke. Pack the images, or keep them in a folder next to the .blend file.
Why your texture is gray, black or stretched
- Gray surface. No material on the object. Click New in the Material Properties tab.
- Black surface. The Image Texture node has no image loaded, or it is not connected to anything.
- Plain material look. The image node exists but is not connected to Base Color. If no texture node feeds the shader, the object renders with its plain material settings.
- Stretched or smeared image. The UVs are stretched or missing. Unwrap again or switch Projection to Box.
- The image shows once in a corner. Extension is set to Clip or the UVs only cover part of the image.
- Washed out or too dark data maps. A roughness, metallic or normal map is still on a color space meant for color images. Set it to Non-Color.
If you see the pattern in the viewport but cannot tell what you are doing wrong, work through Blender material basics first, since textures are only one input to a material.
Skip the node wiring with the Material & Lighting Vault
Image textures need UVs, map files and node wiring. If you want a good material fast, the Material & Lighting Vault takes a different route. It is a Blender 5.2+ extension with 1,690 procedural materials: 1,000 core materials in 32 categories plus 690 Pro. You find them in the Metalight tab in the N panel.
The materials work in Cycles and EEVEE and need no UVs. They use object coordinates by default, and a Use UV option exists if you prefer it. The materials total about 64 MB. There are also 67 weathering presets (rust, moss, snow, soot, cracks, edge wear) that work on any material, including the image-textured one you just built. That makes it a good pairing: texture the base, then weather it. The license covers personal and commercial use, with no redistribution. It is a tool, not a course.
If you would rather learn the full workflow in order, The Blender Launchpad has a stage on UV and PBR texturing, built from hand picked free YouTube lessons, and its bonuses include 1,000+ CC0 assets, HDRIs and textures that are free for commercial use.
Questions people also ask
How do I add a texture to an object in Blender?
Give the object a material, add an Image Texture node in the Shader Editor, load your image with Open, and connect Color to the Principled BSDF's Base Color. The object's UV map decides how the image is laid out.
How do I apply a texture in Blender without UV mapping?
Set the Image Texture node's Projection to Box. It projects along the axis closest to the surface normal, and the Blend value softens the seams. Sphere and Tube project the image around a ball or a cylinder instead.
How do I add a texture in Blender 3D that has a normal map?
Load the normal image in its own Image Texture node, set its Color Space to Non-Color, connect it to a Normal Map node, and connect that node to the Principled BSDF's Normal input.
Can Blender add all texture maps automatically?
Yes. Enable Node Wrangler, select the Principled BSDF node, press Shift+Ctrl+T, and pick all the map files. It adds, loads, color-spaces and connects the nodes using the file names.
How we checked this
We did not run Blender for this guide. We read these pages on November 4, 2026, and wrote only what they confirm:
- Blender Manual (5.2 LTS), read November 4, 2026: Image Texture node, Principled BSDF, Texture Coordinate node, Mapping node, Normal Map node, Applying an image to a mesh, UV texture spaces, Node Wrangler, Shader Editor and node editors.
- Poly Haven, read November 4, 2026: license page, the Rocky Terrain 02 texture page and the Blender add-on page.
We could not confirm the exact Properties editor labels for choosing an image directly from the Surface panel, so the steps use the Shader Editor. We also could not confirm differences between Blender 4.x and 5.x for these nodes.


