
To texture paint in Blender, give the mesh a UV map, switch to Texture Paint Mode, add a texture slot such as Base Color, pick a brush and paint straight onto the model. Blender projects each stroke through the UVs into an image, and that image is only kept if you save it.
This guide follows the Texture Paint section of the Blender Manual (5.2 LTS) and walks through setup, brushes, masks, and the usual reasons painting fails.
Sources: Texture Paint section of the Blender Manual
Before you paint: what texture painting needs
Texture painting writes into an image, and the image reaches the mesh through UVs. So two things must exist before the first stroke: a UV map, and an image to paint into. The manual states that the object must be unwrapped first, either with the normal unwrapping tools or with Add Simple UVs inside Texture Paint Mode. If no UV layers can be detected, Blender shows a warning.
A good unwrap matters more than any brush setting. Painted detail is spread across the image according to how big each island is, and overlapping islands paint on each other. If you have not made a map yet, start with how to UV map in Blender.
How to texture paint in Blender, step by step
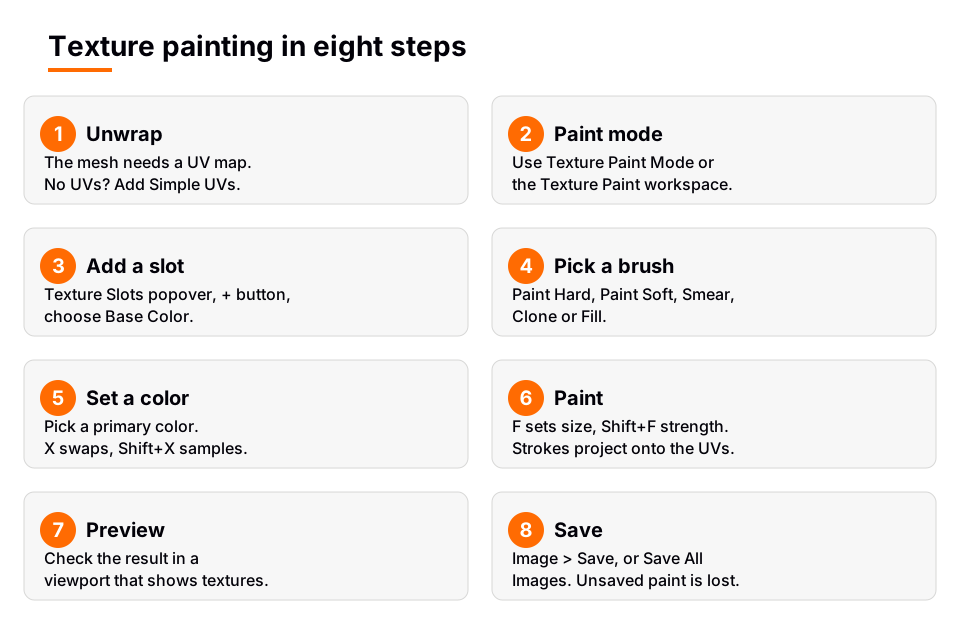
- Check the UVs. Select the mesh. If it has no UV map, Texture Paint Mode shows a "UV Map Needed" prompt with an Add Simple UVs button. That operator does a simple cube unwrap followed by a pack, and the manual still recommends a custom unwrap for real work.
- Enter Texture Paint Mode. Either open the Texture Paint workspace, where the 3D Viewport is in Texture Paint Mode and the Image Editor is already in Paint mode, or pick Texture Paint Mode from the mode selector in the 3D Viewport header. Your cursor becomes a brush.
- Add a texture slot. Open the Texture Slots pop-over in the 3D Viewport header. In Material mode, the list shows the Image Texture nodes found in the material. With no textures it reads "No Textures". Use the add button next to the list and choose a type: Base Color, Specular, Roughness, Metallic, Normal, Bump or Displacement. A dialog asks for a Name and image size (the default in Blender's Python API is 1024 by 1024), a fill Color, and options such as Alpha and 32-bit Float.
- Pick a brush. Choose Paint Hard or Paint Soft from the brush assets for a normal color brush. Other brushes are covered in the next section.
- Set the color. Use the color picker for the primary color. Press X to swap primary and secondary colors, or Shift+X to sample a color under the cursor. Holding Ctrl while painting temporarily uses the secondary color.
- Paint. Press F and drag to change brush size, or Shift+F to change strength. For painting brushes, Strength is the maximum opacity of a stroke. Drag over the model and the stroke is projected onto the UVs.
- Preview the result. The manual suggests two areas side by side: a 3D Viewport with a shading mode that shows textures, and an Image Editor with the same image loaded. Changes in one show up in the other.
- Save the image. Painting does not save the file. An asterisk next to the Image menu in the Image Editor means unsaved changes. Use Image > Save, Save As, or Save All Images in the Texture Slots pop-over. If you pack the image into the .blend file instead, you do not need a separate file.
After step 3 the model should show your fill color. After step 6 it should show paint exactly where you stroked, even across several faces, as long as those faces have their own area of the UV map.
A tip from the manual: Texture Paint is fastest in the 3D Viewport when the image is square and its side is a power of two, such as 512, 1024 or 2048 pixels.
Brushes and brush types
The Brushes page lists the brush types for Texture Paint and the brushes in the Essentials asset library that use them.
| Brush type | What it does | Notes |
|---|---|---|
| Draw | Paints a swath of color or erases | Paint Hard, Paint Soft, the Pressure variants, Erase brushes |
| Soften | Blurs, or sharpens when set to Sharpen | Blur brush; Kernel Radius is 2D only |
| Smear | Drags the colors under the cursor along your stroke | Like a smudge tool |
| Clone | Copies color from another place or image | Ctrl+LMB sets the clone cursor in 3D painting |
| Fill | Fills the brush color or a gradient | Fills similar adjacent pixels; Fill Threshold is 2D only |
| Mask | Paints grayscale values into a mask texture | Masked areas are not affected by other brushes |
Strokes have a method too. The Stroke panel's Stroke Method includes Dots, Drag Dot, Space, Airbrush, Anchored, Line and Curve, and Alt+E is its shortcut. Use Space with a Spacing value for evenly spaced dabs, or Line for straight lines. The Falloff panel controls how brush strength fades from center to edge. Texture Paint Mode always uses Projected falloff.
The brush can also carry a texture. In paint modes, a brush texture acts as a color source. Set its Mapping to View Plane, Area Plane, Tiled, 3D, Random or Stencil. Stencil projects the image from camera space, which suits stamping a logo or a photo onto a model, and you move it with RMB, scale it with Shift+RMB and rotate it with Ctrl+RMB.
Sources: Brushes page
Paint more than color: roughness, metallic and bump
The slot types are what make Blender texture painting useful beyond flat color. Add a Roughness slot and a Metallic slot next to Base Color, and each gets its own image and its own entry in the slot list. Select a slot in the list to paint it. Because these maps hold data rather than color, paint them with grays.
If you want to understand what each map does in a material, read our plain English guide to PBR textures. Painting is also how you add dirt, wear and hand placed variation that tiling textures cannot give you. The manual makes the same point about image textures in general: a car would have scratches in a few sensible places, not randomly all over its body.
Masks: limit where paint lands
Three masking tools help keep paint where you want it.
- Stencil Mask. In the Mask pop-over, choose a Stencil Image, a UV Layer for it, and optionally Invert. Masked surfaces are not changed by painting. The checkbox in the header turns it off.
- Mask brush. Paints grayscale values into the mask. A value of 0 means unmasked and 1 fully masked, and holding Ctrl inverts the painted value.
- Cavity Mask. Masks the brush where there is a cavity or a hill on the mesh, using a vertex based algorithm.
The manual also points to the face selection mask as a simpler alternative for limiting paint to chosen faces.
Painting in the Image Editor
You can also paint in 2D. In the Image Editor, switch the mode to Paint, and strokes on the flat canvas are wrapped around the mesh through the UVs. Changes appear in the 3D Viewport right away. The 2D view gives you access to some options that apply only to 2D painting, such as Anti-Aliasing for pixel art, the Fill threshold and the Tiling option, which wraps a stroke to the opposite side of the image. That is handy when the goal is a tileable texture rather than a painted model.
If you prefer another painting program, the manual's route is to edit the texture externally, for example in GIMP or Krita, then reload it in Blender's Image Editor. The Texture Paint External panel also has Quick Edit, which sends a snapshot of the viewport to an external editor, and Apply, which projects the edited image back onto the object.
Why texture painting fails or looks wrong
- Nothing happens or "UV Map Needed". The mesh has no UV map. Unwrap it or use Add Simple UVs.
- Paint shows in the viewport but not in the render. The manual says UV painting without a material renders default gray. The image must be used by a material through an Image Texture node. When you paint through a slot, check the Shader Editor and make sure the image feeds the shader input you want.
- Paint is lost after you close the file. The image was never saved or packed. Look for the asterisk and use Save All Images.
- A stroke appears in two places. Overlapping UVs. The manual says overlapping UVs are generally not supported, which becomes a problem when one stroke paints several faces that share a texture. See overlapping UVs in Blender.
- You cannot paint a face in perspective view. A face partially behind the view cannot be painted. Zoom out or switch to an orthographic view.
- Painting fails on the side of a low poly cube. Normals facing away from the view can block strokes. The manual's workaround is to disable Normal Falloff (named Front-Face Falloff in newer panels) in the falloff settings.
- Visible lines at UV seams. Turn on Bleed in the Options panel, which extends paint beyond the island bounds, like bleed for baking.
- Paint goes through to hidden parts. Under Options, Occlude limits painting to exposed pixels, and Backface Culling limits it to the front side of faces.
- Paint looks transparent or gets erased. Check the Blend mode. Add Alpha and Erase Alpha change opacity, and the Image Editor needs its Display Channels set to Color & Alpha to show it.
When you want ready made surfaces instead of painting from scratch, see our list of free textures for Blender, and how to add a texture in Blender for the node setup.
Learn this in order with The Blender Launchpad
Texture painting only feels easy once modeling, UVs and shaders are in place. The Blender Launchpad is a members app with a roadmap of hand picked, free YouTube lessons in six stages, and the third stage covers UV and PBR texturing, so painting arrives after you can unwrap and read a material.
Stage 1 assumes you have never opened Blender. The Launchpad is a curated playbook rather than original video lessons, and it includes 1,000+ CC0 assets, HDRIs and textures that are free for commercial use. It is one payment with no subscription.
Questions people also ask
How do I texture paint in Blender?
Unwrap the mesh, switch to Texture Paint Mode, add a texture slot (Base Color for plain color), pick a brush such as Paint Hard and paint on the model. Then save the image with Image > Save.
Do I need UVs to texture paint in Blender?
Yes. Texture painting paints through the UV map into an image. If the object has none, Blender shows a warning and offers Add Simple UVs, though a custom unwrap is recommended.
Where is the texture paint workspace?
It is a tab at the top of the window. It puts the 3D Viewport in Texture Paint Mode and the Image Editor in Paint mode. You can also pick Texture Paint Mode from the mode selector in the 3D Viewport header.
How do I save a texture painted in Blender?
Use Image > Save or Save As in the Image Editor, or Save All Images in the Texture Slots pop-over. Painted pixels live in the image, which Blender does not save automatically.
How we checked this
We read these Blender Manual (5.2 LTS) pages on November 4, 2026: Texture Paint introduction, Texture Slots, Brushes (Texture Paint), Mask, Options, Tiling, Brush Settings, Stroke, Falloff, Texture and Texture Mask, and Using UV Maps. We also read the Blender 5.2 Python API entry for the Add Texture Paint Slot operator and the Blender user interface source for the Texture Slots panel. We did not run Blender while writing this, so panel positions can differ slightly in your interface.


