
To UV map in Blender, open the UV Editing workspace, enter Edit Mode, mark seams where the surface should be cut, select the faces and press U to choose an unwrap method. Blender flattens the mesh into islands in the UV Editor, and you then check the stretch, scale the islands and pack them into the square.
This guide covers the whole workflow in the current Blender Manual (5.2 LTS), including which unwrap method to pick, where seams go, how to find stretching and how to fix it.
Sources: Blender Manual
What UV mapping is
Blender UV mapping is the step that tells every face of a 3D mesh which part of a 2D image it should show. The letters U and V name the horizontal and vertical axes of that flat image, chosen so they are not confused with X and Y in 3D space.
The manual's own analogy is a cardboard box: cut along its edges, lay it flat on a table, and you have a UV layout. Each cut is a seam, each flat piece is an island, and the faces in the layout decide which pixels of a texture land on which faces of the model. UV mapping in Blender is also what you need before you add an image texture or paint on a model.
New meshes are not created with UVs by default, so you create the map yourself. Simple objects can use a built-in projection, but complex meshes need an actual unwrap.
How to UV map in Blender, step by step
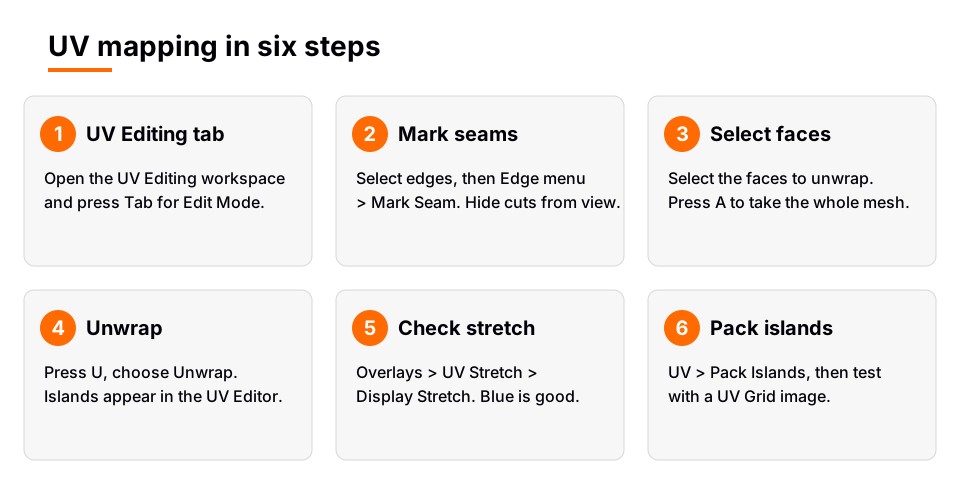
- Open the UV Editing workspace. Click the UV Editing tab at the top of the window. One area becomes the UV Editor and the other the 3D Viewport. The UV Editor is empty until you unwrap.
- Enter Edit Mode. Select your mesh and press Tab. All unwrapping happens in Edit Mode, and you can be in vertex, edge or face selection mode (1, 2, 3).
- Mark seams. Switch to edge select, pick the edges where the surface should be cut, and use Edge > Mark Seam. The manual gives Ctrl+E for the seam commands.
- Select the faces to unwrap. Press A to select everything, or select only a region and unwrap it separately.
- Unwrap. Press U in the 3D Viewport and choose Unwrap, or use the UV menu. Islands appear in the UV Editor, one per seamed piece.
- Adjust Last Operation. Open the Adjust Last Operation panel to change the Method and the Margin (described below).
- Check for stretch. In the UV Editor, open the Overlays pop-over and turn on Display Stretch under UV Stretch. Blue means little distortion and red means a lot.
- Pack the islands. In the UV Editor, choose UV > Pack Islands so the islands fill the unit square with a margin between them.
After step 5 you should see flat shapes that look like the mesh cut open along your seams. If you see one huge blob, or a single tangled shape, your seams probably do not split the mesh into flat enough pieces. Go back to step 3.
Two details are worth knowing. First, the Sync Selection option, which the 5.2 manual describes as on by default, shares selection between the 3D Viewport and the UV Editor and shows all faces in the editor at all times. If you turn it off, the editor shows only the UVs of faces selected in the 3D Viewport. Second, the unwrap overwrites any UV coordinates the selected faces already had.
Sources: Sync Selection
Choose an unwrap method
Everything on the UV menu in the 3D Viewport (U) is a different way of producing the map. The UV Operators page describes each one.
| Method | What it does | Use it for |
|---|---|---|
| Unwrap | Cuts along seams, flattens, lays out the islands | Organic shapes and anything you seamed by hand |
| Smart UV Project | Splits faces at sharp edges by Angle Limit, projects each group | Mechanical objects and architecture |
| Cube, Cylinder, Sphere Projection | Projects onto a virtual shape, then flattens it | Boxes, tubes, eyes and planets |
| Project from View | Takes a picture of the mesh from the current view | Matching a photo of a real object |
| Follow Active Quads | Extends the active quad across neighboring quads | Strips and grids of quads |
| Lightmap Pack | Places each face separately to use the whole texture | Baked lighting, not hand painting |
For the plain Unwrap, the Method option offers Angle Based (Angle Based Flattening, a good 2D representation of a mesh), Conformal (Least Squares Conformal Mapping, usually less accurate but better on simpler objects) and Minimum Stretch (which tries to reduce distortion in both areas and angles). Angle Based is the sensible starting point.
Smart UV Project is the quick option when you do not want to place seams. A low Angle Limit makes many small islands with little distortion, and a high limit makes a few large islands with more distortion. The cost is a lot of seams, which you will see in the texture.
Other options appear in the Adjust Last Operation panel. Fill Holes virtually fills holes so overlaps are avoided. Use Subdivision Surface takes the vertex positions calculated by the Subdivision Surface modifier. Correct Aspect scales the UVs for a non-square image, but only if the mesh has a material with an Image Texture node selected in the Shader Editor.
Sources: UV Operators page
Where to put seams
The Seams page compares seams to peeling an orange: you make cuts, peel the skin off and flatten it with some stretching. More seams mean less stretching but more edges to hide in the texture, so aim for as few seams as give acceptable stretch, and place them where nobody looks.
- Hide them. Cut along the back, underside or inside of the model. The manual's cylinder example puts the seam on the back-most edge.
- Cut along sharp corners. On hard surface forms a seam on a hard edge splits the model into flat pieces that unwrap with little distortion.
- Seam along the mirror axis on symmetrical models so both halves can share the same texture space.
- Check continuity. In face select mode, select one face and use Select Linked. If faces outside your intended region are selected, the seam has a gap. Seams do not have to be continuous, as long as they release the regions that would stretch.
To remove a seam, select the edge and use Edge > Clear Seam. If a mesh was already unwrapped by other means, UV > Seams from Islands in the UV Editor adds seams along the existing island boundaries.
For a deeper walk through a full model, see our guide to how to UV unwrap in Blender.
Sources: Seams page
Fix stretching and wasted space
A first unwrap is rarely finished. The manual's editing goals are to stitch pieces back together, minimize wasted space, enlarge areas that need detail and fix stretched faces. These tools are all in the UV menu of the UV Editor.
- Minimize Stretch reduces the difference between angles in 3D and in UV space. It works like the Relax tool but with a different algorithm.
- Average Island Scale scales each island so they all share about the same scale, which gives an even pixel density across the model.
- Pin (P) locks selected UVs so they do not move when you unwrap again. Alt+P unpins.
- Stitch (Alt+V) joins selected UVs that share vertices, with an optional Limit Distance.
- Pack Islands scales, moves and optionally rotates islands to fill the unit square. Its options include Shape Method, Rotate, Margin Method and Margin.
For Pack Islands, the manual notes that the Bounding Box shape method and the Add margin method are the fastest, and that Exact Shape and the Fraction margin method are slower. Keeping Rotate on usually improves how tightly islands fit. If you need a margin of exactly one pixel on a 1024 pixel texture, set the Margin Method to Fraction and the margin to 1/1024.
Test the map with a UV grid
A checker or grid texture shows stretching faster than any overlay. In the UV Editor header, use New in the image data-block menu and set Generated Type to UV Grid. Then use that image on a material through an Image Texture node. Squares should look square and the same size everywhere on the model. Squares that are bigger or smaller in one region tell you that region has the wrong scale.
Rendering needs a material. The manual warns that without one you get a default gray, and without an image loaded you get black. See Using UV Maps. Our image texture guide covers the node setup.
Sources: Using UV Maps
Multiple UV maps and the UV Maps panel
A mesh can hold more than one UV map, and each can give the same vertex different coordinates. The usual reason is one map for textures and another for prebaked lighting. You add and remove maps in the UV Maps panel, which sits in the Data tab of the Properties Editor for a mesh object, and you choose which one the UV Editor shows with the Active UV Map Layer menu in its header.
To use a particular map in a shader, the manual says to use the Texture Coordinate node (UV output) or the UV Map node and select the map by name, "UVMap" by default. To copy a map from another mesh, use Copy UV Maps if topology is identical, or Transfer Mesh Data if it only has a similar surface. Once the map is ready you can export the UV layout to paint in another program.
Common problems
- Nothing in the UV Editor. You are not in Edit Mode, nothing is selected with Sync Selection off, or the mesh has no UV map yet. Read UV editing not showing in Edit Mode.
- Islands overlap. Cube projection places its sides overlapping, and a bad unwrap can too. Overlap is fine for repeating tiling textures, but not for baking and painting, since the manual says overlapping UVs are generally not supported there. See overlapping UVs in Blender.
- Texture looks stretched on one part. Check Display Stretch, add a seam through the stretched region and unwrap again, or use Minimize Stretch.
- Edited the mesh after unwrapping. Blender adds UVs for new faces, but the manual says you may need to map or edit them yourself. Finish the geometry before you unwrap.
Skip the UV work with the Material & Lighting Vault
You do not always need a UV map. If you want a surface that looks like rust, painted metal or concrete without hand placing seams, procedural materials built on object coordinates ignore the UV layout altogether.
The Material & Lighting Vault is a Blender 5.2+ extension (the Metalight tab in the N panel) with 1,690 procedural materials that work in Cycles and EEVEE. They need no UVs because they use object coordinates by default, and a Use UV option exists when you want a material to follow your map. There are also 67 weathering presets that work on any material, including your own. It is a tool rather than a course, and for those surfaces there is nothing to unwrap.
If you want to learn UV unwrapping and PBR texturing in order, the stage on UV and PBR texturing in The Blender Launchpad course points you to a hand picked set of free YouTube lessons, after a first stage that assumes you have never opened Blender.
Questions people also ask
What is UV mapping in Blender?
UV mapping is the process of laying out the faces of a mesh on a flat 2D grid so an image texture knows which pixels belong to which face. U is the horizontal axis and V is the vertical axis of that grid.
What is the shortcut to UV unwrap in Blender?
Select faces in Edit Mode and press U to open the UV mapping menu, then choose Unwrap. Marking seams comes first, using Edge > Mark Seam.
Do I need to mark seams before unwrapping?
Not always. Unwrap uses your seams if you have set them, and Smart UV Project cuts at sharp edges by itself. For organic or complex models, seams give you control over where the cuts and any stretching land.
How do I see my UV map in Blender?
Switch to the UV Editing workspace, enter Edit Mode and select the faces. The UV Editor shows the layout of the active UV map, which you can change in the editor header.
Can a model have more than one UV map?
Yes. Add and remove maps in the UV Maps panel in the Data tab of the Properties Editor. Pick the one to edit with the Active UV Map Layer menu.
How we checked this
We read these pages of the Blender Manual (5.2 LTS) on November 4, 2026: UVs, Unwrapping introduction, Seams, UV Operators (Editing UVs), Layout Workflow, Using UV Maps, UV Editor introduction, UV Overlays, Selecting UVs and Object Data. We did not run Blender while writing this, so button positions can differ slightly in your interface.


