
If UV editing is not showing in Edit Mode, the UV Editor is almost always empty for one of a few plain reasons: the object is not in Edit Mode, the mesh has no UV map yet, Sync Selection is off and no faces are selected, or the faces are hidden. Work down the checklist below and the UVs usually come back in a minute or two.
The steps follow the Blender 5.2 LTS manual. Where a default matters, we say what the 5.2 manual states and where to look, so you can check your own version.
UV editing not showing in Edit Mode: the checklist
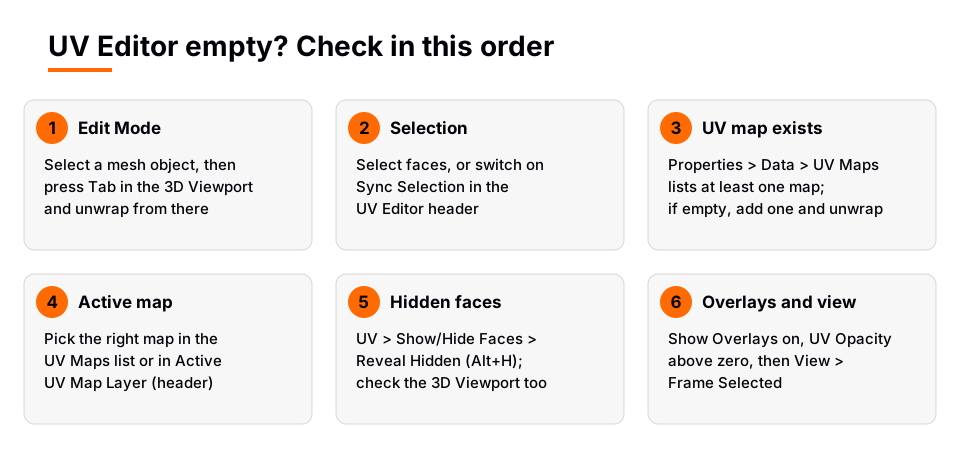
The sections below take each check in turn and say what you should see once it is fixed.
1. Enter Edit Mode on the right object
The manual states that all unwrapping is done in Edit Mode in the 3D Viewport, and that the UV Editor then shows the resulting UV islands. So start there.
- Click the mesh object in the 3D Viewport or the Outliner so it is selected and active.
- Move the mouse over the 3D Viewport and press Tab. The header should now say Edit Mode.
- Look at the UV Editor. If faces are selected you should see their UV islands.
The manual suggests the UV Editing workspace for this work. It is one of the workspace tabs at the top of the window, and it gives you a UV Editor beside a 3D Viewport. If you are in another workspace, either switch to it or change one area to the UV Editor.
The manual puts a mesh object's UV maps in the Properties editor, on the Data tab, in the UV Maps panel. If you cannot find that panel, check that the selected object is a mesh.
2. Select faces, or turn on Sync Selection
The UV Editor header has a Sync Selection button. It controls what the editor displays:
- On. The manual says the UV Editor and the 3D Viewport share one selection, and that all faces are visible in the UV Editor at all times, because UV visibility follows mesh selection. For the 5.2 manual, this is the default.
- Off. Only the UVs of the faces currently selected in the 3D Viewport are shown. Selections in the UV Editor become independent of the 3D Viewport.
So with Sync Selection off and nothing selected, the editor is empty even though the UVs exist. The fix has two forms:
- In the 3D Viewport, select the faces. In face select mode, A selects everything.
- Or click Sync Selection in the UV Editor header so every face shows no matter what is selected.
The manual's layout workflow describes exactly this trap. After you unwrap one piece, such as an ear, the UV Editor shows only that piece. The UV coordinates for the rest of the mesh are still there, hidden, and you get them back by selecting those faces again or enabling Sync Selection.
One side effect to know: the manual says Rip Move UV is not compatible with Sync Selection, so turn it off before using that tool.
3. Check that the mesh has a UV map
The manual says meshes are not created with UVs by default, so a new mesh can have nothing to show. Open Properties, then the Data tab, then the UV Maps panel.
- The list has an entry. A UV map exists. Go on to check 4.
- The list is empty. There is no UV map. Click Add UV Map (the plus button), which the manual says creates a new one if the list is empty. Then select the faces in Edit Mode and press U to unwrap, so the map holds real coordinates. The full method is in how to UV unwrap in Blender.
For primitives you add yourself, the manual lists a Generate UVs option in the Adjust Last Operation panel. It generates a default UV unwrapping of the new geometry in the first UV layer, and adds that layer if needed. It is worth switching on when you add a shape you plan to texture.
4. Pick the right UV map
One mesh can have several UV maps. The manual says that after you select a map in the UV Maps list, you can view and edit it in the UV Editor, and the UV Editor header has an Active UV Map Layer menu for the same choice. If you made a second map for baking or a lightmap, you may be looking at a different one than you expect.
Do not confuse this with the Active Render button in the same panel. That marks the default map for rendering, used by the Texture Coordinate node, the UV Map node when no map is named, and the UV pass. It is not what the UV Editor displays.
5. Reveal hidden faces
Faces that are hidden are not shown. In the UV Editor the manual lists UV, then Show/Hide Faces, with Reveal Hidden (Alt+H), Hide Selected (H) and Hide Unselected (Shift+H). If part of your model is missing from the UV Editor, run Reveal Hidden, then check that those faces are not hidden in the 3D Viewport either.
6. Check the UV overlays and the view
Sometimes the UVs are there but you cannot see them.
- Show Overlays. The button in the UV Editor header turns all UV overlays off. Make sure it is on, then open the drop-down next to it.
- UV Opacity (Edit Mode). In the Geometry section of the popover, this sets the opacity of edges and faces. Raise it if the UVs look faint or absent.
- Display As (Edit Mode). It sets how edges draw: Outline, Dash, Black or White. Change it if the edges blend into your image.
- Faces (Edit Mode). It displays the faces over the image.
- View. Use View, then Frame Selected (NumpadPeriod) to bring the selected UVs into view. You can also pan with the middle mouse button and zoom with the mouse wheel. UVs can sit far outside the image area, or be very small.
The 5.2 manual also lists Display UVs (Object Mode) in the same overlay popover: it shows the active UV map as an overlay in the UV Editor. That is a display option. The editing tools in the manual all list Edit Mode, so you still enter Edit Mode to change UVs.
Learn UV mapping in order with The Blender Launchpad
Empty-editor problems usually come from one gap in how the pieces fit together: mode, selection, UV map, then image. Learning those in the right order saves a lot of guessing.
The Blender Launchpad is a members app with a roadmap of hand picked, free YouTube lessons in six stages. One stage covers UV and PBR texturing, and the first stage assumes you have never opened Blender. It is a curated playbook, not original video lessons. Once your UVs show up, you can follow the lessons in order and build from there. It is one payment with no subscription.
For the next steps after the UVs appear, read how to UV map in Blender, the explainer on what a UV map is, and how to export a UV map.
Questions people also ask
Why is my UV Editor empty in Edit Mode?
Most often the mesh has no UV map, Sync Selection is off with no faces selected, or the faces are hidden. Check the UV Maps panel on the Data tab first, then the Sync Selection button.
Why does the UV Editor show only some of my faces?
With Sync Selection off, the editor shows only the UVs of faces selected in the 3D Viewport. Select more faces, or turn Sync Selection on to show them all.
Why is there nothing in the UV Editor on a new mesh?
The manual says meshes are not created with UVs by default. Add a UV map in the UV Maps panel and unwrap with U, or use the Generate UVs option when you add a primitive.
Can I see UVs outside Edit Mode?
The 5.2 manual lists a Display UVs (Object Mode) overlay that shows the active UV map in the UV Editor. Editing the UVs still happens in Edit Mode.
How do I bring back hidden UVs?
In the UV Editor choose UV, Show/Hide Faces, Reveal Hidden, or press Alt+H. Also check that the faces are not hidden in the 3D Viewport.
How we checked this
We read these pages of the Blender Manual 5.2 LTS on November 4, 2026. We did not run Blender for this article, so we could not see how the UV Editor looks in each failing case on screen.
- UV Editor: Introduction
- UV Editor: Selecting UVs (Sync Selection)
- UV Editor: Overlays and Navigating
- UVs: Unwrapping, Introduction
- UVs and Texture Space (UV Maps panel)
- Editing UVs and Layout Workflow
- Mesh primitives (Generate UVs)
The manual does not say whether Sync Selection was on or off by default in older Blender versions, so we left that out. We also did not find a manual page for hiding faces in the 3D Viewport, so we only name the UV Editor's own Show/Hide Faces menu.


