
To transfer UV maps in Blender, select the target objects, make the source object active, and in Object Mode choose Object, Link/Transfer Data, Copy UV Maps if both meshes have the same topology and face order. If the surface is similar but the topology is different, use Transfer Mesh Data or the Data Transfer modifier with the UVs data type instead.
This guide shows each method step by step, the mapping options that decide how UVs are matched, and the reasons a transfer fails. It follows the Blender 5.2 LTS manual.
Which method to use to copy a UV map
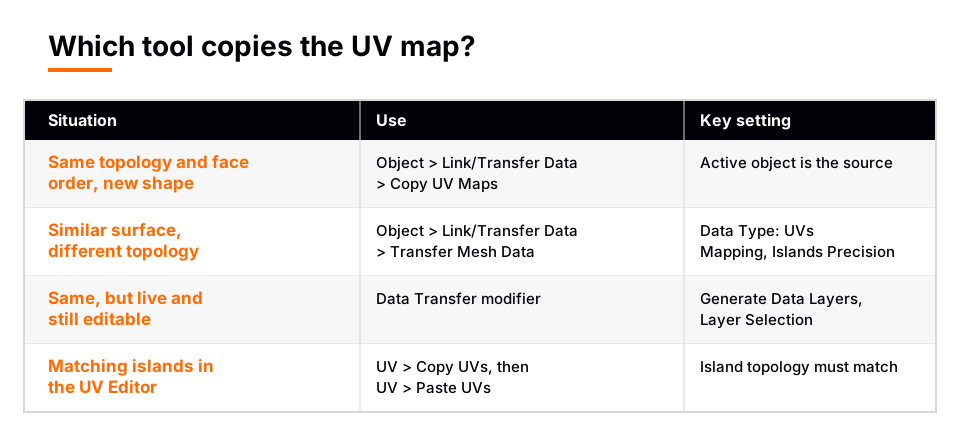
The manual's layout workflow gives the rule. If the meshes have the exact same topology and only differ in vertex positions, use Copy UV Maps. If they have approximately the same surface but different topology, use Transfer Mesh Data. The modifier does the same job as the Transfer Mesh Data operator, but stays editable.
Copy UV Maps: same topology, same face order
- Enter Object Mode. This operator works with objects, not in Edit Mode.
- Select the destination objects, then select the source object last so it is the active one.
- Open the menu. Choose Object, Link/Transfer Data, Copy UV Maps. The shortcut for the Link/Transfer Data menu is Ctrl+L.
- Check the result. Select a destination object, enter Edit Mode and look at the UV Editor. It should show the same layout as the source.
According to the manual, this replaces the active UV map of each selected mesh object with the active UV map of the active object, and if a selected object has no UV maps, one is created. All objects must have matching geometry and face order. You can fix the face order with Sort Elements, but even then the manual says the operator is really only useful if the destination is a deformed copy of the source. For anything else, use Transfer Mesh Data.
Transfer Mesh Data: similar surface, different topology
This operator copies a type of data from the active mesh to the selected meshes. For each element in each destination mesh, it finds one or more matching elements in the source and interpolates between them.
- Make the meshes overlap. The source and destination should sit on top of each other in world space. If they do not, enable Auto Transform in the options, or turn off Object Transform. The manual says that overlapping them by hand may give better results than Auto Transform.
- Select the destinations in Object Mode, with the source mesh active.
- Choose Object, Link/Transfer Data, Transfer Mesh Data.
- Open the Adjust Last Operation panel. Set Data Type to the UVs option, which the manual groups with the face corner data.
- Turn on Create Data, which adds any missing data layers on the destination meshes, so a destination without a UV map gets one.
- Pick a Mapping (below) and adjust until the result in the UV Editor looks right.
If you are editing several settings on a heavy mesh, enable Freeze Operator. It prevents changes to the settings from re-running the transfer each time.
Mapping options for UVs
UVs are face corner data. The manual defines a face corner as a vertex in the context of a face, so one 3D vertex can have several UV vertices, one per face. These are the face corner mappings:
| Mapping | What it does |
|---|---|
| Topology | Matches elements by index. Needs the same number of elements in the same order. Best for a deformed copy. |
| Nearest Corner and Best Matching Normal | Uses the nearest source corner with the most similar split normal. |
| Nearest Corner and Best Matching Face Normal | Uses the nearest source corner with the most similar face normal. |
| Nearest Corner of Nearest Face | Uses the nearest source corner on the nearest source face. |
| Nearest Face Interpolated | Finds the nearest point on the nearest source face, then interpolates between that face's corners. |
| Projected Face Interpolated | Projects the destination corner along its normal onto a source face, then interpolates. |
The three Nearest Corner mappings are one-to-one: each destination corner takes a single source corner. The two Face Interpolated mappings blend several source corners. Topology ignores position and matches by index. The manual does not name a best option, so try one, check the UV Editor, and change it if the islands look wrong.
Other options that matter
- Islands Precision. It prevents a destination face from receiving UV coordinates from disparate source UV islands. At 0.0 there is no island handling. The manual says small values like 0.02 are typically enough, but going from a very high-poly source to a very low-poly destination may need a much higher value.
- Max Distance and Only Neighbor Geometry. Source elements further away than the maximum distance are not considered matches, which is useful when part of the surface should not receive UVs.
- Source Layers Selection and Destination Layers Matching. They choose which source UV map is copied and how it finds the matching destination map, by name or by order.
The Data Transfer modifier for a live transfer
The Data Transfer modifier works like the operator but on one object, and you can change settings at any time. The manual's usage steps:
- Add a Data Transfer modifier to the destination object, from the Modifiers tab in the Properties editor.
- Choose the Source mesh object.
- If the source and the modified mesh are not overlapping in world space, uncheck Object Transform (the axes icon next to the source).
- Turn on the UVs data type among the data type toggle buttons.
- Pick the Mapping from the same list as above.
- If you only want one UV map, choose it in Layer Selection. If the destination lacks a UV map, click Generate Data Layers.
The manual says the modifier does not generate missing layers by itself, so click that button or add the layers yourself, since the transfer may not work otherwise. Layers added this way stay behind when you remove the modifier. When you are happy with the result, apply the modifier so the UVs become part of the mesh. It also has Layer Mapping (by name or by order) and the same Islands Precision setting.
Other ways to copy UVs
- Copy UVs and Paste UVs. In the UV Editor, UV, Copy UVs (Ctrl+C) copies the topology and UV coordinates of each selected island into a clipboard, and Paste UVs (Ctrl+V) pastes onto selected islands whose topology matches. The manual says the clipboard is internal and not shared between instances of Blender, and that you may want to use the Rip tool or UV, Split, Selection before pasting.
- Copy Mirrored UV Coordinates. Under UV in the UV Editor, it copies UVs from one side of a symmetrical mesh to the mirrored side, only for selected vertices. You set the Mesh Axis, the UV Axis and a Precision tolerance.
- Link Object Data. In the same Link/Transfer Data menu, it replaces the object data of the selected objects with that of the active one. The objects then share one mesh and shape, so it is only suitable for identical copies.
When the UV transfer does not work
- The source is not active. The active object is the source. Select the destinations first and the source last.
- The source has no UV map. Check the UV Maps panel on the Data tab. Nothing can be copied from a mesh with none. See how to UV unwrap in Blender.
- The destination has no UV layer. Turn on Create Data in the operator, or click Generate Data Layers on the modifier.
- The objects are far apart. Move them to overlap, or use Auto Transform or turn off Object Transform.
- The topology does not match. Copy UV Maps and the Topology mapping both need matching geometry and order. Switch to a Nearest or Projected mapping.
- Islands look smeared. Raise Islands Precision from 0.0.
- It copied the wrong map. Check the Source Layers Selection and Destination Layers Matching, and which UV map is active on each object.
After a transfer, the UV Editor may be empty if nothing is selected and Sync Selection is off. See UV editing not showing in Edit Mode. If the transferred islands overlap, read overlapping UVs in Blender. For the basics of the maps themselves, see what a UV map is in Blender.
Learn UV mapping in order with The Blender Launchpad
Transferring UVs is a shortcut, and it works best when the original unwrap was good. That means knowing how seams, islands and packing fit together before you copy them across.
The Blender Launchpad is a members app with a roadmap of hand picked, free YouTube lessons in six stages. One stage is UV and PBR texturing, and the first stage assumes you have never opened Blender. It is a curated playbook, not original video lessons, so you follow the best free material in a sensible order. It is one payment with no subscription. If you are starting from a plain mesh, begin with how to UV map in Blender.
Questions people also ask
How do I copy UVs from one object to another in Blender?
In Object Mode, select the target objects, make the source active, then choose Object, Link/Transfer Data, Copy UV Maps. It needs matching topology and face order.
How do I transfer UVs between objects with different topology?
Use Object, Link/Transfer Data, Transfer Mesh Data with the UVs data type, or add a Data Transfer modifier. Overlap the meshes, enable Create Data, and choose a mapping.
What does Islands Precision do?
It stops a destination face from getting UV coordinates from different source islands. At 0.0 there is no island handling, and the manual says values like 0.02 are typically enough.
Why does the Data Transfer modifier give no UVs?
The destination may lack a UV layer. Click Generate Data Layers, because the modifier does not add missing layers by itself. Also check that the source is set and that the objects overlap or Object Transform is off.
Can I copy UVs inside the UV Editor?
Yes. Select islands and use UV, Copy UVs, then select islands with matching topology and use UV, Paste UVs. The clipboard works only inside the same Blender instance.
How we checked this
We read these pages of the Blender Manual 5.2 LTS on November 4, 2026. We did not run Blender for this article, so we could not test how each mapping behaves on a real model.
- Link/Transfer Data (Copy UV Maps)
- Transfer Mesh Data
- Data Transfer modifier
- Layout Workflow (Transferring UV Maps)
- Editing UVs (Copy UVs, Paste UVs, Copy Mirrored UV Coordinates)
The manual does not name a best mapping for UVs, so we do not recommend one. We also left out the exact position of the UVs toggle in the operator's Data Type list, which the manual shows only as an image.


