
To do a Blender UV unwrap, enter Edit Mode with Tab, select the faces, mark seams on the edges where the mesh should be cut with Ctrl+E, then press U and choose an unwrap method. Blender cuts the mesh along the seams, flattens it, and shows the result as UV islands in the UV Editor.
That is the whole idea, and the rest of this guide is the detail that makes it work on real models: which method to pick, where to put seams, how to tell a good unwrap from a bad one, and what to do when the UV Editor is empty, stretched or overlapping. Everything here follows the Blender 5.2 LTS manual.
What UV unwrapping does
A UV map says which part of a 2D image each face of your mesh uses. The manual explains it with a cardboard box: cut along the edges, spread the box flat on a table, and you have the map. U is the horizontal direction and V is the vertical one, named that way to avoid confusion with the X and Y axes of 3D space.
Every UV point matches a vertex, every line matches an edge, and every UV face matches a mesh face. By default, meshes are not created with UVs, so you map the faces first and edit them after. If you only need a procedural material, you can skip this. If you use a photo texture, paint on the model or bake, you need a UV map.
How to UV unwrap in Blender, step by step
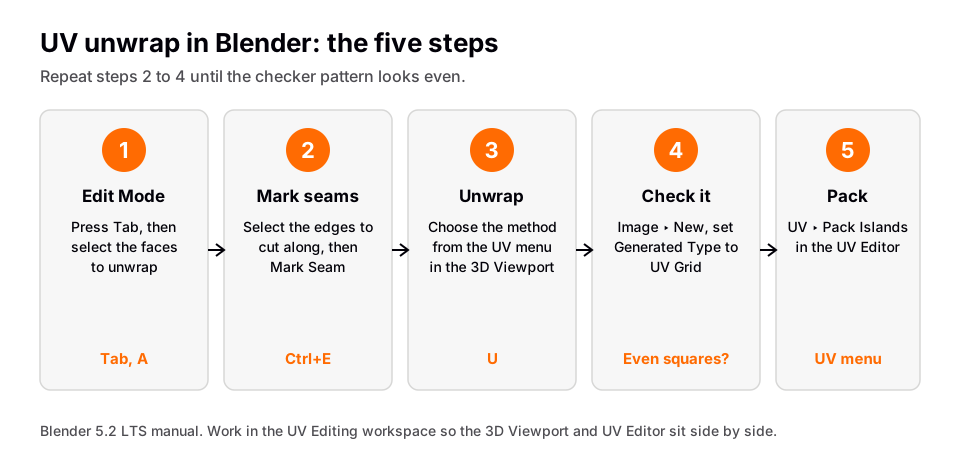
- Open the UV Editing workspace. Click the UV Editing tab at the top of the window. It shows the 3D Viewport on one side and the UV Editor on the other.
- Enter Edit Mode. Hover over the 3D Viewport and press Tab. All unwrapping happens in Edit Mode, and you can be in vertex, edge or face select mode.
- Mark seams if the shape needs them. Select the edges where you want the mesh cut, press Ctrl+E and choose Mark Seam. Seams appear as red lines. The next section explains where to put them.
- Select the faces to unwrap. Press A to select everything, or select only part of the mesh.
- Unwrap. Press U in the 3D Viewport (or use the UV menu) and pick a method. For a first try on an organic or seamed mesh, choose Unwrap. For a hard-surface object, try Smart UV Project.
- Adjust Last Operation. Open the panel at the bottom left of the 3D Viewport to change the method, margin and other options. The result in the UV Editor updates as you change them.
- Test it. Add a test image to see stretching before you texture. See the checker section below.
- Edit the layout. Move, scale and pack the islands in the UV Editor. See the packing section.
After step 5 you should see one or more islands inside the square UV space in the UV Editor. If you see nothing, jump to the troubleshooting section.
One menu note: in the 5.2 manual, the UV menu lists Unwrap Angle Based, Unwrap Conformal and Unwrap Minimum Stretch. These match the three values of the Method option in the Adjust Last Operation panel. If your menu shows a single Unwrap entry, set the method in that panel instead.
Unwrapping UV in Blender: where to put seams
A seam is where the UV map is allowed to break. The manual compares it to peeling an orange or sewing cloth: you make a few cuts, then lay the skin flat. More seams mean less stretching but more edges to hide when you texture. The manual's advice is to use as few seams as you can while keeping stretching low, and to hide them where they will not be seen.
Practical rules from the manual:
- Think of holding the object and cutting it apart with scissors so it spreads out with as little tearing as possible.
- Cut around parts that stick out, such as ears, arms or handles, so each can flatten on its own.
- For anything symmetrical, put a seam down the mirror axis. The two halves can then overlap in the same UV space and share texture pixels.
- Check a seam loop by switching to face select and using Select Linked (L under the cursor, or Ctrl+L). If faces outside your intended region get selected, the seam is not closed.
To remove a seam, select the edge and press Ctrl+E then Clear Seam. If you already have a UV layout and want seams to match its island borders, use UV ‣ Seams from Islands.
Choose the right unwrap method
All of these live in the UV menu and share the U shortcut. Each one writes over any UV coordinates the faces already had, so run them on a copy if you care about the old layout.
| Method | Use it for | What to know |
|---|---|---|
| Unwrap | Organic shapes cut with seams | Method can be Angle Based (ABF), Conformal (LSCM) or Minimum Stretch (SLIM) |
| Smart UV Project | Mechanical objects and architecture | Splits at sharp edges; Angle Limit controls how many islands |
| Cube Projection | Boxy objects | Islands overlap until you pack them |
| Cylinder Projection | Pipes, bottles, necks | Pole option: Pinch or Fan |
| Sphere Projection | Eyes, planets | Flattens like a world map |
| Project from View | Matching a photo of a real object | Stretches where surfaces recede from the view |
| Follow Active Quads | Strips of quads, such as straps | Copies the active quad's shape to its neighbors |
| Lightmap Pack | Baked lighting, not hand texturing | Places every face separately |
| Reset | Starting over | Makes each face fill the whole UV area |
Unwrap and Smart UV Project options
For Unwrap, Angle Based gives a good 2D representation of a mesh. Conformal is usually less accurate but performs better on simple objects, and Minimum Stretch tries to reduce distortion in both area and angle. Fill Holes virtually fills holes before unwrapping to avoid overlaps. Margin Method and Margin set the gap between islands. With the Fraction method, a margin of 1/1024 on a 1024 pixel texture leaves one pixel around each island.
For Smart UV Project, Angle Limit is the largest angle between neighboring face normals before they split. A low limit makes many small islands with little distortion. A high limit makes a few big islands with more distortion. Area Weight blends between a plain average of face normals (0) and an area-weighted average (1). Scale to Bounds stretches the layout to fill the whole texture.
Several methods have Correct Aspect. It scales UVs for the aspect ratio of the material's image. The manual says it only works when the mesh has a material with an Image Texture node and that node is selected in the Shader Editor.
Check the result with a UV Grid
A layout can look fine in the UV Editor and still stretch your texture. Test it. In the UV Editor, click New in the image data-block menu and set Generated Type to UV Grid. The manual says this built-in test image is the quick way to check an unwrap. Switch the 3D Viewport to Material Preview or Textured shading and look at the squares.
- Even squares of similar size mean a good unwrap.
- Stretched or sheared squares mean you need another seam, a different method or UV ‣ Minimize Stretch.
- Squares that are much larger on one part than another mean that part has less texture detail. Resize the island.
The manual notes that distortion cannot always be removed completely, because flattening a curved surface always costs something. Seams are how you control where it goes.
Edit, align and pack UV islands
With the unwrap done, work in the UV Editor. These tools are in the UV menu there, with the shortcuts the manual lists.
- Move, Rotate, Scale: G, R, S. Press X or Y to lock to an axis.
- Pin: P pins selected UVs so they stay put on the next unwrap. Alt+P unpins.
- Stitch: Alt+V joins selected UVs that share vertices. Turn on Use Limit and set Limit Distance in the Adjust Last Operation panel to limit it.
- Minimize Stretch: reduces stretch by matching the angles in UV space to the angles in 3D. Options are Fill Holes, Blend and Iterations.
- Average Island Scale: scales every island so they have approximately the same scale, which gives the whole model a similar texture sharpness.
- Pack Islands: arranges the islands to fill the UV space with a margin between them.
In Pack Islands, Shape Method can be Exact Shape (Concave), Boundary Shape (Convex) or Bounding Box. Rotate lets Blender turn islands to fit better. Margin Method and Margin set the gap. The manual says Bounding Box with the Add margin method is the fastest combination, and that the Fraction margin method can take up to 10 times longer on some layouts. Leave rotation on, because it usually improves the fit.
Run Average Island Scale before Pack Islands, so that the packer works with islands that are already the right relative size.
Blender unwrap UV not working: common fixes
The UV Editor is empty
The UV Editor only shows the faces that are selected in the 3D Viewport. Select the faces again, or enable Sync Selection in the UV Editor header. The manual says the other UV coordinates are still there, only hidden.
The checker pattern is stretched
The mesh needs more seams, or the wrong method was used. Add seams where the stretch is worst, unwrap again and compare. Switching Method to Minimum Stretch is a quick test. Pinned UVs also constrain the result, so unpin them if the island will not relax.
Islands overlap
Projection methods like Cube Projection lay all sides on top of each other. Run Pack Islands. Overlap is not always wrong, because overlapping islands share the same pixels, which suits mirrored halves. It is a problem when you paint or bake unique detail. For a deeper look, see overlapping UVs in Blender.
The texture shows in the viewport but not in the render
The viewport shows textures without any real rendering. The manual says you need a material on the object, and an Image Texture node that uses the UV map, either by leaving its Vector input empty or by connecting the UV output of a Texture Coordinate node. Without a material, a render gives you default gray.
Textures are squashed on a non-square image
Turn on Correct Aspect in the Adjust Last Operation panel, and make sure the Image Texture node is selected in the Shader Editor.
Unwrap in several passes for complex models
The manual's layout workflow suggests that unwrapping a whole character in one go often gives a messy result, with squashed ears and a stretched neck. Instead, unwrap the head with Sphere Projection, the ear with Project from View after aligning the view to look straight at it, and the neck with Cylinder Projection. As a shortcut, mark seams around the ear and neck and run a single Unwrap.
Select an island with L or Ctrl+L, or set the UV Editor's selection mode to Island. When you are happy, use Pack Islands, or move and scale islands by hand and then stitch edges together.
A mesh can also have several UV maps, for example one for textures and another for baked lighting. Add and remove them in the UV Maps panel of the mesh's Object Data properties. To save the layout for painting in another application, use UV ‣ Export UV Layout. The exported image shows the UV edges inside the standard 0 to 1 grid, as covered in how to export a UV map from Blender. Copying a layout from one mesh to another is covered in transferring UV maps.
Skip the node wiring with the Material & Lighting Vault
Unwrapping is necessary when you use image textures, paint on the model or bake. It is wasted effort when the material is procedural, because a procedural material can take its coordinates from the object itself.
The Material & Lighting Vault works that way. It is a Blender 5.2+ extension (the Metalight tab in the N panel) with 1,690 procedural materials, 1,000 core in 32 categories plus 690 Pro. They work in Cycles and EEVEE and need no UVs, since they use object coordinates by default. A Use UV option exists if you want the material to follow your map. The 67 weathering presets (rust, moss, snow, soot, cracks, edge wear) work on any material, including your own.
That means a clean unwrap is a choice you make when a texture needs one, and not a gate on every object. If you want the full UV and PBR texturing path in order, The Blender Launchpad has it as one stage of its roadmap, after Blender basics and hard surface modeling.
Related guides
If you are comparing terms, how to UV map in Blender covers the same workflow from the mapping side. Once the layout is ready, how to add a texture in Blender shows how to put an image on it.
Questions people also ask
How do I UV unwrap in Blender?
Enter Edit Mode, select the faces, mark seams with Ctrl+E where you want cuts, press U and choose Unwrap. The islands appear in the UV Editor.
What is the shortcut for UV unwrap in Blender?
The shortcut is U in Edit Mode, in the 3D Viewport or the UV Editor. It opens the UV menu of unwrap methods.
Why is my UV unwrap stretched in Blender?
Stretching usually means the mesh needs another seam or a different method. Add a UV Grid test image, add seams where squares distort, then try Minimum Stretch.
Do I need seams to unwrap UV in Blender?
Not for simple shapes. The manual says cube, cylinder, sphere and regular unwrap often give good results without seams, but complex meshes need seams to guide the cut.
Why is my UV Editor empty after unwrapping?
The editor shows only the selected faces unless Sync Selection is on. Reselect the faces in the 3D Viewport or turn on Sync Selection.
How we checked this
We read these pages of the Blender Manual 5.2 LTS on November 4, 2026. We did not run Blender for this article.


