
Overlapping UVs in Blender mean two or more faces use the same part of the texture. That is fine when you want those faces to share it, such as mirrored halves or repeated parts, and it is a problem for baking and for any texture where each face needs its own detail. To find overlaps, use Select, Select All by Trait, Overlap in the UV Editor, and to fix them, move the islands apart or run Pack Islands.
This guide covers when to keep an overlap, how to detect one, and the fixes the manual lists, including Average Island Scale. It follows the Blender 5.2 LTS manual.
What overlapping UVs are
A UV map says which part of an image each face uses. The manual points out that faces can overlap in the UV map, which makes them share the same part of the texture. Nothing in Blender stops you from doing it, and some tools do it for you. Cube Projection, for example, places all the projected sides in the UV map overlapping each other, and the manual says to use Pack Islands if you do not want that.
Overlap is therefore not an error. It is a choice about texture space, and it is right or wrong depending on what the texture is for.
When overlapping UVs are fine
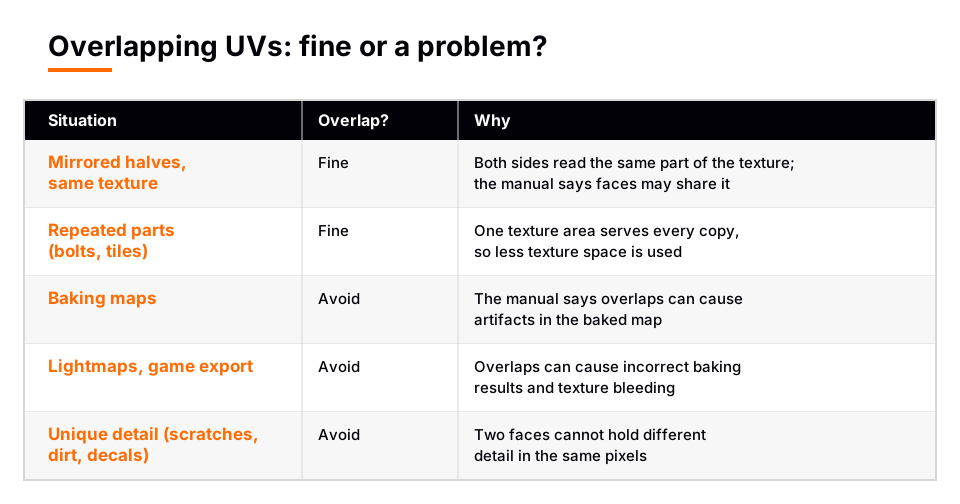
Keep the overlap when faces are meant to look the same:
- Mirrored parts. The left and right of a symmetrical object can read the same pixels. You save texture space and the two sides match. The manual's Mirror modifier has options for this case, covered below.
- Repeated parts. Bolts, tiles, window frames or any part that is the same everywhere can share one patch of texture.
- Tiling materials. A texture meant to repeat over a surface does not need unique space for each face.
The common point is that you do not need different pixels for those faces. If you do, overlap is the wrong choice.
When overlapping UVs break things
The manual describes overlapping UVs as sharing the same or partially intersecting texture space, which can cause rendering artifacts, texture bleeding or incorrect baking results. It names baking, lightmaps and game engine export as the places where overlap is often undesirable.
- Baking. A bake writes one result per pixel. If two faces share pixels, they compete for them, and the result is wrong for at least one. The manual's Mirror modifier note says the same: overlapping UVs can cause artifacts to appear in the baked map.
- Unique detail. Dirt, scratches, labels and decals differ from face to face. Faces that share pixels also share the detail, so a scratch painted on one appears on the other.
- Lightmaps. Lightmap Pack places each selected face separately on the UV map. With several objects, its Share Texture Space option makes the UV maps not overlap each other, so one lightmap texture can serve all the meshes.
If you are about to bake, read how to bake lighting in Blender too. Baking requires a UV map, and the manual notes that a margin is generated around UV islands by default.
How to find overlapping UVs
- Open the UV Editor with the mesh in Edit Mode, for example in the UV Editing workspace. If the editor is empty, check that the mesh has a UV map and that Sync Selection is on or the faces are selected.
- Choose the faces to test. With Sync Selection on, the UV Editor shows all faces. Press A in the UV Editor to select all UVs.
- Run the overlap check. Use Select, then Select All by Trait, then Overlap. The manual says it selects all UV faces that overlap one another. In island selection mode (4), it selects the entire island.
- Read the result. Everything that lights up overlaps something. Intended overlaps, like mirrored halves, light up too, so decide which ones you meant to keep.
Two other tools help but answer different questions:
- Display Stretch. In the Overlays popover under UV Stretch, Display Stretch colors faces from blue (little distortion) to red (high distortion). The manual describes it as a distortion check that compares the UV map to the 3D mesh, with an Angle or Area type. It does not show overlap, so use it for stretching, not for this problem.
- Select by Winding. Under the same Select All by Trait menu, it selects faces by positive or negative winding. The manual says a negative winding would mirror the content of an image displayed on the mesh, so it finds flipped faces.
How to fix overlapping UVs in Blender
Pack Islands
Pack Islands (UV, then Pack Islands) lays existing islands out to fill the texture space, scaling, translating and, if allowed, rotating them with a margin between them. The manual's layout workflow says overlapping islands from separate unwrapping steps can be fixed by clicking Pack Islands to have Blender lay them out automatically. The options in the manual:
- Shape Method: Exact Shape (Concave), Boundary Shape (Convex) or Bounding Box. Bounding Box is the fastest.
- Rotate and Rotation Method: Any, Axis-aligned or Cardinal.
- Margin Method (Scaled, Add or Fraction) and Margin, the empty space between islands.
- Lock Pinned Islands: islands with pinned UVs stay put and the rest pack around them.
- Merge Overlapping: before packing, overlapping islands are temporarily combined and keep their relative position and rotation. Turn it on when mirrored overlaps should stay together.
Pack Islands moves whole islands. An overlap inside one island is a fold in the unwrap, so it needs a different fix, such as another seam or Minimize Stretch. The manual says that tool temporarily fills internal holes to prevent stretching and overlaps of the surrounding UVs.
Average Island Scale
UV, then Average Island Scale, scales each island so they are all approximately the same scale. It has two options: Non-Uniform scales U and V independently to reduce stretching, and Shear shears the U axis to reduce texture shearing. It does not remove overlaps by itself. Run it first so islands share a texture density, then run Pack Islands to place them.
Move islands by hand
For a small fix, select a vertex of an island and press Ctrl+L to select everything linked to it. Hovering over it and pressing L also works, or set the selection mode to Island. Then scale the island down and move it to free space. Another route in the manual is Rip Move UV (V), which separates selected UV elements from connected ones and enters move mode. It is not compatible with Sync Selection, so turn that off first.
Mirrored parts and the Mirror modifier
The Mirror modifier has Flip UV, which mirrors the UV coordinates across the middle of the image. It also has UV Offsets, which shift mirrored UVs on the U and V axes. The manual says that is useful for baking: the mirrored UVs can be moved outside the image, so they are not used for baking but are still used for display.
Check again
After the fix, run Select Overlap again. Nothing should be selected except overlaps you chose to keep. If you are laying out for painting, the full process is in how to UV unwrap in Blender and how to UV map in Blender, and you can test the result with a texture in how to texture paint in Blender.
Learn UV layout in order with The Blender Launchpad
Whether an overlap is fine depends on what you will do next with the texture: bake it, paint it, or tile it. Knowing that order of operations is what keeps you from redoing a layout later.
The Blender Launchpad is a members app with a roadmap of hand picked, free YouTube lessons in six stages. One stage is UV and PBR texturing, and the roadmap starts from the point of never having opened Blender. It is a curated playbook, not original video lessons, and it is one payment with no subscription. Follow the texturing lessons in sequence and the choices in this guide start to feel routine.
Related: if you need to copy a finished layout onto another mesh, see how to transfer UV maps between objects.
Questions people also ask
Are overlapping UVs bad in Blender?
Not always. They are fine when faces should share the same texture, such as mirrored or repeated parts. They are a problem for baking, lightmaps and textures with unique detail.
How do I select overlapping UVs in Blender?
In the UV Editor, choose Select, Select All by Trait, Overlap. It selects all UV faces that overlap one another, or the whole island in island selection mode.
How do I fix overlapping UVs in Blender?
Scale and move the islands apart, or run UV, Pack Islands. Use Average Island Scale first if you want islands at an even scale.
Do mirrored UVs need to overlap?
No. Overlap saves texture space and keeps both sides identical, but you can offset the mirrored UVs for baking. The Mirror modifier has Flip UV and UV Offsets for this.
Does the stretch display show overlapping UVs?
No. Display Stretch shows distortion, from blue for little to red for high, by comparing the UV map to the 3D mesh. Use Select Overlap to find overlaps.
How we checked this
We read these pages of the Blender Manual 5.2 LTS on November 4, 2026. We did not run Blender for this article.
- UV Editor: Selecting UVs (Select Overlap, Select by Winding, island selection)
- UV Editor: Overlays (Display Stretch)
- Editing UVs (Pack Islands, Average Island Scale, Minimize Stretch, Rip Move UV)
- UV Operators (Cube Projection, Lightmap Pack)
- Layout Workflow and UV Editor: Introduction
- Mirror modifier and Render Baking
The manual does not say how Select Overlap treats faces that only touch at an edge, or what it selects when nothing overlaps, so we describe only what it states.


