
A Blender UV map is a flat layout that says which part of a texture each face of a mesh shows, and you manage the maps on an object in the UV Maps panel: Properties > Data > UV Maps. There you select a map, add a new one, rename it, remove it and choose which one is the Active Render map that shaders and renders use.
Most meshes need only one map, but a second is common for baked lighting or a separate texture layout. This guide follows the Blender 5.2 LTS manual's description of the panel and explains the difference between the map you are editing and the map used for rendering, which is where most confusion starts. To create the layout itself, read how to UV map in Blender or how to UV unwrap in Blender first.
Where the UV Maps panel is
Select a mesh object and open the Data tab of the Properties editor. The UVs & Texture Space page of the manual says this is where you find the object's UV maps. After you select a map, you can view and edit it in the UV Editor. One mesh can have several maps, for example one per texture, and it can also reuse a single map for several textures.
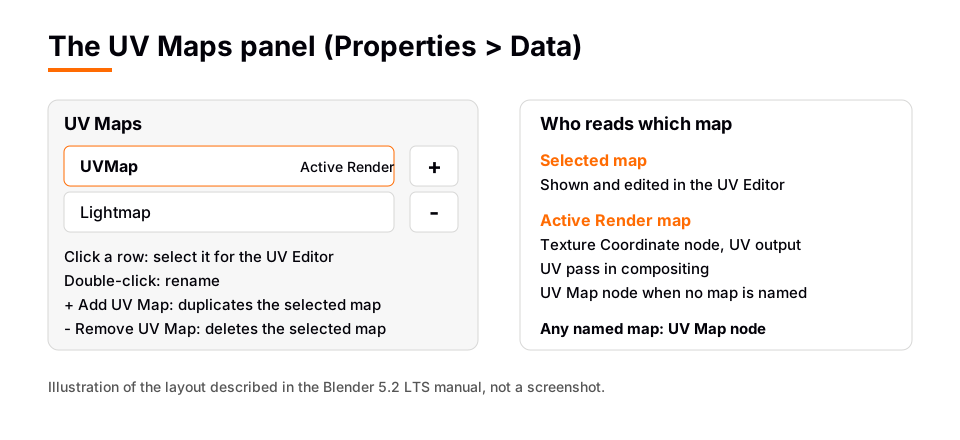
The panel is a standard Blender list. The manual's List View page describes the controls that apply to it: click an item to select it, double-click it or Ctrl+click it to rename it, and use the buttons at the right of the list to add or remove an item.
Sources: UVs & Texture Space page · List View page
Add, rename and delete a UV map
- Open the panel. Select the mesh, then go to Properties > Data > UV Maps.
- Add a map. Click Add UV Map. The manual says it duplicates the selected UV map, or creates a new one if the list is empty. Expect the new map to start as a copy of the one you had selected, then unwrap or edit it.
- Rename it. Double-click the name, type a new one and confirm. Ctrl+click also works, per the List View page. A clear name such as the texture it serves helps later when a node asks you to pick a map by name.
- Select the one to edit. Click its row in the list. The manual says the selected map is the one you view and edit in the UV Editor.
- Delete a map. Select it and click Remove UV Map. This removes the selected map.
The duplicate behavior is the practical way to try an alternative layout safely: add a map, change the copy, and keep the original. If you delete the wrong map, use Ctrl+Z rather than rebuilding it by hand.
Select the UV map you are editing
The UV Editor header has an Active UV Map Layer menu, which the manual says selects which UV map to use. Picking a map there and picking it in the Data tab list both change which map you see and edit in the UV Editor. If the editor looks empty or shows the wrong layout, check this first. Our guide to UV editing not showing in Edit Mode covers the other causes.
Also check Sync Selection. The manual says that with it on (the default), all faces are visible in the UV Editor because UV visibility follows mesh selection. With it off, the editor shows only the UVs of faces selected in the 3D Viewport.
Active Render: the map shaders use
The Active Render toggle marks a UV map as the default one for rendering. The manual lists what it is used for:
- the UV pass for compositing,
- the Texture Coordinate node (its UV output) for material shading,
- the UV Map node for material shading when no UV map is specified.
So selecting a map to edit and marking a map as Active Render are two separate things. You can edit a lightmap layout while your textured material still reads the first map. The manual's note on the Texture Coordinate node says that to use a UV map other than the active one, you use the UV Map node.
Use a specific UV map in a material
Add a UV Map node (Shift+A in the Shader Editor, in the Input group) and connect its UV output to the Vector input of an Image Texture node. The manual says the node's UV Map field lists the UV maps on the object's mesh, and that if you leave it unset, the Active Render map is used.
Because the node picks a map by name, check it after you rename a map and confirm it still points at the map you want. The manual's Using UV Maps page names "UVMap" as the default map name. For the image side of the setup, see how to add an image texture in Blender.
| You want | Use | Reads |
|---|---|---|
| The default map for a quick setup | Image Texture with Vector unconnected | The object's active UV map |
| The Active Render map, explicitly | Texture Coordinate node, UV output | The Active Render map |
| A specific map by name | UV Map node | The map you pick |
Check a UV map with a test grid
To see whether a map is stretched, create a generated image. The manual's Image Settings page lists UV Grid, a checkerboard with a colored cross in each square, and Color Grid, a more complex grid with letters and numbers that it says could be used to check for stretching or distortion. The Using UV Maps page says to press New in the Image Editor header's data-block menu and change the Generated Type. Apply the image through an Image Texture node and look for squares that change size across the model.
Texture Space is not a UV map
The Data tab also has a Texture Space panel. The manual describes it as a 3D box used for generating texture coordinates without a UV map. You read it through the Generated output of the Texture Coordinate node. It does not appear in the UV Maps list and cannot be edited in the UV Editor. If a texture ignores your edits, make sure the node is reading UV and not Generated.
Common problems
- I edited a map but the render did not change. The material may read a different map. Check which map is marked Active Render, or which map a UV Map node names.
- Two maps look identical. You probably duplicated one with Add UV Map. That is expected, since the new map copies the selected one.
- The map exists but nothing shows in the editor. Enter Edit Mode and select faces, or enable Sync Selection.
- Overlapping islands. Select the map and check the layout in the UV Editor.
- Copying a map to another mesh. See how to transfer UV maps in Blender.
Skip the UV work with the Material & Lighting Vault
When you only want a good-looking surface, you can avoid UV maps altogether. The Material & Lighting Vault is a Blender 5.2+ extension (the Metalight tab in the N panel) with 1,690 procedural materials, 1,000 core in 32 categories plus 690 Pro. They work in Cycles and EEVEE and need no UVs, because they use object coordinates by default. A Use UV option exists if you want a material to follow one of your maps.
The 67 weathering presets (rust, moss, snow, soot, cracks, edge wear) work on any material, including your own. The Vault is a tool, not a course. To learn UV mapping and PBR texturing in order, The Blender Launchpad includes a UV and PBR texturing stage made of hand picked, free YouTube lessons.
Questions people also ask
Where is the UV map in Blender?
Select the mesh, open the Data tab of the Properties editor and find the UV Maps panel. The map you select there is the one you see in the UV Editor.
How do I add a UV map in Blender?
Click Add UV Map in the UV Maps panel. It duplicates the selected map, or creates a new one if the list is empty.
How do I switch between UV maps?
Click another map in the UV Maps list, or use the Active UV Map Layer menu in the UV Editor header. That changes the map you edit. The Active Render toggle controls the one used for rendering.
What is the difference between the selected UV map and Active Render?
The selected map is what you view and edit in the UV Editor. Active Render marks the default map for rendering, used by the Texture Coordinate node's UV output and by the UV Map node when none is named.
How we checked this
We did not run Blender while writing this. We read these Blender 5.2 LTS manual pages on November 4, 2026: UVs & Texture Space, Texture Coordinate Node, UV Map Node, UV Editor Introduction, Selecting UVs, List View, Image Settings, Using UV Maps and Object Data properties. The manual shows the panel's buttons as icons without labels, so we named them by the manual's tooltips (Add UV Map, Remove UV Map, Active Render). We could not confirm where the Active Render toggle sits in each row, and we did not check Blender 4.x differences.


