
To add an image texture in Blender, select the object, give it a material, add an Image Texture node in the Shader Editor, click Open to load your file, and connect the node's Color output to the Base Color input of the Principled BSDF. With nothing plugged into the node's Vector input, the image follows the object's UV map.
The node has more settings than the one click suggests: Interpolation, Projection, Extension, Color Space and Alpha. This guide walks through the steps once, then explains each setting as the Image Texture Node page of the Blender 5.2 LTS manual describes it. For the full texturing workflow with several maps, see our guide on how to add a texture in Blender.
Sources: Image Texture Node page
Add an image texture in Blender, step by step
- Select the object and open the Shading workspace. You get a Shader Editor that shows the material's nodes.
- Create a material. In the Material Properties tab, click New. The manual says a render without a material shows a default gray.
- Add the node. Hover over the Shader Editor, press Shift+A, open Texture and choose Image Texture.
- Load the image. Click Open on the node, which opens a File Browser, and pick your file. The manual warns that a render with no image loaded is black.
- Connect it. Drag from the Color output to the Principled BSDF Base Color input.
- Preview it. Press Z in the 3D Viewport and choose Material Preview or Rendered.
You should see the picture on the surface. If it looks cut up or smeared, the problem is the coordinates, not the node. The manual says an unconnected Vector input takes the object's active UV map, so an object without a good map shows a bad result. Start with how to UV map in Blender or how to UV unwrap in Blender, or switch Projection to Box as described below.
The Vector input: where the image lands
The Vector input is a 3D coordinate that the node projects onto the 2D image using the selected Projection. The manual says it is usually connected to an output of the Texture Coordinate node. If you leave it unconnected, the coordinate comes from the object's active UV map, with Z set to 0.
That is why a plain Image Texture node works on a UV-mapped model with no extra wiring. Add a Texture Coordinate node only when you want a different source, such as its UV or Generated output. Our guide to Blender UV coordinates explains what that input actually carries.
Interpolation: how the image is scaled
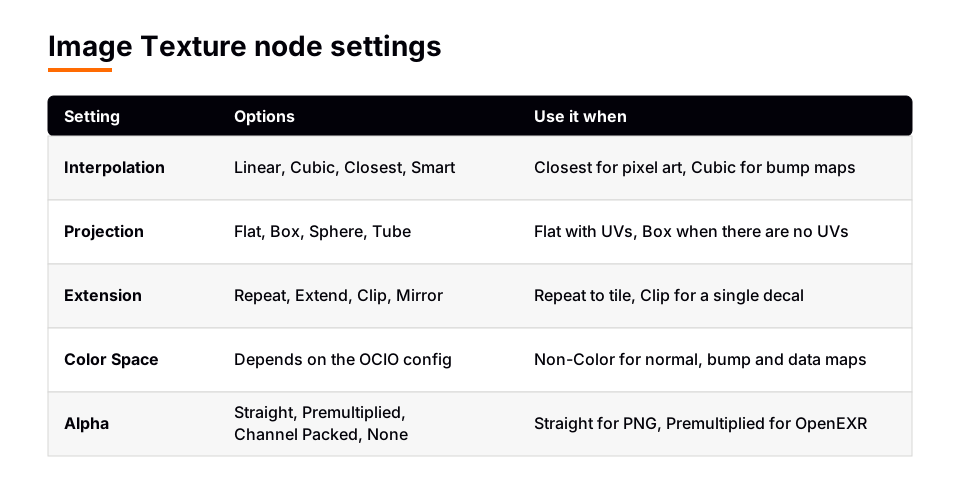
Interpolation is the method used to scale the image up or down for rendering. The manual lists four options:
- Linear is regular quality interpolation.
- Cubic is smoother and better quality. The manual says bump maps should use it for best results.
- Closest is nearest neighbor with no interpolation, useful for pixel art.
- Smart is Cycles only and for Open Shading Language. It uses cubic when scaling up and linear when scaling down.
Projection: Flat, Box, Sphere and Tube
Projection decides how the Vector is mapped onto the image. The manual describes four modes.
- Flat places the image in a unit square from (0, 0, 0) to (1, 1, 0) and projects the Vector straight onto it. The manual says it is typically used with UV maps.
- Box places the image on each side of a unit cube and projects along the axis closest to the mesh normal. The manual says it is common in architectural models. The Blend value projects onto several sides and mixes them: the higher the value, the smoother the transition.
- Sphere wraps the image around a sphere with its origin at (0.5, 0.5, 0.5). It suits planets and is also useful for organic objects.
- Tube wraps the image around a cylinder and projects horizontally from the central axis. It suits a label on a bottle but is not suited for the top or bottom of an object.
Box is the quick answer to "how do I texture without UVs". The cost is that a seam can show wherever two sides meet, which Blend softens but does not remove.
Extension: what happens outside 0 to 1
Extension controls how the image is extrapolated when the Vector lies outside the regular bounds of (0, 0, 0) to (1, 1, 1).
| Option | What it does | Typical use |
|---|---|---|
| Repeat | Tiles the image horizontally and vertically | Floors, walls and other tiling textures |
| Extend | Repeats the pixels on the image edges | Stretching an edge outward |
| Clip | Clips to the image size; outside pixels are transparent black | A decal or label that appears once |
| Mirror | Flips the image on every repeat | Hiding the seam between tiles |
The "typical use" column is our reading of what each option does, not wording from the manual. If you scale the coordinates up and the image does not tile, check that Extension is not on Clip.
Color Space and Alpha
Color Space is the color space the image file was saved in. Blender uses it to convert the file to its internal linear color space. The manual says textures and final renders are often stored in sRGB, while OpenEXR images are stored in a linear color space. Images that do not strictly contain colors, such as normal, bump or stencil maps, should never have a color conversion applied, so set them to Non-Color. The list of options depends on the active OpenColorIO configuration. A roughness map is also a map of values rather than colors, so it belongs on Non-Color too (see how to add a rough texture in Blender).
Alpha says how the image uses its alpha channel, and it only appears for formats that support transparency. The options are:
- Straight: RGB and alpha are stored separately, as in PNG files.
- Premultiplied: alpha is multiplied into the RGB channels, as in OpenEXR files.
- Channel Packed: different images are packed in the RGB and alpha channels and should not affect each other.
- None: ignore the alpha channel and make the image fully opaque.
The node has two outputs. Color is the RGB color; if the image has transparency, the color is premultiplied when the Alpha output is used and straight otherwise. Alpha is the alpha channel. For a decal or a leaf, connect Alpha to the Principled BSDF Alpha input.
Images that move: Source, Frames and Offset
The node can also play a movie. The manual lists Source (Single Image, Movie and so on), Frames, Start Frame, Offset, Cyclic and Auto Refresh. It adds a hint that Blender plays video textures at the scene frame rate, not the file's own, so they run fast or slow if the two differ. For a still image, ignore all of these.
Why your image texture does not look right
- Black surface. The node has no image loaded. Click Open.
- Gray surface. The object has no material, so the render shows the default gray.
- Looks the same as before. The node is not connected to a shader input. The manual says that without a texture feeding the material, the object renders with its procedural material settings.
- Image appears once in a corner. Extension is Clip, or the UVs only cover part of the 0 to 1 area.
- Dull or wrong data map. A non-color map is still using a color space meant for color images.
- Only the viewport shows it. Textured viewport shading is not a render. Create a material and connect the node before you render.
Skip the image hunt with the Material & Lighting Vault
An image texture needs a file, a UV map or a projection, and the right color space on every map. If you want a believable surface without any of that, the Material & Lighting Vault is a different route. It is a Blender 5.2+ extension, in the Metalight tab of the N panel, with 1,690 procedural materials: 1,000 core materials in 32 categories plus 690 Pro.
The materials work in Cycles and EEVEE and need no UVs, because they use object coordinates by default; a Use UV option exists if you want a material to follow your map. There are also 67 weathering presets (rust, moss, snow, soot, cracks, edge wear) that work on any material, including your own image-textured one. It is a tool, not a course.
If you would rather learn the image texturing workflow in order, The Blender Launchpad course has a stage on UV and PBR texturing built from hand picked, free YouTube lessons.
Questions people also ask
How do I add an image texture to an object in Blender?
Give the object a material, add an Image Texture node in the Shader Editor, click Open to load your file, and connect Color to the Principled BSDF Base Color. The image uses the object's active UV map unless you connect something to Vector.
How do I add an image texture without UV mapping?
Set the node's Projection to Box, Sphere or Tube. Box projects along the axis closest to the surface normal, and Blend smooths where the sides meet.
Which color space should an image texture use?
Leave color images such as albedo on the color space that matches how they were saved, usually sRGB. Set normal, bump and other non-color maps to Non-Color.
Why is my image texture black in Blender?
The Image Texture node most likely has no image loaded. The manual says the render is black when no image is loaded.
How we checked this
We did not run Blender while writing this. We read these Blender 5.2 LTS manual pages on November 4, 2026: Image Texture Node, Image Settings, Texture Coordinate Node, Using UV Maps and Principled BSDF. We could not confirm from the manual the exact interface path for adding a node, so the steps follow the same Shader Editor method as our other texturing guides, and we did not check how these options differ in Blender 4.x.


