

To add a rough texture in Blender, add an Image Texture node, load your roughness map, set its Color Space to Non-Color, and connect its Color output to the Roughness input of the Principled BSDF. No image? Feed a Noise Texture through a Color Ramp into the same input to get a procedural rough surface.
"Rough" can mean two things: a surface that reflects light softly, or one with bumps you can see. Roughness controls the first. This guide covers both ways to drive the Roughness input, based on the Blender 5.2 LTS manual, and says where to look when you want actual bumps instead.
What the Roughness input does
The manual's Principled BSDF page says Roughness specifies the microfacet roughness of the surface for specular reflection and transmission. A value of 0.0 gives a perfectly sharp reflection, while 1.0 gives a diffuse reflection. Everything between is a softer and softer highlight.
So a roughness map is a grayscale picture of that value across the surface. Black areas reflect sharply, white areas reflect softly, and the shades between them blend. It changes how the light bounces off the surface, not the shape of the surface. A rough concrete wall with a roughness map still has a flat silhouette.
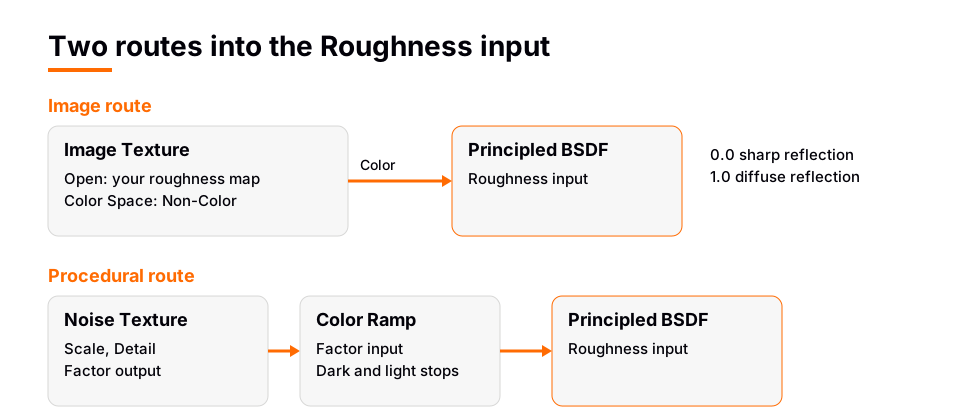
Sources: Principled BSDF page
How to add a roughness map (image route)
- Give the object a material. Open the Material Properties tab and click New, then open the Shading workspace.
- Add an Image Texture node. Press Shift+A over the Shader Editor, open Texture and choose Image Texture.
- Load the roughness file. Click Open and choose it.
- Set Color Space to Non-Color. The manual says images that do not strictly contain colors, such as normal, bump or stencil maps, should never have a color conversion applied. A roughness map holds values, not colors, so it follows the same logic. Our reading is that this is why the setting matters here; the manual does not name roughness maps specifically.
- Connect it. Drag the node's Color output to the Principled BSDF Roughness input.
- Preview. Press Z in the 3D Viewport and pick Material Preview or Rendered. Look at a highlight: it should be sharper in dark parts of the map and softer in light parts.
The map uses the object's UV map unless you plug something into the node's Vector input, so the usual UV rules apply. If your roughness map lands in the wrong place, read how to UV map in Blender and the settings in how to add an image texture in Blender.
Use the same UV map and the same Vector setup for every map in a set. If the base color image and the roughness map use different coordinates, the shine will not line up with the paint.
Where roughness maps come from
Free texture libraries usually publish roughness as one of several maps in a set. Poly Haven, for example, licenses its textures under CC0, as its license page states. Check each set for a map called Rough or Roughness, and see free Blender textures for sources. To wire a full set, follow how to add a texture in Blender.
Sources: license page
Procedural roughness: Noise Texture plus Color Ramp
If you do not have a map, you can build variation with nodes. This works without UVs, because the manual says the Noise Texture's Vector input defaults to the Generated texture coordinates when left unconnected.
- Add a Noise Texture node (Shift+A, then Texture).
- Add a Color Ramp node. The manual describes it as mapping values to colors using a gradient, where a Factor of 0.0 gives the leftmost color and 1.0 the rightmost.
- Connect the Noise Texture's Factor output to the Color Ramp's Factor input.
- Connect the Color Ramp's Color output to the Principled BSDF Roughness.
- Set the two end stops of the ramp to the darkest and lightest gray you want. For example, a dark gray stop on the left and a lighter gray stop on the right gives a surface that is glossier in some places and more matte in others.
The Noise Texture node has its own controls. Scale sets the scale of the base noise, Detail sets how many noise octaves it uses, and a Roughness value on the noise blends between a smoother pattern and one with sharper peaks. That last setting belongs to the noise pattern, so do not confuse it with the shader's Roughness input. The manual also notes that higher noise dimensions increase render time, so use a lower dimension unless you need more.
The idea behind the ramp is simple: instead of a flat number on the Roughness slider, you pass in a value that changes across the surface.
Other roughness inputs in the Principled BSDF
The base Roughness is not the only one. The manual lists a Roughness inside the Coat layer for the glossy coat, one inside Sheen, and a Diffuse Roughness (Cycles only) where 0.0 gives standard Lambertian reflection and higher values activate the Oren-Nayar BSDF. For most textures, only the base Roughness needs a map. Metallic is a separate input too: 0.0 is a dielectric and 1.0 a fully specular, base-color-tinted reflection.
Roughness map or bump: which do you need?
A roughness map makes a surface look rough only through its reflections. If you want visible relief, such as the grain of stone, add a normal or bump map as well. The manual says the Principled BSDF Normal input controls the normals of the base layers, and recommends Cubic interpolation for bump maps on the Image Texture node. Roughness and relief usually come together in a texture set, and each one needs its own Image Texture node.
- Soft highlights and smudges: roughness map.
- Visible grain, dents and scratches in the lit surface: normal or bump map.
- Mirror shine on a polished surface: roughness near 0.0.
Common problems
- The surface looks too shiny or too matte. The map is probably on a color space meant for color images. Set it to Non-Color and compare.
- Nothing changes. The Color output may be connected to the wrong socket, or the node is not plugged in at all. Check that the link ends at Roughness.
- The pattern is stretched. That is a UV problem, not a roughness one. Check the map with a UV grid.
- The result is uniform. A single gray image, or a Color Ramp with both stops the same, gives the same roughness everywhere.
Skip the node wiring with the Material & Lighting Vault
Building a roughness setup from nodes takes time. The Material & Lighting Vault is a Blender 5.2+ extension (the Metalight tab in the N panel) with 1,690 procedural materials: 1,000 core in 32 categories plus 690 Pro. Because they are procedural, you do not have to find a roughness image or wire a Color Ramp yourself.
They work in Cycles and EEVEE, need no UVs because they use object coordinates by default (a Use UV option exists), and total about 64 MB. The 67 weathering presets (rust, moss, snow, soot, cracks, edge wear) work on any material, including a textured one you built here. It is a tool, not a course.
To learn PBR texturing step by step, The Blender Launchpad has a stage on UV and PBR texturing made of hand picked, free YouTube lessons.
Questions people also ask
How do I add a roughness map in Blender?
Add an Image Texture node, open the roughness file, set Color Space to Non-Color and connect Color to the Principled BSDF Roughness input.
What do the roughness values mean?
The manual says 0.0 gives a perfectly sharp reflection and 1.0 gives a diffuse reflection. A roughness map sets that value for each point on the surface.
How do I make a rough texture without an image?
Connect a Noise Texture's Factor to a Color Ramp's Factor, then connect the ramp's Color to Roughness. Move the ramp stops to set how glossy and how matte the surface gets.
Should a roughness map be sRGB or Non-Color?
Non-Color. The manual says maps that do not strictly contain colors should never have a color conversion applied, and a roughness map holds values.
How we checked this
We did not run Blender while writing this. We read these Blender 5.2 LTS manual pages on November 4, 2026: Principled BSDF, Image Texture Node, Image Settings, Noise Texture Node and Color Ramp Node. We also read the Poly Haven license page. The manual does not name roughness maps when it lists Non-Color examples, and we could not confirm the Color Ramp default stops or how Blender converts a Color output into the single-value Roughness socket.


