
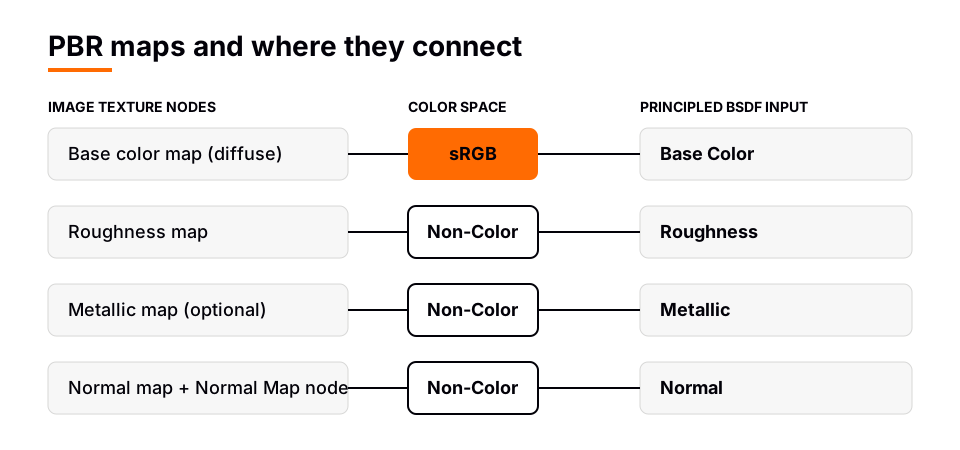
To use a white PBR texture in Blender, add an Image Texture node for each map and connect them to the Principled BSDF: the base color (diffuse) map to Base Color, the roughness map to Roughness, the metallic map to Metallic if the set has one, and the normal map through a Normal Map node. Set the color map to sRGB and the data maps to Non-Color.
That recipe is the same for any PBR material. A white one just has a few quirks, mainly how bright white behaves in a render and how to keep it from looking flat. This guide uses the Principled BSDF page of the Blender Manual (5.2 LTS) and the Poly Haven and ambientCG pages to explain the maps, the setup, a gradient variant and where to find free textures.
Sources: Principled BSDF page of the Blender Manual
What PBR means in Blender
PBR stands for physically based rendering. In practice it means a material is described by a few separate properties, such as color, roughness and metallic, instead of one baked picture of how the surface looks under one light. The light and the camera then decide the final look.
In Blender, the node that takes those properties is the Principled BSDF. The manual describes it as a node that combines multiple layers into a single easy to use node, based on the OpenPBR Surface shading model. It provides parameters compatible with similar PBR shaders in other software, such as the Disney and Standard Surface models. The manual also says that image textures painted or baked from software like Substance Painter may be directly linked to the corresponding input of this shader.
That last point is why PBR texture sets work so smoothly: each image is made for one input. If you are new to the node itself, Blender material basics covers the shader, and Blender material nodes covers wiring.
The PBR maps you will meet
| Map | Plug it into | Color Space |
|---|---|---|
| Base color (also called diffuse or albedo) | Base Color | sRGB for a color image |
| Roughness | Roughness | Non-Color |
| Metallic | Metallic | Non-Color |
| Normal | Normal Map node, then Normal | Non-Color |
| Displacement, ambient occlusion | Optional extras, not covered here | Non-Color |
What each Principled BSDF input does, according to the manual:
- Base Color: the overall color of the material, used for diffuse, subsurface, metal and transmission.
- Roughness: microfacet roughness for specular reflection. 0.0 gives a perfectly sharp reflection and 1.0 gives a diffuse reflection.
- Metallic: blends between a dielectric and a metallic model. At 0.0 you get a diffuse or transmissive base with a specular layer on top. At 1.0 you get a fully specular reflection tinted with the base color, with no diffuse reflection.
- Normal: controls the normals of the base layers, which is where a normal map plugs in.
A white painted wall, ceramic or plastic is a non-metal, so its Metallic value is 0 or the set has no metallic map at all. That leaves three maps for most white materials: base color, roughness and normal.
How to set up a white PBR material, step by step
- Open the Shading workspace. Click the Shading tab at the top of the window. It gives you the Shader Editor under the 3D Viewport.
- Select the object and add a material. In the Shader Editor, click New. Blender creates a material with a Principled BSDF connected to the Material Output.
- Add the base color map. Press Shift+A, choose Texture > Image Texture, open the image, and connect its Color output to Base Color. Leave Color Space on sRGB.
- Add the roughness map. Add another Image Texture node, open the roughness image, set Color Space to Non-Color, and connect Color to Roughness.
- Add the normal map. Add an Image Texture node with the normal image and set it to Non-Color. Add a Normal Map node (the 5.2 manual lists it under the Displacement nodes, and older versions list it under Vector; search for it with Shift+A if you cannot find it), connect the image Color to its Color input, and connect its Normal output to the Principled BSDF Normal.
- Check the UVs. Preview with Material Preview in the 3D Viewport header. The surface should show the white color with fine bumps. If it stretches, fix the UVs first with our UV unwrap guide.
If you have not loaded an image node before, how to add an image texture in Blender shows each click. For a broader view of applying textures to a model, see how to add a texture in Blender.
Color space and normal map settings that matter
The Image Settings page of the manual explains Color Space: it tells Blender how the file was saved so it can convert to the internal linear color space used for rendering. Textures are often stored in sRGB. Some images, such as normal, bump or stencil maps, do not hold colors and should never have a color conversion applied, so their color space should be Non-Color. Roughness and metallic maps hold plain values in the same way, so the standard practice is to set them to Non-Color as well.
The Normal Map node page adds three details:
- Tangent space normal maps are the most common. The UV coordinates for the image must match, and the image texture should be set to Non-Color.
- Blender uses the OpenGL convention by default for rendering and baking, where the Y axis in the green channel points up. The DirectX convention, used by normal maps from other software, assumes the Y axis points down. The node has a Convention property for this.
- The Strength input scales the effect, so you can soften a normal map that looks too harsh.
If the bumps in your render look inverted, as if dents are raised, the normal map probably uses the other convention. Poly Haven's file list for a texture offers both an OpenGL and a DirectX normal file, named nor_gl and nor_dx, so pick the one that matches your Convention setting.
How a white base color behaves
A white Base Color does not make a surface glow. It makes the diffuse part of the material reflect light strongly, and the specular layer on top still adds its own highlights. The manual notes that in reality, non-metallic specular reflection is fully white, so even a white material has white-tinted highlights, and Roughness decides how sharp they are. Use a low Roughness for glazed ceramic and a high one for matte paint or plaster.
Some practical consequences:
- Pure white can look flat. With one flat white value there is nothing for the eye to read. A texture from the sites below has variation in the color, roughness and normal maps, and that variation is what makes a white wall look like a wall.
- Strong lights clip it faster. A bright surface under a bright light can lose detail in the render. Lower the light, or lower the Base Color value a little and compare renders. The manual does not give a recommended maximum value for a base color, so judge by the render rather than by a number.
- Metallic should stay at 0. A white metal is a different material. Metallic at 1.0 tints the reflection with the base color and removes diffuse reflection.
- The IOR Level input adjusts reflections. The manual says 0.5 means no adjustment, 0 removes all reflections, and 1 doubles them at normal incidence. Leave it at its default unless a reference shows otherwise.
The easiest check is to render the object at the angle and with the lights of your scene, then compare it with a photo of the real surface. How to render in Blender shows how to do that quickly.
Make a gradient PBR texture in Blender
People also search for a "gradient PBR texture" in Blender. You do not need an image for this, because Blender can generate a gradient inside the material. Two nodes do it:
- Gradient Texture. Add it from Texture > Gradient Texture. The manual says it generates interpolated color and intensity values based on the input vector, and that the Vector input defaults to Generated texture coordinates when left unconnected. Types include Linear, Quadratic, Easing, Diagonal, Spherical, Quadratic Sphere and Radial.
- Color Ramp. Add it from Color > Color Ramp (the 5.2 manual lists it under Color; search for it with Shift+A in older versions). It maps a value to colors using a gradient: a Factor of 0.0 gives the leftmost color and 1.0 the rightmost.
Connect the Gradient Texture's Factor output to the Color Ramp's Factor. Set the left color to white and the right to a light grey (or any color you like), then connect the Color Ramp's Color output to Base Color. You now have a white-to-grey gradient on a PBR shader.
You can use the same trick on Roughness. Feed a Color Ramp that goes from black to white into the Roughness socket, and the surface goes from glossy to matte across the gradient. To combine it with a real PBR set, mix the gradient with the base color map using a Mix node, or drive only the Roughness with the gradient and keep the image maps for color and normal.
Where to get free white PBR textures
Two sites publish full PBR sets under a public domain license. We checked their pages on November 4, 2026.
- Poly Haven. Its license page says its assets, including textures, are CC0, free to use for any purpose including commercial work, with no credit required. Poly Haven's public file list for the texture we looked at (Rock Boulder Dry) offers the files Diffuse, Rough, AO, Displacement, nor_gl, nor_dx and arm, in several resolutions. Its listings are tagged, and at the time we looked, the Concrete Wall 001 listing carries the tags plaster, white and painted.
- ambientCG. Its license page says all assets are provided under the Creative Commons CC0 1.0 Universal License, that you can use them even for commercial purposes without asking permission, and that credit is appreciated but not required. Its asset types page separates "Material (PBR)", a material with PBR maps, from "Photo Texture (Plain)", a plain photo texture without PBR maps. For a white PBR material, filter for the PBR type. In the site's listing for the search term white, we saw entries such as Tiles107 (tagged white) and Plaster001 (tagged clean and matte).
Download the resolution you need rather than the largest one. For a wider list of sources, read free Blender textures.
Sources: license page · license page
Fix a white texture that looks wrong
| Symptom | Likely cause | Fix |
|---|---|---|
| Washed out or too bright | Base Color near pure white under strong light | Lower the light or the color value and compare renders |
| Normal map looks inverted or lumpy | Wrong normal convention or color space | Switch Convention in the Normal Map node and set the image to Non-Color |
| Looks like plastic | Roughness too low or a flat value | Plug in the roughness map, or raise Roughness |
| Flat, no detail | Only Base Color connected | Add roughness and normal maps |
| Stretched pattern | Poor UVs | Re-unwrap, then check with a test grid |
Skip the node wiring with the Material & Lighting Vault
A PBR set means downloading files, wiring nodes and checking UVs for each material. The Material & Lighting Vault takes a different route. It is a Blender 5.2+ extension, in the Metalight tab of the N panel, with 1,690 procedural materials (1,000 core in 32 categories plus 690 Pro). They work in Cycles and EEVEE, need no UVs by default because they use object coordinates, and total about 64 MB.
It also has 67 weathering presets, covering rust, moss, snow, soot, cracks and edge wear, that work on any material including your own. That means you can add edge wear or soot to a white material you built yourself. The Vault is a tool, not a course, with a personal and commercial license and a single payment.
To learn how PBR texturing fits into the whole workflow, The Blender Launchpad has a stage on UV and PBR texturing in its roadmap of hand picked, free YouTube lessons. It is a curated playbook, not original video lessons, and Stage 1 assumes you have never opened Blender.
Questions people also ask
What is PBR in Blender?
PBR means physically based rendering: a material described by properties like base color, roughness and metallic. In Blender the Principled BSDF takes those properties, and it is based on the OpenPBR Surface model.
How do I use a white PBR texture in Blender?
Add an Image Texture node for each map in the Shader Editor. Connect the color map to Base Color as sRGB, the roughness map to Roughness as Non-Color, and the normal map through a Normal Map node to Normal.
How do I make a gradient PBR texture in Blender?
Connect a Gradient Texture node's Factor to a Color Ramp, then connect the Color Ramp's Color to Base Color. Use the same setup on Roughness for a glossy to matte gradient.
Are free PBR textures from Poly Haven and ambientCG safe to use commercially?
Both sites state that their assets are CC0, and both say commercial use is allowed and credit is not required. Check each site's license page for the current wording before you ship a product.
How we checked this
We read these pages on November 4, 2026: Blender Manual (5.2 LTS) Principled BSDF, Image Texture node, Normal Map node, Gradient Texture node, Color Ramp node and Image Settings; Poly Haven's license page and FAQ and its public file list for one texture; and the ambientCG license and asset types documentation. We did not run Blender while writing this, and we did not download any texture files, so we cannot say how a specific white texture renders. The manual gives no reflectance or albedo numbers for white, so none are stated here.


