
The Blender Environment Texture node uses an environment map image to light your scene and fill the background. You add it in the World shader, load an image, leave the Projection on Equirectangular for a normal HDRI (or choose Mirror Ball for a mirror ball photo), and plug its Color output into a Background node.
This guide is a field guide to the node's settings: what Image, Color Space, Texture Interpolation and Projection Method do, what the Vector input changes, and which settings to leave alone. It follows the Blender 5.2 LTS manual. For a full lighting workflow, see our Blender HDRI guide.
What the Environment Texture node does
The manual says the node is used to light your scene using an environment map image file as a texture. In the World properties, the surface shader sets the background and environment lighting, and the manual says the world is rendered as very distant, so there is only light coming in. The only shader the world surface accepts is the Background node, which is where the Environment Texture connects.
For image based lighting, the manual says to use the Environment Texture node rather than the Image Texture node, for correct mapping. It adds that the node supports Equirectangular (also called latitude/longitude) maps and Mirror Ball maps. An Image Texture node would treat the picture as a flat surface texture.
How to add the Environment Texture node
- Open the Shader Editor and set Shader Type to World.
- Press Shift+A, open Texture and choose Environment Texture. As a shortcut, the manual says dragging an image file into the Shader Editor while editing the World shader creates the node for you.
- Click Open and pick your image.
- Drag the node's Color output to the Color input of the Background node.
- Press Z in the 3D Viewport and choose Rendered to see the result.
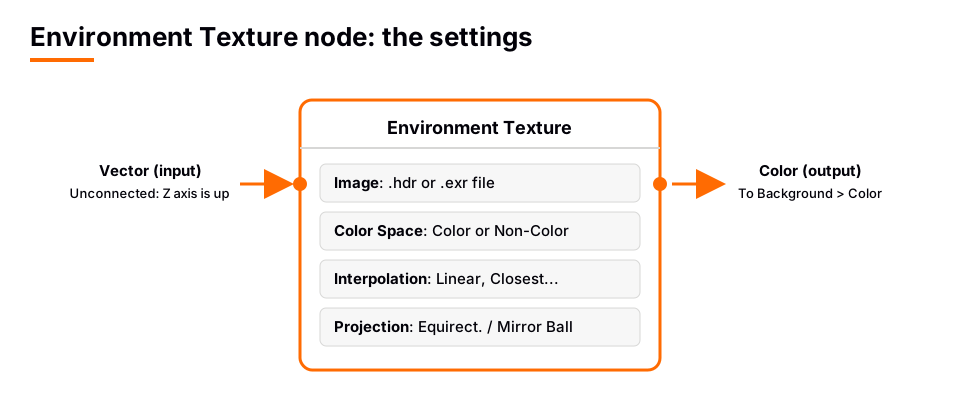
The node has one output, Color, the RGB color from the image. Strength lives on the Background node, not here. Brightness changes belong there, as covered in how to add an HDRI in Blender.
Image
The Image setting is the image data-block used as the source. The manual notes that additional settings are in the Sidebar, under Item then Properties, and include options for the alpha channel and extra color space options. These are the Common Image Settings described in the manual.
The file type matters for lighting. The manual's image format list shows Radiance HDR (.hdr) as float data, and says Cineon, DPX, OpenEXR and Radiance HDR default to a linear color space. A normal 8-bit JPEG is not float, so it cannot hold the very bright values a sun needs. That makes .hdr and .exr the right choices for lighting, with details in HDRIs for Blender.
Color Space
The manual says Color Space is the type of data the image contains, either Color or Non-Color Data. For most color textures the default of Color should be used. Non-Color Data is for things like a bump or alpha map, where the values should not go through a color conversion. The list of color spaces depends on the active OpenColorIO config.
The related Image Settings page says Color Space tells Blender what the file was saved in, so it can convert to Blender's internal linear color space. Textures and final renders are often sRGB, while OpenEXR images are linear. For an environment map, leave this on the setting Blender picks for the file type unless the image looks wrong. Changing it to Non-Color Data does change how the pixel values are read, so use it only for data maps, not for a sky photo.
Texture Interpolation
This is how the node samples the image between pixels. The manual lists four:
| Option | What the manual says |
|---|---|
| Linear | Regular quality interpolation |
| Closest | No interpolation, use the closest pixel |
| Cubic | Smoother, better quality interpolation |
| Smart | Bicubic when magnifying, otherwise bilinear; only available for OSL (Open Shading Language) |
Interpolation only matters when the image is visible, for example as a backdrop or in a sharp reflection. For distant lighting it changes little, so resolution of the file matters more. A higher resolution file is the real fix for a blurry background.
Projection Method: Equirectangular or Mirror Ball
The Projection Method tells Blender how the picture is laid out. Pick the one that matches the file:
- Equirectangular is the manual's projection from an equirectangular photo, the latitude/longitude panorama that almost every HDRI download uses.
- Mirror Ball is the projection from an orthographic photo or mirror ball, where a picture of a reflective sphere stands in for the environment.
If the sky looks pinched, mirrored in the wrong way or wrapped around a circle, the projection does not match the file. A normal panoramic HDRI under Mirror Ball will look wrong, and the reverse is true too.
Vector input: orientation and rotation
The Vector input is the texture coordinate used to look up the image. The manual says that if it is left unconnected, the image is mapped as environment with the Z axis as up. That is the right behavior most of the time.
To turn the environment, add a Texture Coordinate node and a Mapping node, connect them to the Vector input, and change the Mapping's Rotation. In the Mapping node, the Texture vector type performs an inverse transformation, so the texture itself moves the way the numbers suggest, while Point moves it the opposite way. If the sun swings the wrong way, check that setting. Step-by-step instructions are in how to rotate an HDRI in Blender.
When the Environment Texture node misbehaves
- Nothing changes in the viewport. The Shader Type is not World, or Color is not connected to the Background node.
- Everything looks stretched. The projection does not match the file.
- The scene is too dim or too bright. Adjust Strength on the Background node, not the image.
- The background is blurry. The file resolution is too low for how large it appears on screen.
- Shadows look weak or noisy. Sampling and sun settings are covered in HDRI shadows in Blender.
Add controlled light with the Material & Lighting Vault
An environment image gives you one fixed lighting condition per file. The Material & Lighting Vault is a Blender 5.2+ extension in the Metalight tab of the N panel that adds light you can shape. It has 200 lighting setups in 19 categories, tuned for Cycles, that measure the selected objects and build themselves around them, plus 267 studio lights, including softboxes, beam profiles, gobos and colored light textures.
Use your Environment Texture for reflections and ambient light, then add a setup for key and fill. The extension also has 1,690 procedural materials and 67 weathering presets that work on any material. The license covers personal and commercial use, and it is a tool, not a course. To learn how world lighting, cameras and render settings fit together, The Blender Launchpad lays out free YouTube lessons in order, with 1,000+ CC0 assets, HDRIs and textures as a bonus.
Questions people also ask
What is the Environment Texture node in Blender?
It is a shader node that uses an environment map image to light a scene and show a background. It is normally used in the World shader and connected to a Background node.
What is the difference between Environment Texture and Image Texture?
The manual says to use the Environment Texture node for image based lighting because it maps the image correctly as an environment. Image Texture is for applying images to surfaces.
Which projection should I use, Equirectangular or Mirror Ball?
Use Equirectangular for a typical HDRI panorama. Use Mirror Ball only when the image is a photo of a mirror ball.
What color space should an HDRI use in Blender?
Blender's manual says Radiance HDR and OpenEXR files default to a linear color space. Leave the node on what Blender selects unless the image looks wrong.
How we checked this
We did not run Blender for this guide. We read these pages on November 4, 2026, and wrote only what they confirm:
- Blender 5.2 LTS manual, read November 4, 2026: Environment Texture node, World Environment (Image Based Lighting), Image Settings, Image formats and the Mapping node.
We did not compare the node's setting names across Blender 4.x and 5.x, so the names above are those of the 5.2 manual.


