
HDRI shadows in Blender look soft when the light comes from a large or evenly bright part of the image, like an overcast sky, and harder when a small, intense sun is stored in the file at full brightness. To change them, pick a different HDRI, or use the sun controls in the World settings: Threshold, Angle and Use Shadow in EEVEE, and Sampling and Cast Shadow in Cycles.
This guide explains the cause, the settings in each render engine, and what to do about a clipped or noisy sun. It follows the Blender 5.2 LTS manual and Poly Haven's pages. For loading and rotating an HDRI, see our main Blender HDRI guide.
Why HDRI shadows look soft or hard
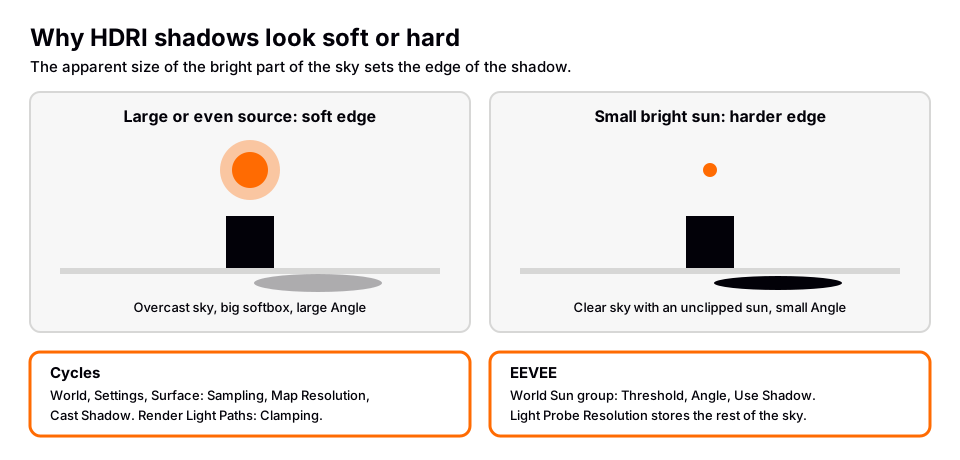
An HDRI is a light source made of the whole sky. What decides the edge of a shadow is how big the bright part of that source appears from your object. The manual states this rule for lights: a point light with a larger Radius has softer shadows, the area light produces shadows with soft borders and lists a cloudy sky as one example of a large emitter, and a sun light has an Angle that is its size as an angular diameter. We could not find a manual page that says it in those words for an HDRI, so treat the HDRI case as the same principle: a sky that is bright everywhere is a big source, and one small intense sun is a small one.
The kind of file you choose decides most of it:
- Overcast or evenly lit files. Poly Haven's article on making HDRIs notes that an overcast sky has a low dynamic range, while a scene with bright sun has a potentially high one. A low-range sky has no small, very bright spot, so shadows come out soft and shallow.
- Clear sky with a bright sun. The sun is a small area that is far brighter than the rest of the sky, so it dominates the lighting and gives a clear shadow direction. Poly Haven's Kloofendal 48d Partly Cloudy page, for example, tags the file Midday, Partly Cloudy, Natural light and High contrast.
- Studio files. Poly Haven describes its Studio category as purpose-built lighting setups. If a file is built from large light panels, expect soft shadows by the same rule.
Clipped HDRI suns: why the shadows go flat
If the sun in an HDRI was clipped when it was captured, it is not bright enough to light a scene correctly. Poly Haven's article says that if the darkest exposure is not dark enough to capture the brightest light source, the lighting the HDRI produces in a 3D scene will be incorrect, and calls this clipping. Its FAQ adds that a clipped (clamped) HDRI usually produces flat lighting that lacks contrast, and that sites often do not mention when a file is clipped.
The FAQ also says all of Poly Haven's HDRIs are unclipped, so you do not need to adjust gamma or plug the image into a strength input to get realistic results. If shadows from a downloaded file look weak even though you can see the sun in the picture, suspect the file. Try one from a source that states it is unclipped. Where to look is covered in free HDRIs for Blender.
Shadows from an HDRI in EEVEE
The manual says EEVEE stores the world lighting in an internal light probe, which makes it less precise than Cycles. It also says EEVEE treats world lighting as indirect lighting, whereas Cycles treats it as direct lighting. A light probe alone cannot reproduce a very bright, small source with enough precision, so EEVEE can pull the sun out of the HDRI and replace it with a real sun light. These options sit in the World properties under the Sun group:
- Threshold: if non-zero, the maximum world value recorded in the light probe. The excess is converted to a sun light, which the manual says reduces light bleeding from very bright sources. Zero disables the feature, and all lighting then stays in the probe.
- Angle: the angular diameter of the extracted sun. A larger angle is a larger source, so softer shadows by the rule above.
- Use Shadow: turns shadow casting on for that sun. Its shadow properties are the same as for a sun light object.
The Light Probe panel in the same place has a Resolution for the stored world light. The EEVEE light settings also include Jitter, which enables jittered soft shadows. The manual says it has a high performance impact and is not visible by default in the viewport. Overblur above zero blurs shadows but is not physically correct, the manual warns.
These controls come from the 5.2 LTS manual. Older 4.x releases may differ, so use the version selector on the manual page if you run an older build.
Shadows from an HDRI in Cycles
The manual lists the sun extraction under the EEVEE world settings, not the Cycles ones. The Cycles settings that matter are in World properties, Settings then Surface:
- Sampling: None, Auto or Manual. Auto and Manual enable multiple importance sampling, which favors the lighter parts of the background. The manual says to enable it when using an image texture with small area lights such as the sun, otherwise noise can take a long time to converge, at the price of possible fireflies. A small, bright sun is exactly this case.
- Map Resolution: the resolution of the importance map. Higher values detect small features better and give more accurate sampling, but use more memory and render slightly slower.
- Cast Shadow: lets the world background cast shadows. The manual says that disabling it stops the world from contributing shadowing, which can be useful for artistic control. If you see no shadows at all from an HDRI, check that this box is on.
A sharp sun in Cycles often shows up as noise before it shows up as an edge. More render samples help. If bright specks remain, the Clamping settings under Light Paths limit the intensity any one sample can add. The manual says clamping dims other bright lights and reflections too, and suggests clamping only the indirect bounces so highlights seen directly by the camera stay untouched.
Cycles vs EEVEE for HDRI shadows
| Question | Cycles | EEVEE |
|---|---|---|
| How is the HDRI treated? | Direct light, sampled from the image | Indirect light, stored in a light probe |
| How do I get a crisp sun shadow? | Sampling Auto, enough samples | Sun Threshold above zero, small Angle, Use Shadow on |
| How do I limit fireflies or hot spots? | Light Paths, Clamping: Direct Light and Indirect Light | Light Paths Clamping, Surface Indirect also limits world lighting |
If you are choosing an engine for a lighting-heavy scene, our Blender EEVEE vs Cycles comparison covers the wider differences.
Sharpen or soften HDRI shadows: a checklist
For sharper shadows:
- Use an unclipped HDRI with a clearly visible sun. On Poly Haven you can narrow the list by weather, time of day and contrast.
- In Cycles, set Sampling to Auto, check Cast Shadow is on, and render with enough samples to clean the noise.
- In EEVEE, set a Threshold above zero, reduce Angle, and turn on Use Shadow.
- Still not enough? Add a Sun light object and rotate it to match the sun in the HDRI. The manual says the direction comes from the light's rotation and its location does not matter. It adds light on top of what the HDRI already gives, so balance the two with Strength. To find where the sun sits, see how to rotate an HDRI in Blender.
For softer shadows:
- Choose a lower-contrast or overcast file, or a Studio HDRI.
- In EEVEE, raise the extracted sun's Angle.
- Add a large Area light as fill. The manual says area lights produce shadows with soft borders.
Changing the world Strength alone makes everything brighter or darker. It does not change how big the light source looks.
Skip the guesswork with the Material & Lighting Vault
With an HDRI you accept the shadows that come with the file. The Material & Lighting Vault is a Blender 5.2+ extension that gives you shaped lights to control them. Select your objects and one of its 200 lighting setups measures them and builds itself around them. The setups come in 19 categories and are tuned for Cycles.
It also has 267 studio lights, including softboxes, beam profiles, gobos and colored light textures, so you can choose a large soft source or a tight beam on purpose instead of searching for the right HDRI. It lives in the Metalight tab in the N panel, and the license covers personal and commercial use. It is a tool, not a course. To learn the settings above in order, The Blender Launchpad is a curated roadmap of free YouTube lessons with a stage on studio lighting and rendering, and its bonuses include 1,000+ CC0 assets, HDRIs and textures free for commercial use. For lighting a whole product scene, see a studio lighting scene in Blender.
Questions people also ask
Why are my HDRI shadows so soft in Blender?
Most likely the HDRI is an overcast or evenly lit sky with no small bright sun, so the light source is effectively large. Try a file with a clear sun, or in EEVEE reduce the extracted sun's Angle.
How do I get sharper shadows from an HDRI in Blender?
Use an unclipped HDRI with a visible sun. In Cycles set the world Sampling to Auto, and in EEVEE set the Sun Threshold above zero with a small Angle and Use Shadow on.
Why does my HDRI cast no shadows in Blender?
In Cycles, check that Cast Shadow is on in the world Surface settings. In EEVEE, check that Use Shadow is on for the extracted sun, and that Threshold is above zero.
Does Cycles or EEVEE make better HDRI shadows?
The manual says Cycles treats world lighting as direct light and is more precise, while EEVEE stores it in a light probe and relies on its sun extraction for sharp shadows.
How we checked this
We did not run Blender for this guide. We read these pages on November 4, 2026, and wrote only what they confirm:
- Blender Manual (5.2 LTS), read November 4, 2026: World lights, Cycles World settings, EEVEE World settings, Light Objects, Cycles Light Paths (Clamping), EEVEE Light Paths, EEVEE Light settings, Reducing Noise and Environment Texture node.
- Poly Haven, read November 4, 2026: the FAQ, the blog article on creating high quality HDRIs, the HDRI catalog and the Kloofendal 48d Partly Cloudy asset page.
The manual does not state the soft-versus-hard rule for HDRIs in particular, only for lights, so that part is our reading of the same principle. We could not confirm differences between Blender 4.x and 5.x for the EEVEE Sun settings.


