
A studio lighting scene in Blender is a curved backdrop, a subject on it, and three Area lights: a large key light, a dimmer fill on the other side, and a rim light behind the subject. To build one, add a plane, extrude one edge upward and bevel the bend, add three Area lights, and set each light's Shape, Size and Power while you watch Rendered view.
This guide builds the scene by hand using the settings named in the Blender 5.2 LTS manual. It also covers how big a softbox should be, what Spread does, when light linking helps, and why a studio render often looks flat or blown out.
Build a studio lighting scene in Blender, step by step
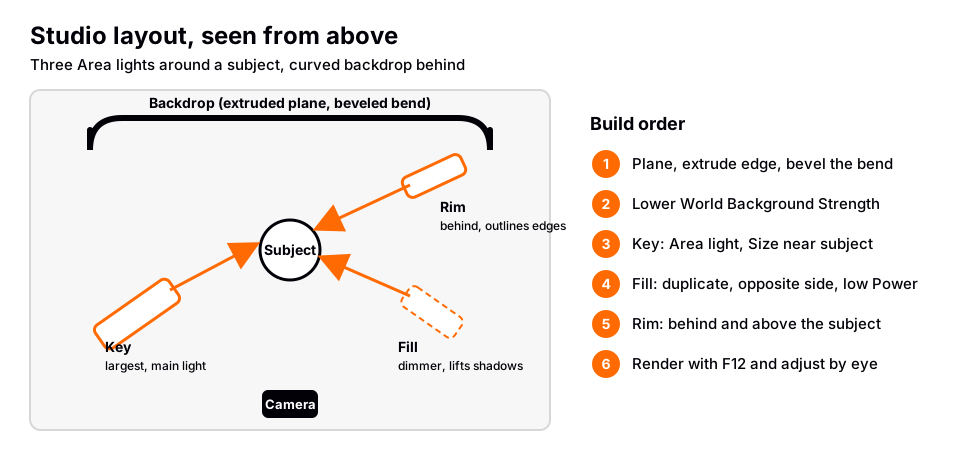
You need a subject object already in the scene. The target layout is in the diagram below. Work in Cycles if you can (our Blender lighting guide covers the basics of each light type), since the Spread setting covered later is documented on the manual's Cycles light settings page.
Step 1: make a curved backdrop
A cyclorama backdrop has no hard corner between floor and wall, so the background fades smoothly in the render. You can make one from a single plane.
- Press Shift+A, choose Mesh, then Plane. The manual describes the plane as a single quad with no thickness, often used for floors and walls. In the Adjust Last Operation panel, raise Size so the plane is several times larger than your subject.
- Press Tab to enter Edit Mode and select the back edge of the plane.
- Press E to extrude the edge, then move it up along Z so the plane grows a wall. The manual lists E as the shortcut for Extrude Edges.
- Select the edge where the floor meets the wall and press Ctrl+B (Bevel Edges). Move the mouse to widen the bevel, roll the mouse wheel to add Segments, then click to confirm. The manual says higher Segments values give a smoother result.
- Press Tab to return to Object Mode, then press Z and choose Rendered to check that the bend looks smooth.
The manual also offers the Bevel modifier as a non-destructive alternative to this tool. Our guide to how to bevel in Blender covers Width, Segments and Limit Method in full.
Step 2: darken the world so your lights do the work
The world is a light source too. The manual says the world surface accepts only the Background node, with a color and a strength. Open World properties, then Surface, and lower the Background Strength (or set the Color to a dark value). Now the light on your subject comes from the lights you place next, which is what makes a studio look controlled. If you would rather light with an image, see our Blender HDRI guide.
Step 3: add the key light
- Press Shift+A, choose Light, then Area.
- Move it in front of the subject, off to one side and a little above it, and rotate it so it points at the subject.
- In Object Data properties, keep Shape on Square or switch to Rectangle, and set Size (or Size X and Size Y). Start with a light about as large as your subject.
- Raise Power until the lit side reads well in Rendered view. Power is in Watts, and the manual notes this is radiant power, not the wattage printed on a consumer bulb.
The key is your main light. It sets the direction of the shadows and the overall exposure, and the other lights are judged against it.
Step 4: add the fill light
Duplicate the key with Shift+D and move the copy to the opposite side of the camera. Lower its Power well below the key's, so it lifts the shadows without creating a second set of shadows. If the shadow side turns flat and gray, the fill is too strong. If it is pure black, the fill is too weak.
Step 5: add the rim light
Duplicate again and place the light behind and above the subject, aimed at its back edge. A rim light draws a bright outline along the edges and separates the subject from the backdrop. Keep it smaller than the key and give it just enough Power to show a clean edge without washing out the surface.
The three-point layout (key, fill, rim) is a long-standing studio convention. The manual does not prescribe it or give ratios, so treat the positions and relative Power values here as starting points to adjust by eye.
Step 6: check the render
Set the render engine to Cycles, press F12 and compare the result with Rendered view. Our guide to how to render in Blender explains the render settings and where the image is saved. If the whole image is too bright or too dark after you balance the lights, the manual says to adjust Exposure in Render then Film. Its power-of-lights section adds that a render engine does not adapt the way eyes do, so exposure is the place to compensate.
Softbox size: how big should the key light be?
An Area light stands in for a softbox. These settings decide how soft its light looks.
| Setting | What the manual says | Effect in a studio |
|---|---|---|
| Size, Size X, Size Y | Dimensions of the Square or Rectangle. For point and spot lights, larger size means softer shadows | Try a bigger light for softer shadow edges |
| Normalize | On by default: total power stays the same when size and shape change. Off: a bigger light emits more | Leave it on so resizing does not change exposure |
| Spread | How wide the light fans out. Larger values give soft shadows, smaller values give sharper light, simulating a gridded softbox | Lower Spread focuses the light like a grid |
The manual states the size and softness rule for point and spot lights, and says the area light produces shadows with soft borders by sampling a light along a grid whose size you define. In photography, a softbox looks softest when it is large compared with the subject and close to it. That rule is general studio knowledge, not a manual statement. For shape, the manual suggests a Rectangle for something like a window or neon strip, and a vertical Square for something like a screen.
Light linking: keep the rim light on the subject only
Light linking lets a light affect only chosen objects. The manual's own example is a rim light that only illuminates a character and is not blocked by other objects in the scene. In a studio, you might use it so a rim light skips the backdrop.
- Select the light and open the Cycles Shading panel in Object properties. The manual names the EEVEE Shading panel as the other place to do this.
- Create a new light linking collection and drag your subject from the Outliner onto the list.
- Check the render. If only included objects are listed, the light affects only those. If you list excluded objects instead, the light affects everything except them.
The manual recommends dedicated linking collections so you can change links without touching the scene layout. It also says shadow linking can make renders slower, and that sampling for light linking is most efficient with the light tree enabled. Grease Pencil objects do not support light linking at all.
Why a studio scene looks flat, harsh or noisy
| Symptom | Likely cause | Fix |
|---|---|---|
| Flat, no depth | Fill as strong as the key, or all lights next to the camera | Lower the fill's Power, move the key to the side |
| Hard, sharp shadows | Light is small or has a low Spread | Raise Size or Spread |
| Backdrop lit unevenly | Key and rim light spill onto it | Move the backdrop back, or use light linking |
| Harsh bend line on the backdrop | Bevel has too few Segments | Raise Segments or widen the bevel |
| Everything is dim | World Strength is low and lights are weak | Raise Power, or Exposure in Film |
Skip the manual rig with the Material & Lighting Vault
Everything above is worth doing once, because it teaches you what each light does. For repeat work it is slow, since every new subject needs the lights resized and moved again. The Material & Lighting Vault is a Blender 5.2+ extension that builds the rig for you. You select your objects, and one of its 200 lighting setups measures them and builds itself around them. The setups come in 19 categories and are tuned for Cycles.
The Vault also includes 267 studio lights: softboxes, beam profiles, gobos and colored light textures, so you can add a shaped light to a rig you built by hand. The tool lives in the Metalight tab in the N panel. It has 1,690 procedural materials and 67 weathering presets too, with a personal and commercial license. It is a tool, not a course.
If you want to learn the fundamentals in order first, The Blender Launchpad has a stage on studio lighting and rendering in Cycles and EEVEE, built from hand picked free YouTube lessons. For the bigger picture of product work, read how to start a product visualization studio.
Questions people also ask
How do I set up studio lighting in Blender?
Add a backdrop plane, then add a large Area light as the key, a weaker Area light as the fill on the opposite side, and a rim light behind the subject. Set each light's Power in Object Data properties and check the result in Rendered view.
What size should a softbox light be in Blender?
The manual only says that larger lights give softer shadows. Start with an Area light about as large as your subject, then change Size until the shadow edges look right. Keep Normalize on so exposure stays stable while you resize.
How do I make a white studio background in Blender?
Extrude one edge of a plane upward and bevel the corner so floor and wall form one curve. Give it a plain, light material and light it with your studio lights. The manual does not name a cyclorama workflow, so this is standard modeling with the Extrude and Bevel tools.
Can one light affect only one object in Blender?
Yes, with light linking. Create a linking collection in the light's Shading panel and add the object. The manual describes this for both Cycles and EEVEE.
How we checked this
We did not run Blender for this guide. We read these pages on November 4, 2026, and wrote only what they confirm:
- Blender 5.2 LTS Manual, read November 4, 2026: Light Objects (Area light, Shape, Size, Power, Normalize, power of lights), Light Settings (Cycles) for Spread, Light Linking, World Environment, Mesh Primitives (Plane), Extrude Edges, Bevel (Edit Mode), Bevel Modifier and Cycles Film settings.
The three-point layout, the relative Power of fill and rim, and the rule that a softbox is softest when large and close are general studio practice, not manual statements. The cyclorama steps combine tools the manual describes. We could not confirm a manual page for building a cyclorama itself.


