
Blender texture UV mapping works like this: each face of your mesh has a spot on a flat 2D layout called a UV map, and an Image Texture node reads that layout to decide which pixel of the image appears on each point of the surface. With nothing connected to the node's Vector input, the manual says the coordinate is taken from the object's active UV map.
This guide is about the shading side of that link: how the Image Texture, Texture Coordinate, UV Map and Mapping nodes pass UV coordinates around, and when to use a projection instead of a UV map. It follows the Blender 5.2 LTS manual. To create the UV map itself, see how to UV map in Blender.
What a UV texture is
A UV texture is an image applied to a mesh through its UV map. The manual explains the letters: U is the horizontal axis and V the vertical axis of the map, chosen to avoid confusion with X and Y in 3D space. Its analogy is a cardboard box cut open and laid flat on a poster: the flat layout says which part of the poster covers which face.
The manual points out two freedoms that matter later. You can place, rotate and scale each face independently on the texture, and faces can overlap in the UV map, so they share the same part of the image. The cost is distortion: flattening a 3D shape means some faces cover more or less of the image than their 3D size suggests, which stretches the picture. That is why a checker test (see below) is worth doing.
How the Image Texture node finds the UV map
The Image Texture node takes a 3D coordinate on its Vector input and projects it onto the 2D image using the selected Projection. The default projection, Flat, places the image in a unit square from (0, 0, 0) to (1, 1, 0) and projects the vector onto it. The manual says Flat is typically used with UV maps.
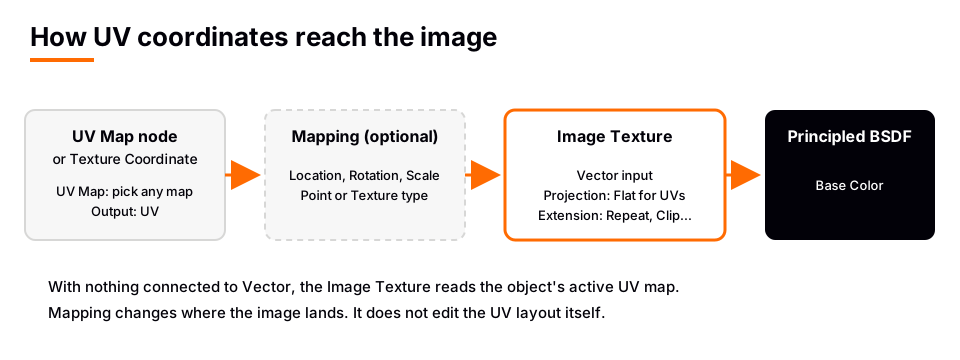
If Vector is left unconnected, the coordinate comes from the object's active UV map, with Z set to 0. So the simplest UV texture needs no extra nodes: an Image Texture with Color connected to the Base Color of the Principled BSDF. The steps for loading the image are in how to add a texture in Blender.
A material is required for the render. The manual says you can UV texture a mesh without one and still see it in the viewport's Textured mode, but the render shows a default gray when there is no material, and black when no image is loaded.
Texture Coordinate or UV Map node: which one to use
Two nodes can feed UV coordinates into the Vector input. They differ in one important way.
- The Texture Coordinate node has a UV output. The manual says it gives the coordinates from the Active Render UV map.
- The UV Map node has a UV Map field, populated from the UV maps on the object's mesh. The manual says that unlike the Texture Coordinate node, it can access any UV map on the object, and it falls back to the Active Render map if the field is left unset.
Use the UV Map node when a mesh has more than one layout, for example one for the base texture and one for a baked lightmap. The Texture Coordinate node has other outputs worth knowing:
| Output | What the manual says | Typical use |
|---|---|---|
| UV | Coordinates from the Active Render UV map | Image textures on an unwrapped mesh |
| Generated | Automatic coordinates from vertex positions, 0 to 1 over the bounding box | Quick mapping with no UVs |
| Object | Uses an object, often an empty, as the coordinate source | Placing a small image at a point |
| Camera / Window | Camera space position / screen location from 0 to 1 | Screen-space effects |
Image textures use UV coordinates by default, while the manual says other texture nodes use Generated by default. To make an image use Generated instead, connect the Generated output.
Use a specific UV map for a texture
- Select the mesh and open Object Data Properties. Check the UV Maps list for the names you have.
- In the Shader Editor, add a UV Map node with Shift+A (find it under the Input category).
- Pick the map in the node's UV Map field.
- Connect its UV output to the Image Texture's Vector input.
The result: that image follows the chosen layout, even when another map is the active render map. If your texture ends up on the wrong part of the mesh, a wrong map is a likely reason. More on layouts in Blender UV coordinates.
Scale, rotate and move the texture with a Mapping node
To tile or shift a texture without touching the UV map, put a Mapping node between the UV output and the Image Texture's Vector input.
- Add Texture Coordinate or UV Map, then a Mapping node (Vector category).
- Connect UV to the Mapping's Vector input, and the Mapping's Vector output to the Image Texture's Vector input.
- Change Scale, Rotation or Location.
The Vector Type matters here. The manual says Point transforms the coordinates, so translating them along positive X moves the evaluated texture in negative X, and scaling them up makes the texture appear to scale down. Texture performs an inverse transformation, so the texture itself moves and scales the way the numbers suggest. For most image placement, Texture is the intuitive choice.
If a scaled image repeats, that comes from the Image Texture's Extension setting. The manual lists Repeat (tiling), Extend (repeat the edge pixels), Clip (transparent black outside the image) and Mirror (flip repeatedly). If you see transparent patches when scaling down, check it. See also why a Blender texture looks too transparent.
Projection types: when you can skip the UV map
The Image Texture node has four projections. The manual says Blender offers projections that apply a 2D image automatically, but that these tend to work only for simple meshes, and a UV map gives complete control for complex ones.
| Projection | What the manual says | Suits |
|---|---|---|
| Flat | Image in a unit square, projected vertically | UV maps, planes |
| Box | Image on each side of a unit cube, projected along the axis closest to the normal | Box-shaped models |
| Sphere | Image wrapped around a sphere, projected from its origin | Planets, organic shapes |
| Tube | Image wrapped around a cylinder, projected horizontally | Labels on bottles |
With Box, the Blend value projects onto several sides and mixes them, so a higher value gives smoother transitions between sides. Tube is described as unsuited to the top or bottom of objects. For these projections the Vector input usually comes from a non-UV output such as Object or Generated, as the manual's examples use Object coordinates.
Test the mapping with a UV Grid
A test image shows stretching in seconds. In the Image Editor, create a new image and set its Generated Type to UV Grid, a checkerboard with a colored cross in each square. Color Grid adds letters and numbers, which the manual says helps check stretching or distortion. Connect it to Base Color. Squares should stay square and the same size across the model. If they do not, fix seams and unwrapping first, as in how to UV unwrap in Blender.
Common problems
- Texture is gray in the render. No material is assigned, or the image is not connected to a shader.
- Texture is black. The manual says an object with no loaded image renders black.
- Texture stretched. The UV layout distorts the faces. Add seams and unwrap again.
- Wrong part of the image. The Image Texture reads a different UV map. Select it with a UV Map node.
- Two faces show the same detail. Their UV faces overlap, which the manual says shares texture area.
Skip the UV work with the Material & Lighting Vault
Some surfaces never need an image at all. The Material & Lighting Vault is a Blender 5.2+ extension in the Metalight tab of the N panel, with 1,690 procedural materials (1,000 core in 32 categories plus 690 Pro). They work in Cycles and EEVEE and need no UVs: they use object coordinates by default, with a Use UV option when you want them. That removes the unwrapping step for metal, plastic, wood and similar surfaces.
It also includes 67 weathering presets (rust, moss, snow, soot, cracks, edge wear) that work on any material, including your own image-textured ones. The license covers personal and commercial use. It is a tool, not a course. If you want a guided route through UV and PBR texturing instead, The Blender Launchpad arranges free YouTube lessons into a roadmap, one stage of which is UV and PBR texturing.
Questions people also ask
What is UV mapping in Blender?
UV mapping lays the faces of a 3D mesh out flat on a 2D map, so an image can be applied to them. U is horizontal and V is vertical on that map, and the Image Texture node reads it to pick the pixel for each point.
How do I use a UV texture in Blender?
Create a material, add an Image Texture node with your image, and connect its Color to the Principled BSDF's Base Color. With nothing in the Vector input, the node uses the object's active UV map.
What is 3D UV mapping in Blender versus projection?
UV mapping uses a layout you control per face. Projections (Flat, Box, Sphere, Tube) apply the image from a simple shape, which the manual says tends to work only for simple meshes.
How do I use a different UV map for my texture?
Add a UV Map node, choose the map in its UV Map field, and connect its UV output to the Image Texture's Vector input.
How we checked this
We did not run Blender for this guide. We read these pages on November 4, 2026, and wrote only what they confirm:
- Blender 5.2 LTS manual, read November 4, 2026: Image Texture node, Texture Coordinate node, UV Map node, Mapping node, Image Settings, UV Editor introduction and Using UV Maps.
We did not confirm the exact location of the UV Maps list or the node search path in other Blender versions, so the steps above describe the 5.x interface in general terms.


