
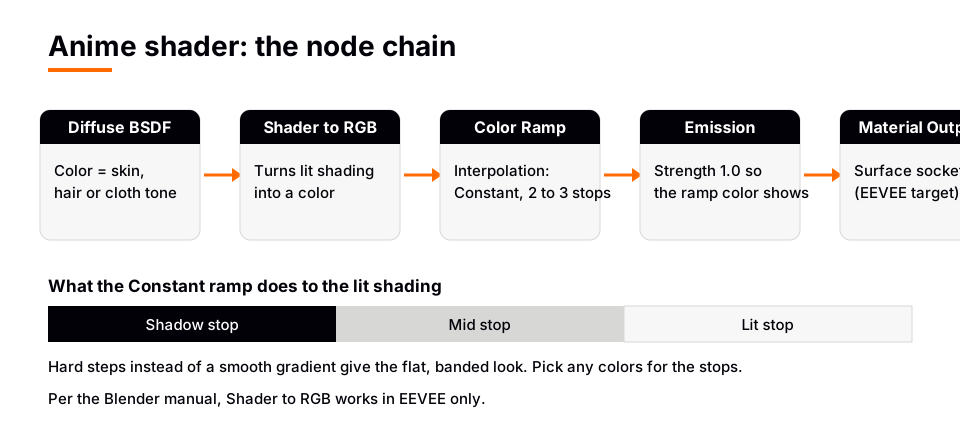
A Blender anime shader is a toon material: you take the lit shading of a Diffuse BSDF with a Shader to RGB node, run it through a Color Ramp set to Constant interpolation so it breaks into two or three flat tones, and send the result through an Emission shader into the Material Output. The manual says Shader to RGB works in EEVEE only, so build this in EEVEE.
This guide gives the anime shader Blender setup step by step in Blender 5.2 LTS, then covers the details that make it look like anime rather than a generic toon material: tinted shadows, a hard highlight and a rim light. For the general toon method, read our toon shader in Blender guide first. This post builds on it and does not repeat it.
Build a Blender anime shader, step by step
The Shader to RGB node page of the Blender Manual (5.2 LTS) says the node is typically used for non-photorealistic rendering, and that a color ramp on the output of a diffuse BSDF can make a flexible toon shader. These steps follow that idea.
- Use EEVEE. In the Render tab of the Properties editor, set Render Engine to EEVEE. Set the 3D Viewport to Material Preview or Rendered (Z opens the shading pie menu) so you can see the bands.
- Add a light. The bands come from how light hits the surface, so add a light. One light gives one clear shadow edge, which suits an anime look.
- Start the material. Select the object, open the Shading workspace and give it a new material. Delete the Principled BSDF and add a Diffuse BSDF. Set its Color to the base tone, such as a skin or cloth color.
- Add Shader to RGB. Add the Shader to RGB node (the manual lists it with the Color nodes). Connect the Diffuse BSDF's BSDF output to its Shader input.
- Add a Color Ramp. Add a Color Ramp node and connect Shader to RGB's Color output to the ramp's Factor input. The manual says you can connect Color sockets to Value sockets, which converts the image to black and white, so the ramp reads the brightness of the lit shading.
- Make it Constant. In the ramp's interpolation menu, choose Constant. The manual lists it as an interpolation mode, and it makes the ramp jump between stops instead of blending them. Set one stop for shadow on the left and one for lit on the right. Ctrl+click on the ramp adds a stop for a mid tone.
- Convert back to a shader. A color cannot go into Surface, so add an Emission node, connect the ramp's Color output to its Color input, and leave Strength at 1.0. The manual says a strength of 1.0 makes the object show exactly the Color input, "shadeless", which is what keeps your ramp colors true.
- Connect to the output. Connect the Emission node's output to the Surface socket of the Material Output.
You should now see an object split into flat shapes. If the shading is still smooth, the ramp is not on Constant. If nothing appears, see our guide on a Blender material that is not showing.
Sources: Shader to RGB node page
Make it look like anime
The chain above is a basic toon shader. These changes give it the anime character. The node choices below are common practice built from nodes the manual documents, so adjust them to taste.
Use colored shadows, not gray
Anime shadows are usually a shifted hue, not a darker version of the base color. Click the shadow stop in the Color Ramp and choose a color with a slightly cooler or more saturated hue than the lit tone. The manual's Color Ramp widget also has a Color Mode option: HSV or HSL mixing keeps saturation between different hues, where RGB desaturates. With Constant interpolation you rarely blend, but the setting matters if you switch to a soft ramp for some materials.
Move the shadow edge
The Position slider of the active stop sets where the shadow turns into light. Move it right for more shadow, left for less. A second stop gives a mid tone, which is what many anime characters use on hair and clothes. Stay with two or three tones; more starts to look like smooth shading again.
Add a hard highlight
The manual says Shader to RGB's Color output is the surface color computed from the BSDFs and lighting. That means a highlight from the connected shader can be flattened by a bright stop at the right end of the ramp. If you want specular in the result, connect a shader that produces it, such as the Principled BSDF, instead of the Diffuse BSDF, then raise the ramp's last stop to a near-white color so the highlight becomes a flat shape. Check the result in the viewport with a light placed so the highlight is visible.
Add a rim light
Anime often has a bright edge around the silhouette. The Layer Weight node's Facing output gives a weight that goes from facing the viewer to a grazing angle, per the manual. Feed Facing into its own Constant Color Ramp (black to white), then combine it with the main ramp's output using a Mix node set to Color with the Add or Screen blend mode, both listed in the manual. Keep the Factor low so the rim stays subtle. If the rim shows up in the middle of the form instead of at the edge, use Flip Color Ramp in the ramp widget's Tools menu.
Keep textures
A ramp that outputs strong colors replaces the object's texture colors. For a textured character, keep the ramp in grays (dark gray, light gray, white), then multiply it with the texture color using a Mix node in Multiply mode before the Emission node. Our guide on how to add a texture in Blender covers connecting the image.
Add outlines
Anime shading usually comes with line art. The Blender Manual shows a simple toon example using Shader to RGB together with Freestyle, a line-based non-photorealistic render system. You can also build an outline from geometry. Our guide to the outline shader in Blender covers Freestyle and the Solidify inverted hull method, and both work with the node chain here.
Limits of Shader to RGB
The manual lists clear limits for this node, and they explain most problems.
- EEVEE only. The node page is labeled EEVEE Only. The manual does not describe a Cycles equivalent on that page, so this setup is not a Cycles method.
- It breaks the PBR pipeline. The manual says the result is unpredictable with ambient occlusion, contact shadows, soft shadows and screen space refraction.
- Noisy input gives noisy bands. Some effects need several samples to converge, and applying arbitrary changes to noisy input may not give a smooth result. If your band edges flicker, that is the cause.
- Upstream BSDFs are hidden from some effects. The manual lists Screen Space Reflection, Subsurface Scattering, and the Alpha Clip and Alpha Hashed blend modes.
- Render passes. The manual says Shader to RGB does not give the expected results in render passes.
For a project that must render in Cycles, plan another look. Our EEVEE vs Cycles comparison explains the difference between the engines.
Learn this in order with The Blender Launchpad
A stylized shader sits on top of basics: nodes, lighting, UVs and the render engine. The Blender Launchpad is a members app with a roadmap of hand picked, free YouTube lessons in six stages, starting with a first stage that assumes you have never opened Blender. Later stages cover UV and PBR texturing, lighting and rendering in Cycles and EEVEE, and animation.
It is a curated playbook rather than original video lessons, with one payment and no subscription. It also includes 1,000+ CC0 assets, HDRIs and textures that are free for commercial use.
Questions people also ask
How do I make an anime shader in Blender?
Connect a Diffuse BSDF to a Shader to RGB node, then to a Color Ramp set to Constant interpolation, then to an Emission shader with Strength 1.0, and finally to the Surface socket. Use EEVEE as the render engine.
What is the best anime shader Blender setup?
There is no single best setup. The core chain is the same for most looks. What changes is the number of ramp stops, the shadow colors, and extras such as a hard highlight or rim light.
Does the anime shader work in Cycles?
The Blender Manual labels the Shader to RGB node as EEVEE only, so this node setup is for EEVEE. The manual page does not give a Cycles alternative.
How do I add outlines to an anime shader in Blender?
Use Freestyle, which draws lines from edge types, or a Solidify modifier with flipped normals and a separate material. Both are covered in our outline shader guide.
How we checked this
We read these pages on November 4, 2026: Blender Manual (5.2 LTS) Shader to RGB node, Color Ramp node and widget, Diffuse BSDF, Emission, Layer Weight, Mix, RGB to BW (for the Color to Value conversion), Freestyle introduction and Materials introduction. We did not run Blender while writing this. The ramp structure for colored shadows, the highlight and rim light, and the grayscale texture tip are common stylized shading practice built from documented nodes, not tested recipes or manual statements.


