
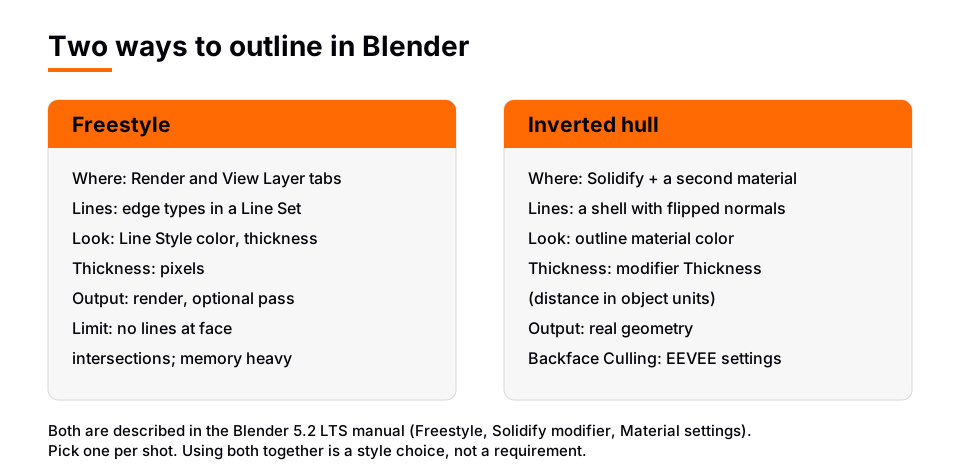
A Blender outline shader is made one of two ways. Freestyle draws lines from the mesh's edges at render time: tick Properties > Render > Freestyle, then choose edge types and a line style. The inverted hull method adds a slightly larger shell to the object with a Solidify modifier, flips its normals, and gives it a separate material with Backface Culling on, so only the part of the shell around the silhouette shows.
This guide covers both in Blender 5.2 LTS, using the node, modifier and panel names from the manual, and then compares them so you can choose. It pairs well with our toon shader in Blender and anime shader in Blender guides, which cover the shading itself.
Method 1: Freestyle outlines
The Freestyle introduction in the Blender Manual calls it an edge and line based non-photorealistic rendering engine. It uses mesh data and Z-depth information to draw lines on the edge types you select, with a line style controlling how they look.
Turn it on
- Open the Render tab in the Properties editor and tick the checkbox in the Freestyle panel header. The manual says this activates Freestyle for the scene.
- Open the View Layer tab. Freestyle can also be switched on or off per View Layer in the header of its Freestyle panel. Set Control Mode to Parameter Editor Mode, which uses a point-and-click interface for line sets and line styles.
- In the Freestyle Line Set panel, look at Edge Types. The manual says you must choose at least one edge type in the parameter editor to get any output.
- Render with F12 and check the lines in the render window.
Pick the edge types
| Edge type | What the manual says it draws | Use it for |
|---|---|---|
| Silhouette | Lines where the surface turns from facing to facing away from the camera | Organic shapes; it is poor on sharp edges and cannot render open meshes |
| Crease | Edges sharper than the Crease Angle in the View Layer panel | Hard edges of mechanical shapes |
| Border | Open mesh edges (edges with only one face) | Planes and open cylinders |
| Contour | Lines around each object, separating it from objects behind it or the background | Overlapping objects |
| External Contour | Lines around all objects against the background only | A clean outer outline |
| Material Boundary | Lines where two materials meet on the same object | Color blocks on a character |
| Edge Mark | Edges you marked yourself | Full control over which lines render |
For a classic outline, start with Silhouette or External Contour, and add Crease if you want the sharp edges inside the shape. To mark your own, enter Edit Mode, select edges, press Ctrl+E and choose Mark Freestyle Edge, then enable the Edge Mark type. To remove lines from some faces, select faces, press Ctrl+F and choose Face Data > Mark Freestyle Face, then use the Face Marks options in the line set.
Set color and thickness
- Color. In the Line Style, the Color tab has a Base Color. Per material, the Material tab has a Freestyle Line panel with Line Color and Priority, which decides which color wins where materials meet.
- Thickness. The Thickness tab has a Base Thickness. The Thickness Position options (Center, Inside, Outside, Relative) apply only to Silhouette and Border lines. Choose Outside to keep the line from eating into your shape.
- Thickness mode. In the Render tab's Freestyle panel, Absolute uses a set number of pixels. Relative scales the unit line thickness by the image height compared with 480 pixels, so the line keeps the same look at a different resolution.
Freestyle limits
The manual lists these known limitations: it is highly memory demanding because all mesh objects in a view layer are loaded at once; only faced mesh objects are supported; no edges at face intersections are detected yet; Freestyle results have no Z depth information; and panoramic cameras are not supported. There is also an As Render Pass option in the View Layer panel. With it, lines are not drawn on the render directly, and you combine them with an Alpha Over node in the compositor.
Sources: Freestyle introduction in the Blender Manual
Method 2: the inverted hull outline
The inverted hull method uses geometry instead of a render setting. A copy of the surface is pushed slightly outward, its normals are flipped, and it gets a solid color. With Backface Culling on, the front of the shell hides and only the far side shows around the object. That far side makes the outline. The Solidify modifier page of the manual describes every setting used here.
Steps
- Add two materials. In the Material tab, make slot 1 your main material. Add slot 2 with the plus button and create a new material named Outline. In its node tree, use an Emission shader in a flat color with Strength 1.0, which the manual says shows exactly the Color input. Connect it to the Surface socket.
- Add the modifier. In the Modifiers tab, add a Solidify modifier from the Generate group. Keep Mode on Simple, the default, which the manual says simply extrudes the geometry.
- Set Thickness. The manual defines Thickness as the depth to be solidified. Use a small value and adjust until the line width looks right.
- Set Offset. Offset runs from -1 to 1, with 0 centered on the original mesh. The manual says inside and outside are decided by the face normals. For an outline you want the shell outside, so try 1 and check the viewport. If the shell appears inside the object, use -1 instead.
- Flip the normals. In the Normals panel of the modifier, tick Flip Normals, which reverses the normals of all geometry the modifier makes.
- Use the second material. In the Materials panel of the modifier, set Material Offset to 1. The manual says a value of 1 uses the material immediately below the original, so the new shell uses slot 2, your Outline material.
- Turn on Backface Culling. Select the Outline material, open Material > Settings, and tick Backface Culling in the Surface section. The manual says it hides the back side of faces.
View it in Material Preview or Rendered. You should see the object with a line around its silhouette. Because the shell's normals are flipped, the shell side facing the camera counts as a back side and is culled, while the far side of the shell remains visible past the edge of the object.
Tune and fix the hull
- Uneven line width. The manual says the modifier thickness is calculated using local vertex coordinates, so a non-uniform object scale makes the thickness vary on different sides. Apply the scale first (Ctrl+A in Object Mode, then Scale).
- Gaps or broken corners. Simple mode needs the normals of adjacent faces to point the same general way, so recalculate normals in Edit Mode with Shift+N. Even Thickness adjusts for sharp corners, at the cost of more computation. The manual also says the final thickness is an approximation.
- Thinner lines in places. Pick a Vertex Group in the modifier. Its weights are multiplied onto the Thickness, so low-weight areas get a thinner outline.
- The whole object turns black. Backface Culling is off on the Outline material, or the normals are not flipped. Check both.
- Rim faces. The Materials panel also has a Rim setting. The manual says it lets you give another material to the rim faces, which matters if you use the Only Rim or Fill Rim options.
One more limit: the 5.2 manual documents Backface Culling on the EEVEE material settings page. The Cycles material settings page I read does not list it, so plan the inverted hull method for EEVEE. The outline thickness is also a distance in the object's own units, so it looks thinner when the object is far from the camera. Freestyle lines are measured in pixels instead.
Sources: Solidify modifier page of the manual
Freestyle or inverted hull: which to use
| Question | Freestyle | Inverted hull |
|---|---|---|
| Where is it set? | Render, View Layer and Line Style settings | Solidify modifier plus a second material |
| Thickness unit | Pixels (absolute or relative) | Distance in object units |
| Inner lines (creases) | Yes, through edge types | No, silhouette only |
| Known limits | Memory heavy; no intersection edges; no Z depth | Needs Backface Culling; uneven on non-uniform scale |
| Render type | Line pass or on the image | Real geometry in the scene |
Choose Freestyle when you want inner lines or pixel-consistent widths. Choose the inverted hull when you want the outline as real geometry that follows the object in the viewport. The Solid viewport also has an Outline option, but the manual describes it as a viewport display setting, so it is not a way to outline a final render. To add shading under the lines, read how to build the material nodes for either look, and our how to render in Blender guide for output settings.
Learn this in order with The Blender Launchpad
Outlines are a small step in a bigger pipeline of modeling, materials, lighting and rendering. The Blender Launchpad is a members app with a roadmap of hand picked, free YouTube lessons in six stages, starting with a first stage that assumes you have never opened Blender. The stages run through hard surface modeling, UV and PBR texturing, studio lighting and rendering in Cycles and EEVEE, animation, and Geometry Nodes.
It is a curated playbook rather than original video lessons, with one payment and no subscription. It also includes 1,000+ CC0 assets, HDRIs and textures that are free for commercial use.
Questions people also ask
How do I make an outline shader in Blender?
Either tick Freestyle in the Render tab and choose edge types, or add a Solidify modifier with Flip Normals, a second material, and Backface Culling on that material. Freestyle draws lines in pixels; the inverted hull uses geometry.
What is the inverted hull method in Blender?
It is an outline made from a slightly larger shell with flipped normals. Backface Culling hides the shell's front, so only the edge around the object's silhouette shows in the outline color.
Why are Freestyle lines missing where objects intersect?
The manual lists that no edges at face intersections are detected yet. If the intersection follows existing mesh edges, an Edge Mark can draw a line there, and a Material Boundary can draw one where two materials meet.
How do I change the outline color and thickness?
For Freestyle, change Base Color and Base Thickness in the Line Style tabs. For the inverted hull, change the Outline material color and the Solidify Thickness.
How we checked this
We read these pages on November 4, 2026: Blender Manual (5.2 LTS) Freestyle Introduction, Render Properties, View Layer Properties, Line Set, Material Properties, Line Style (Color and Thickness), Solidify Modifier, EEVEE Material Settings, Cycles Material Settings, Emission, and Viewport Shading. We did not run Blender while writing this. The starting Offset of 1, the reason the culled shell leaves an outline, and the choice guidance are general modeling logic, not manual statements, so verify them in your own scene.


