
To optimize a Cycles render in Blender, stop spending samples where the image is already clean. Turn on the Noise Threshold, keep Denoise (Render) on with at least the Albedo pass, render on a supported GPU, and then cut light bounces and clamp fireflies.
Cycles is Blender's physically-based path tracer for production rendering, so quality and time come from the same place: how many light paths it traces per pixel. This guide goes through the settings in the order worth trying them, with what each one does according to the Blender 5.2 LTS manual. We do not quote render times or promise speedups, because they depend on your scene and hardware. Time one frame before and after each change. If you are new to rendering, start with how to render in Blender.
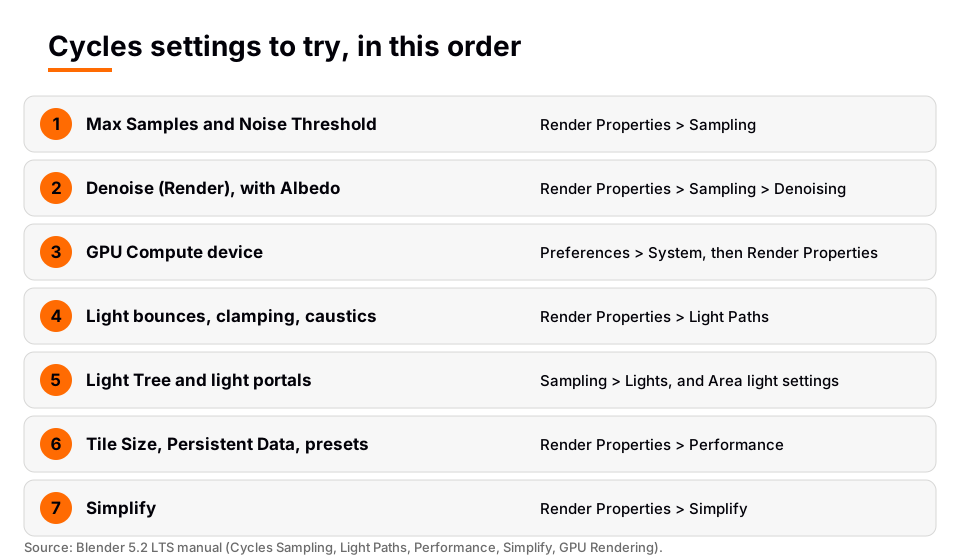
What Cycles is and how to turn it on
Searches for "blender cycles" and "cycles blender" usually mean the render engine. The manual describes Cycles as a physically-based path tracer designed to give physically based results out of the box, with flexible shading nodes. To use it, select Cycles as the Render Engine in Render Properties.
Sampling in Cycles means tracing rays from the camera into the scene and bouncing them around until they reach a light source: a light object, an emissive mesh or the world background. Every optimization below either needs fewer paths, makes each path cheaper, or cleans the result afterward. For the other engine, see EEVEE vs Cycles.
Samples and Noise Threshold
Open Render Properties > Sampling. Render (Max) Samples is the number of paths per pixel in the final render. The manual says a higher number gives a cleaner image at the cost of a longer render time. It gives no single right value, so test.
- Noise Threshold (the checkbox under Adaptive Sampling) lets Cycles stop sampling pixels that have become less noisy than the threshold. The manual's example is that hair may need many samples while the background needs few.
- The manual says typical values run from 0.1 to 0.001, with lower values meaning better quality and longer renders. Setting it to 0 makes Cycles guess a value from the total sample count.
- Time Limit stops the render when the time passes the limit even if the sample count has not been reached. Zero disables it. The limit does not include pre-render processing.
With the threshold on, treat Max Samples as a ceiling. Raise it and let the threshold decide where the samples go.
Denoising
Denoising uses a specialized algorithm to give a less noisy image without requiring more samples. Tick Denoise (Render) in the Denoising section.
- Denoiser: Automatic uses GPU accelerated denoising if supported and prefers OpenImageDenoise over OptiX. The manual says OpenImageDenoise typically provides the highest quality, and OptiX supports GPU acceleration on some older NVIDIA GPUs where OpenImageDenoise does not.
- Passes: the manual recommends at least Albedo, because None can blur out details, especially at lower sample counts.
- Prefilter and Quality (OpenImageDenoise): Prefilter None is the fastest but assumes noise-free input passes, and Accurate usually gives more detail than Fast with more processing time. Quality runs High, Balanced, Fast, trading time for quality.
- Use GPU: the manual says this is significantly faster than the CPU but needs additional GPU memory. Turn it off if a large scene runs short.
The manual notes that without the Albedo pass the denoiser can blur out details, especially at lower sample counts. Check fine textures and thin lines in the denoised result, not only the overall look.
Render on the GPU
The manual says GPU rendering can speed up rendering because modern GPUs are designed to do a lot of number crunching, but it has limits with complex scenes because of more limited memory. To enable it:
- Open Preferences > System and, in Cycles Render Devices, select CUDA, OptiX, HIP, oneAPI or Metal, depending on your hardware.
- Enable the available devices for that backend.
- In Render Properties, set the scene to use the GPU Compute device.
The manual states that OptiX takes advantage of hardware ray-tracing acceleration in RTX graphics cards, and that supported hardware varies by vendor and driver version, so check the GPU Rendering page for your card. If a scene renders on the CPU but not on the GPU, the manual says the usual reason is not enough GPU memory. With CUDA, OptiX, HIP and Metal, Blender then tries to use system memory, which costs performance but usually still beats CPU rendering. On what renders faster, the manual only says it varies with the hardware.
Light paths: bounces, clamping and caustics
Open Render Properties > Light Paths. Max Bounces sets how far each path travels. The manual says that for the best quality the total should be at the maximum, but lower values render faster, and 0 bounces gives direct lighting only. The Reducing Noise page adds that diffuse surfaces can get away with fewer bounces, glossy a few more, and transmission shaders such as glass usually need the most. It also mentions a Limited Global Illumination preset that uses fewer bounces per shader type.
- Clamping (Direct Light and Indirect Light) limits the intensity a single sample can add to a pixel. It reduces noise at the cost of accuracy, and 0 disables it. The manual suggests clamping indirect bounces separately because they cause more fireflies, and warns that low values dim intentionally bright parts.
- Filter Glossy blurs glossy reflections after blurry bounces. The manual says 1.0 is a good starting value.
- Caustics (Reflective and Refractive) can be unchecked. The manual notes caustics are a common source of noise, and that disabling them means missing light.
The Reducing Noise page also says to keep shader color values to 0.8 or less and make the lights brighter, because values near 1.0 let light intensity barely decrease between bounces and add noise. Each transparency step also costs a shader evaluation and a ray, so many stacked transparent layers are slower than they look.
Lights and materials that find the light faster
- Light Tree (Sampling > Lights) samples lights using distance and estimated intensity. The manual says it can significantly reduce noise at the cost of a somewhat longer render time per sample, and that custom falloff, ray visibility and complex shader node setups are not accounted for.
- Light Threshold probabilistically terminates light samples whose contribution is below the threshold, so time is not wasted on lights that add little. Zero disables the test.
- Light portals help a daylight interior lit through a window or door, where the integrator has trouble finding the opening. You shape the portal to match the opening.
- Multiple Importance on bright emissive meshes can reduce noise, but on dim ones it takes samples from more important lights. The manual says the best setting may be trial and error. The world has the same option, useful for environment maps with small bright spots (see Blender HDRI).
- Mix Shader branches are not evaluated when the Factor is exactly 0 or 1, which the manual says can substantially cut the cost of combining materials with a switch input.
Performance panel and Simplify
| Setting | What the manual says | Trade-off |
|---|---|---|
| Performance presets | Default, Faster Render, Lower Memory | Faster Render uses more memory; Lower Memory renders slower |
| Tile Size | Default 2048 is a good balance; 1024 or 512 helps when out of memory | Typically a small performance cost |
| Persistent Data | Keeps render data for faster re-renders and animation renders | More memory while you do other things |
| Texture Cache | Reduces memory and startup time with many image textures | Small render cost, more disk space |
| Use Spatial Splits | Helps scenes mixing large and small polygons | Longer BVH build, slightly more memory |
Simplify (Render Properties > Simplify) offers further savings: Max Subdivision for Subdivision Surface modifiers, a Texture Size Limit that scales textures down, and Camera Cull and Distance Cull for objects out of view or far from the camera. These change what is rendered, so check the result. Path guiding helps noise in scenes where light is hard to reach, but the manual says it is available only on the CPU.
For long animations, also read how to render an animation in Blender, and if you need more quality rather than more speed, see how to make a Blender render higher quality.
Skip the node wiring with the Material & Lighting Vault
Much of Cycles noise starts with how the scene is lit and shaded. The Material & Lighting Vault is a Blender 5.2+ extension (the Metalight tab in the N panel) with 200 lighting setups that measure the selected objects and build themselves around them, tuned for Cycles. It also has 267 studio lights and 1,690 procedural materials that need no UVs by default and work in Cycles and EEVEE.
It does not change the sampling settings above, and you still set samples, denoising and the device yourself. It is aimed at the trial and error of placing lights from scratch. To learn rendering as a whole, The Blender Launchpad is a roadmap of hand picked, free YouTube lessons with a studio lighting and rendering stage.
Questions people also ask
What is Cycles in Blender?
Cycles is Blender's physically-based path tracer for production rendering. You select it as the Render Engine in Render Properties, and it can render on the CPU or on supported GPUs.
How do I make Cycles render faster in Blender?
Turn on the Noise Threshold, enable Denoise (Render) with at least Albedo, use a supported GPU, and reduce light bounces. Change one setting at a time and time a single frame.
How many samples should I use in Cycles?
The manual gives no fixed number. More samples give a cleaner image and a longer render. With the Noise Threshold on, set Max Samples as a ceiling and let the threshold stop clean pixels early.
Why does my Cycles render have white dots?
White dots are fireflies, usually from caustics or very bright, hard to find light paths. Try Filter Glossy, disabling caustics, or clamping indirect light, and accept some loss of accuracy.
Is Cycles on the GPU faster than the CPU?
The manual says GPU rendering can speed up rendering, but memory is more limited and what renders faster varies with the hardware. Test your own scene on both devices.
How we checked this
We read these Blender 5.2 LTS manual pages on November 4, 2026: Cycles, Sampling, Light Paths, Performance, Simplify, GPU Rendering, Reducing Noise and Shader Nodes optimizations. We did not run Blender or time any render, so there are no render times or speedup percentages. We describe the scene's device setting as the GPU Compute device, as the manual does, without naming its exact panel.


