
3D rendering for product visualization in Blender is a fixed sequence: set your units and apply scale, bevel the edges so they catch light, build physically based materials, light the product with soft studio lights, frame it with a camera, render in Cycles with denoising, and save a PNG with or without a transparent background. Each step below names the exact panel and setting in the Blender 5.2 LTS manual.
For what product visualization is and where it is used, read what is 3D product visualization first. This post is the hands-on part. We did not run Blender while writing it, so every menu path and option comes from the manual pages listed at the end, and we say plainly when something is general craft advice instead.
3D rendering for product visualization: the workflow at a glance
Most product images fail for boring reasons: wrong scale, razor sharp edges that reflect nothing, or a single hard light. Each step below depends on the one before it.
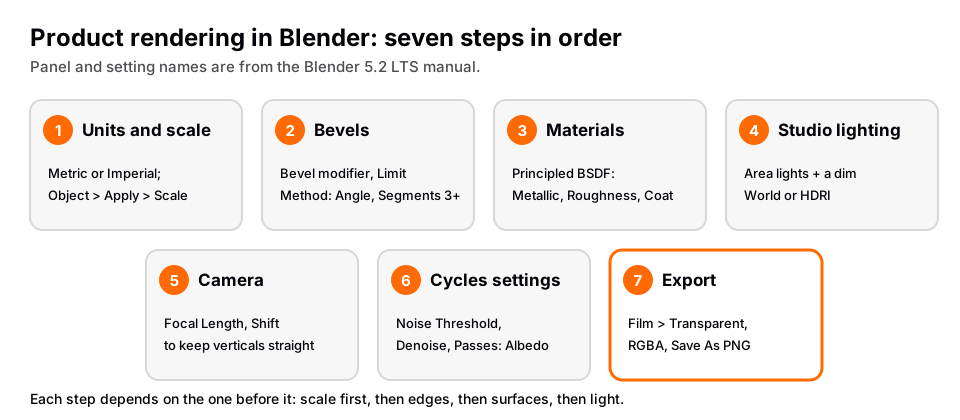
- Units and scale
- Bevels
- Materials
- Studio lighting
- Camera
- Cycles render settings
- Transparent background, saving and post
Step 1: set units and apply scale
Scale decides whether bevels, light falloff and depth of field behave the way you expect, so fix it before you model or import.
- Open the Properties editor, go to the Scene tab and open the Units panel.
- Set Unit System to Metric or Imperial. The manual says None uses units with no relation to the real world.
- Leave Unit Scale alone unless you have a reason. The manual says it only changes the values shown in the interface, not how things behave internally, and that physics simulations do not take it into account.
- Set Length to the unit you think in. Adaptive picks a unit per value, for example 23cm in one field and 10km in another. A fixed unit such as Centimeters keeps every field readable for a small product.
- In Object Mode, select the product and use Object ‣ Apply ‣ Scale (Ctrl+A). The manual says this resets Scale to 1.0 while the object keeps its appearance.
After step 5 the N panel should show a Scale of 1 on every axis. The reason to do it: the manual notes that applying transforms affects how modifiers behave, since they often depend on an object's transform values. A Bevel width you set on an unscaled object can mean something different from the same number on a scaled one.
If you import a file, check its size against the real product. The manual's import options include Scale and axis settings because applications disagree about both.
Step 2: bevel the edges so they catch light
Real manufactured edges are never mathematically sharp. A tiny rounded edge catches a highlight, and that highlight is what tells the eye where a shape ends. A perfectly sharp edge renders as a hard line with no sheen. The full technique is in how to bevel in Blender; here is the product-render version.
- Select the object and open the Modifiers tab in the Properties editor.
- Choose Add Modifier ‣ Generate ‣ Bevel.
- Set Affect to Edges. The manual says this bevels the edges and creates intersections at the vertices.
- Set Limit Method to Angle. The manual says it bevels only sharp edges and leaves smooth surfaces alone.
- Set Segments to 3 or more for a rounded look. Segments are the edge loops added along the bevel. With only 1 segment you get a flat chamfer, and the Shape setting has no effect below 2 segments.
- Raise Width until the edge reads as a soft highlight in a test render. This part is judgment, not manual text: if the edge looks like soap, the Width is too large.
Then check the shading. Choose Object ‣ Shade Smooth. The manual says this changes how shading is calculated across the surface without changing the geometry. The Bevel modifier also has a Harden Normals option in its Shading panel that keeps surrounding faces flat while the bevel shades smoothly into them. It needs a custom split normals attribute, and the manual says Blender creates a custom_normal attribute for you if none exists. Object ‣ Shade Auto Smooth adds a Smooth By Angle modifier to control sharpness by angle.
Step 3: build materials with the Principled BSDF
The Principled BSDF is the shader to start with. The manual describes it as one node that combines several layers and can model a wide variety of materials. The inputs you will touch most for products:
| Input | What the manual says | Product use |
|---|---|---|
| Base Color | Overall color for diffuse, subsurface, metal and transmission | The paint, plastic or metal tint |
| Metallic | Blends between a dielectric and a metallic model | Usually 0 or 1, not in between |
| Roughness | 0.0 is a perfectly sharp reflection, 1.0 a diffuse one | Polished vs brushed vs matte |
| Coat ‣ Weight | A glossy coat on top, for clearcoat, lacquer or car paint | Lacquered or glossy finishes |
| IOR | Default 1.5 is a good approximation for glass | Glass and clear plastic |
Set these in the Material tab of the Properties editor or in the Shader Editor. Build in two passes: get Base Color and Metallic right under neutral light, then tune Roughness while watching the reflections, because roughness is what separates a brushed surface from a polished one.
Glass and clear plastic need extra care because they refract the scene behind them. Our Blender glass material guide covers that case. Image textures painted in Substance Painter or similar programs can be linked straight to the matching Principled BSDF inputs, per the manual.
Step 4: build the studio lighting
Add a light with Add ‣ Light ‣ Area (Shift+A). The manual says the area light simulates a surface emitter and produces soft-bordered shadows, in contrast to point-like lights that give sharp ones. In the light's properties you set Power, Shape (Rectangle, Square, Disk or Ellipse) and Size. The Light Objects page also says lights with larger size have softer shadows and specular highlights, and appear dimmer because their power spreads over a larger area.
A starting layout, which is general studio practice and not from the manual:
- Key light: a large rectangle area light at roughly 45 degrees to the side and above the product. It defines the main highlights.
- Fill light: a larger, dimmer area light on the opposite side, or a white card, to lift the shadows without adding a second set of highlights.
- Rim or back light: a long, narrow rectangle behind the product to outline the edge against the background.
Product renders are mostly reflections, so the shape of your lights shows in glossy surfaces. A long strip light makes a long highlight.
For the world, open the World tab. The manual says the Environment Texture node lights the scene using an environment map image. Poly Haven's license page, read November 4, 2026, says its HDRIs are CC0 and can be used for any purpose, including commercial work, without credit. Blender lighting for beginners goes deeper on all of this.
Step 5: frame the product with a camera
- Choose Add ‣ Camera, then press Ctrl+Numpad0 to set the active object as the camera. The manual lists this under View ‣ Cameras ‣ Set Active Object as Camera.
- Press Numpad0 to look through it. The manual says the rendered image contains everything inside the dashed frame.
- In the Camera properties, set Focal Length. Longer focal lengths give a smaller field of view, shorter ones show more of the scene. As general practice, a longer focal length keeps proportions of a small object more natural than a very wide lens, but judge by eye.
- To keep vertical lines vertical, do not tilt the camera to fit the product. Use Shift in the Lens panel instead. The manual shows that lens shift keeps horizontal lines horizontal where rotating the camera skews them.
- Optional depth of field: turn it on, set a Focus Object or Focus Distance, and use F-Stop. The manual says lower values give a strong depth of field effect, so keep it high if you want the whole product sharp.
Before you render, set Output Properties ‣ Format ‣ Resolution X and Y. The manual says the Percentage slider is useful for small test renders that keep the proportions of the final.
Step 6: render in Cycles and tame the noise
Blender 5.2 includes EEVEE, a realtime engine, and Cycles, a path tracer. The manual says Cycles always provides more physically accurate renders than EEVEE. For glossy products with multiple reflections, start with Cycles.
- In Render Properties, set Render Engine to Cycles.
- Set Device. The manual says GPU Compute is often faster than CPU; the GPU must be enabled in Preferences under Cycles Render Devices.
- Open Sampling. Under Render, Max Samples is the number of paths per pixel. The manual says more samples give a cleaner image at the cost of render time.
- Turn on Noise Threshold (adaptive sampling). The manual says typical values are 0.1 to 0.001, and lower means better quality and longer renders. Setting it to 0 makes Cycles guess a value from the total sample count.
- Turn on Denoise for the render. The Denoiser can be Automatic, OpenImageDenoise or OptiX. The manual says OpenImageDenoise typically provides the highest quality, and that OptiX only appears on NVIDIA GPUs.
- Set the denoiser Passes to Albedo or Albedo + Normal. The manual recommends at least Albedo because None can blur out details, especially at lower sample counts.
- Press F12 to render.
You should see the render build up and then clean. Bright specks on glossy surfaces usually come from a small, very bright light, so try a larger light with lower power. The Time Limit option in Sampling stops a render at a time you set (0 disables it).
Next, color. In the Color Management panel of Render Properties, View Transform decides how scene values become display colors. The manual lists Standard, AgX, Khronos PBR Neutral and others. It describes Khronos PBR Neutral as designed so output colors match the input base colors as faithfully as possible under gray-scale lighting, aimed at product photography where the scene is well exposed. It also calls Filmic deprecated and superseded by AgX, so older tutorials that say Filmic are out of date for 5.2. Try both and compare your product's real color to the render.
Step 7: transparent background, saving and post
To render a product on a transparent background, go to Render Properties ‣ Film and enable Transparent. The manual says it renders the background transparent, for compositing over another background afterward. In Cycles, Transparent Glass renders transmissive surfaces as transparent, and Roughness Threshold keeps rougher surfaces opaque. The full walkthrough is in how to render a transparent background in Blender.
Then save the image. The manual says still renders (F12) are not saved automatically. Save from the Image Editor, and choose a format with alpha. The supported formats table lists alpha for PNG (8 or 16 bit), OpenEXR and WebP, and none for JPEG. In the Output panel, Color must be RGBA for the alpha channel to be saved. The manual advises PNG for on-screen output and OpenEXR if you plan to composite or color grade. In the save dialog, Save As Render applies the render's color management; for display formats like PNG that means the view and display transform are applied.
For post, you have two reasonable routes. Blender's compositor has a Denoise node using Open Image Denoise; the manual says to enable Denoising Data in the View Layer properties and connect the Albedo and Normal passes for best detail. For shadows on a plain floor with a transparent background, a Cycles object can be set as a shadow catcher in Object Properties ‣ Visibility ‣ Mask ‣ Shadow Catcher, which the manual says makes the object receive only shadow rays.
Skip the node wiring with the Material & Lighting Vault
Steps 3 and 4 take the longest, because every finish needs its own node tree and every product needs a lighting rig sized to it. The Material & Lighting Vault is a Blender add-on that handles both from the Metalight tab in the N panel. It ships 1,690 procedural materials (1,000 core in 32 categories plus 690 Pro) that work in Cycles and EEVEE and need no UVs by default, because they use object coordinates, with a Use UV option when you want it.
It also includes 200 lighting setups that measure the selected objects and build themselves around them, in 19 categories and tuned for Cycles, plus 267 studio lights such as softboxes, beam profiles and gobos. Select your product, pick a setup, and adjust from there. A set of 67 weathering presets, such as rust, moss, snow, soot, cracks and edge wear, can be applied over any material, including your own. The Vault needs Blender 5.2 or newer, is a tool and not a course, and is one payment.
If you are learning the whole process from the beginning, The Blender Launchpad is the course side: a roadmap of hand picked, free YouTube lessons, with a stage on studio lighting and rendering in Cycles and EEVEE.
Questions people also ask
What is 3D rendering for product visualization?
It is turning a 3D model of a product into a finished image or animation by giving it materials, light and a camera and then rendering it. In Blender, the rendering step is done by Cycles or EEVEE.
Should I use Cycles or EEVEE for product renders?
The manual says Cycles always provides more physically accurate renders, and that EEVEE can still produce high quality final renders. For glossy or transparent products, start with Cycles and compare.
How do I get a product render with a transparent background?
Enable Render Properties ‣ Film ‣ Transparent, set the output Color to RGBA, and save as PNG. Use Transparent Glass if you want glass to be see-through as well.
Why do my product edges look flat?
Edges with no bevel have nothing for a light to reflect on. Add a Bevel modifier with Limit Method set to Angle and 3 or more Segments, and make sure Shade Smooth is applied.
How we checked this
We did not run Blender for this guide. We read these pages on November 4, 2026, and wrote only what they state. Anything labelled as general practice is our own craft advice, not manual text.
- Blender 5.2 LTS Manual: Scene Properties (Units), Apply, Shading, Bevel modifier, Principled BSDF, Light Objects, Environment Texture, Cameras, Camera View.
- Cycles, EEVEE, Cycles Render Settings, Sampling, Cycles Film, Cycles Object Visibility, Displays and Views.
- Output Format, Output panel, Supported Image Formats, Denoise node.
- Poly Haven license.
We could not confirm the Material tab's exact panel labels from the manual, so we describe the Material tab generally. The default value of Unit System and the default View Transform are not stated on the pages we read, so we give none. Render times depend on your hardware, and we give none.


