

To learn Blender software as a product artist, work through five parts in order: the interface and navigation, modeling with modifiers, UV unwrapping and materials, lighting and camera, then a finished render in Cycles or EEVEE. Animation and Geometry Nodes come after that, and sculpting, video editing and most of the rest can wait. This is how to learn Blender software when the goal is a clean image of a product, not a film.
Blender is large. The Blender Manual says it supports the entire 3D pipeline, from modeling and rigging to compositing and video editing, so a roadmap that cuts the list down to your job is the fastest way in. This guide is that roadmap, built from the Blender 5.2 LTS Manual.
What a product artist needs from the software
A product artist makes still images or short turntables of objects: a bottle, a speaker, a pair of headphones. The work breaks into five jobs, and each maps to a part of Blender.
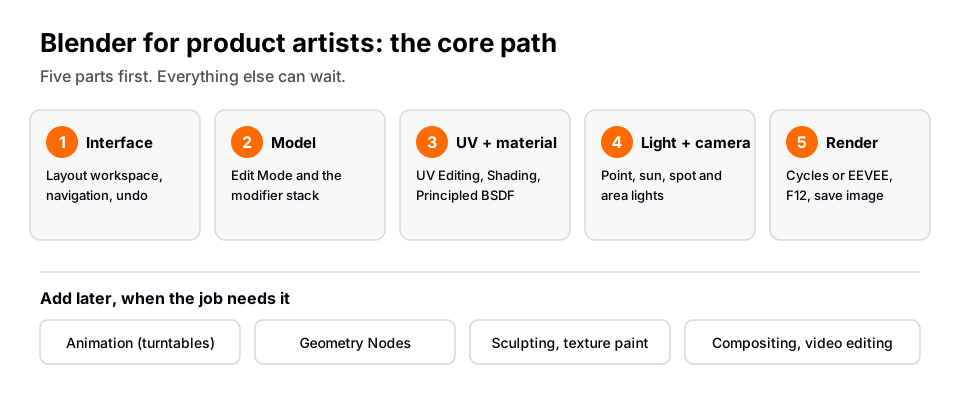
| Job | Where in Blender | What the manual says |
|---|---|---|
| Shape the product | Modeling workspace, Modifiers tab | Modifiers are automatic, non-destructive operations |
| Prepare for textures | UV Editing workspace | For mapping image texture coordinates to 3D surfaces |
| Make the surface | Shading workspace | For specifying material properties for rendering |
| Light and frame | Light objects, camera | Light types include point, sun, spot and area |
| Produce the image | Render properties | Cycles and EEVEE are the two main engines |
Part 1: learn the interface and navigation
Start in the default Layout workspace. The manual says the window has a Topbar, Areas in the middle and a Status Bar, and that Layout holds a 3D Viewport (top left), Outliner (top right), Properties (bottom right) and Timeline (bottom left). The startup scene contains a cube, a light and a camera, which is already a tiny product shot.
- Orbit with the middle mouse button or by dragging the navigation gizmo in the top right of the 3D Viewport. If you have no middle button, the manual points to its Keyboard and Mouse page for workarounds.
- Press Shift+A to add an object, then use G, R and S to move, rotate and scale it.
- Undo with Ctrl+Z. Hover over any control and press F1 to open its manual page.
You are done with this part when you can look at your object from any side and recover from a mistake without thinking. If this part feels slow, is Blender hard to learn explains what is normal.
Part 2: modeling and modifiers
Product shapes are mostly clean, hard-edged forms, so modifiers do a lot of the work. Press Tab to move between Object Mode and Edit Mode and try the Modeling workspace. Then open the Modifiers tab in the Properties editor. The manual lists the Generate modifiers, which include Array, Bevel, Boolean, Mirror, Solidify and Subdivision Surface, and says new modifiers are added at the bottom of the stack and applied last.
That stack order is the main idea to learn here. A Bevel after a Boolean behaves differently from a Bevel before it. Our guide to hard surface modeling goes deeper.
Part 3: UV unwrapping and materials
Switch to the UV Editing workspace to lay your surface flat so an image can wrap around it. Our guide on how to UV map in Blender walks through it. Then open the Shading workspace and build materials with the Principled BSDF node.
The manual describes the Principled BSDF as a node that combines multiple layers into one easy to use shader, built on the OpenPBR Surface model and compatible with parameters from similar PBR shaders in other software. It adds that image textures from tools like Substance Painter can be linked directly to the matching inputs. For a product artist, this one node covers most plastics, metals and coatings.
Part 4: lighting and camera
This is where a model becomes a product image. The manual describes the light types as follows: a point light radiates in all directions, a spot light emits a cone-shaped beam, an area light simulates light from a surface such as a window or screen, and a sun light has constant intensity from a single direction. Larger lights give softer shadows and highlights, per the Radius setting of the point light.
Switch the viewport to rendered shading to see changes live. The manual says Solid shading suits modeling and Rendered suits setting up lighting. Press Z to open the shading pie menu. For the workflow, see Blender lighting and 3D product visualization.
Part 5: choose an engine and render
The manual describes Cycles as the physically based path tracer for production rendering and EEVEE as the realtime engine focused on speed and interactivity. It says EEVEE materials use the same shader nodes as Cycles, so you can preview in EEVEE and render in Cycles, and that Cycles will always give more physically accurate results. Choose the engine in the Render properties, then press F12 (Render > Render Image) and save from the Image menu.
What can wait
You can leave these for later without losing your path: sculpting, texture painting, compositing, video editing, motion tracking and scripting. Add animation when you want a turntable or moving camera, since the Animation workspace is for making properties depend on time. Add Geometry Nodes last. The manual describes it as a system for modifying geometry with node-based operations, reached through a Geometry Nodes modifier, so it makes more sense once the modifier stack is familiar.
Learn this in order with The Blender Launchpad
The roadmap above is the shape of The Blender Launchpad. It is a members app with a roadmap of hand picked, free YouTube lessons in six stages: Blender basics, hard surface modeling, UV and PBR texturing, studio lighting and rendering (Cycles and EEVEE), animation, and Geometry Nodes. The Geometry Nodes Launchpad inside it has eight modules.
Stage 1 assumes you have never opened Blender. It is a curated playbook, not original video lessons, so you still watch free lessons on YouTube; the product is the order and the selection. Three bonuses are included: niche and portfolio building, LinkedIn branding, and 1,000+ CC0 assets, HDRIs and textures free for commercial use. One payment, no subscription.
Questions people also ask
How do I learn Blender software?
Learn it in order: interface and navigation, modeling, UV and materials, lighting, then rendering. Add animation and Geometry Nodes after that.
How to learn Blender software as a beginner?
Start in the Layout workspace, learn to navigate and transform objects, and use F1 for manual help on any control. The manual says a few hours of practice can make you familiar with it.
Which parts of Blender should a product artist learn first?
Modeling with modifiers, UV unwrapping, materials with the Principled BSDF, lighting and rendering. Sculpting and video editing can wait.
Is Blender software free to learn?
Blender itself is described in the manual as free and open source, and the manual is free online. How you structure your learning is the part you choose; we compare free and paid routes in another guide.
How we checked this
We read these pages on November 4, 2026. We did not run Blender for this article.
- Blender 5.2 LTS Manual: About Blender, Window System Introduction and Workspaces
- Blender 5.2 LTS Manual: Startup Scene, Navigating and Viewport Shading
- Blender 5.2 LTS Manual: Modifiers: Introduction, Generate modifiers and Geometry Nodes: Introduction
- Blender 5.2 LTS Manual: Principled BSDF, Light Objects, Cycles and EEVEE


