

To rig a mesh in Blender, add an armature with Add > Armature, build the bones in Edit Mode, select the mesh and then the armature and press Ctrl+P to choose Armature Deform > With Automatic Weights, then pose the bones in Pose Mode. If parts of the mesh deform badly, fix the weights in Weight Paint Mode.
This Blender rigging tutorial follows the Armatures chapter of the Blender 5.2 LTS manual (read November 4, 2026). It covers the basics only: one armature, a few bones, binding and weights. It does not cover constraints, inverse kinematics setups or control rigs.
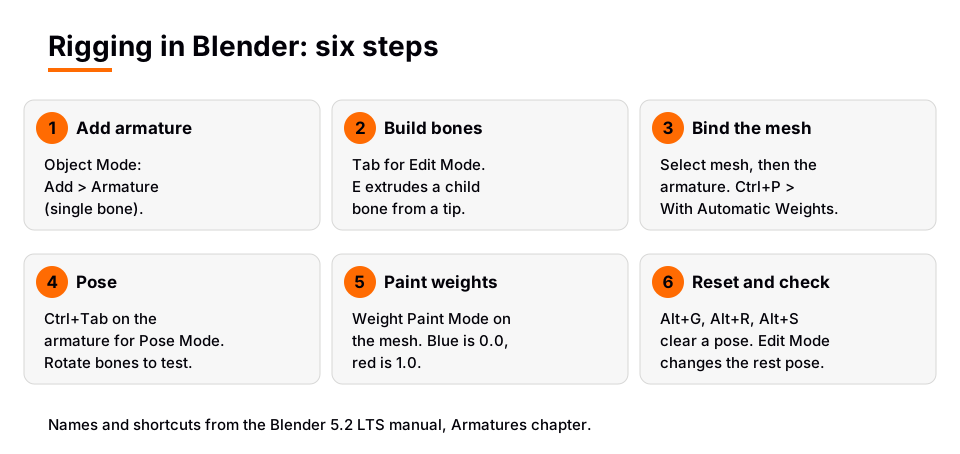
What an armature is
The manual compares an armature to a skeleton: it consists of bones, and anything attached to or associated with those bones moves and deforms with them. An armature is a type of object, with an origin, position, rotation and scale like any other. The rig is the whole setup that lets you pose a character or object.
Three ideas explain most rigging problems:
- Rest position. The armature's default shape, as set in Edit Mode. In Edit Mode you always see the rest position.
- Pose. The offsets you create by transforming bones in Pose Mode, measured from the rest position.
- Skinning. Linking the armature to the mesh. The manual names two ways: parenting objects to bones, which moves them without deforming them, and the Armature modifier, which is the only way to really deform the geometry.
Step 1: add an armature
- In Object Mode, put the 3D Cursor where you want the bone to start. The manual notes Shift+C returns it to the world origin.
- Choose Add > Armature and add a Single Bone, as in the manual's first-armature example.
- Press Tab to enter Edit Mode.
The manual says a new bone is one unit long, points along the global Z axis, has its root at the 3D Cursor, has no parent, and has Deform enabled. The Add Bone panel lets you set its name and length. You should see one bone in the viewport, which you can now move and extend to fit your mesh.
Step 2: build bones in Edit Mode
Bones have a root (also called head) and a tip (tail). In Edit Mode you can select and move both, much like mesh vertices. The key tools:
- Extrude (E). For each selected tip, it creates a new bone that is a child of that tip's bone and connected to it. Select the tip of the first bone, press E, move the mouse and click.
- Ctrl+right-click. With a bone selected, this adds a new bone at the end of the active bone, parented and connected. Repeat it to extend a chain.
- Parenting (Ctrl+P). Select a bone, then its future parent, and press Ctrl+P. Choose Connected or Keep Offset. Alt+P clears a parent.
The manual warns about one trap: if you cancel an extrude, zero-length bones are left behind. They are removed when you exit Edit Mode, but they can confuse you, so undo right away instead.
Name the bones now. Use the Name field in the Bone properties, or double-click a bone in the Outliner. For a symmetrical character, the manual recommends left/right suffixes such as arm.L and arm.R, which let tools like X-Axis Mirror editing pair bones. Shift+E does mirror extrusion once X-Axis Mirror is on.
Finish the skeleton before you skin it. The manual says that editing the rest position later also modifies every existing pose, so be sure the armature is definitive before skinning and posing.
Step 3: bind the mesh with automatic weights
- In Object Mode, select the mesh you want the armature to move.
- Select the armature last, so it is the active object. The manual says to select all child objects and then, lastly, the armature.
- Press Ctrl+P in the 3D Viewport, or use Object > Parent, and choose Armature Deform. Then pick With Automatic Weights in the Set Parent To menu.
After this, the armature is the parent of the mesh and the mesh has an Armature modifier pointing at it. According to the manual, Blender also creates a vertex group named after each deforming bone and fills it with weights calculated from the distance between the vertices and each bone, using a "bone heat" algorithm.
The manual lists the alternatives. With Empty Groups creates the groups but leaves them without weights. With Envelope Weights uses the Bone Envelope settings. Automatic Weights is the easiest to set up, and it is the right choice for a first rig.
One warning from the manual: if you already made vertex groups with the same names as your bones, both Automatic and Envelope Weights completely override their content. Use With Empty Groups in that case.
Step 4: pose the bones in Pose Mode
You cannot pose in Edit Mode, because it edits the rest position, and Object Mode only moves the whole object. Armatures have a third mode for this. With the armature selected, press Ctrl+Tab. The manual says that for an armature this switches between Object Mode and Pose Mode.
- Click a bone to select it. In Pose Mode you select whole bones, not roots or tips.
- Rotate it with R. Moving and scaling work like they do for objects. The manual shows R, Y, Y as a way to rotate around a bone's own local Y axis.
- Watch the mesh. It should bend with the bone.
- To undo a pose, use Pose > Clear Transform, or Alt+G, Alt+R and Alt+S to clear location, rotation and scale.
In Pose Mode each bone starts with neutral values: 0.0 for position and rotation and 1.0 for scale. What you change is an offset from the rest position.
Step 5: weight paint basics
Automatic weights are rarely perfect. The manual says that parts of the mesh not deforming as you expect when you pose is the typical symptom, and that you then have to alter the weights of the vertices manually. Weight Paint Mode is built for this.
- Select the mesh in Object Mode, then enter Weight Paint Mode from the Mode selector in the 3D Viewport header, or with Ctrl+Tab.
- Read the colors. The manual says blue means unweighted (weights close to 0.0) and red means fully weighted (close to 1.0), with a rainbow between.
- Choose the vertex group of the bone you are fixing. Weights are painted into the active vertex group, and the manual says groups are managed in the palette pop-over in the middle of the header.
- Pick the Draw brush, set Weight and Strength, and paint. Starting to paint adds weights to the active vertex group.
- Use the Blend mode to control what a stroke does. The manual describes Mix (paint toward a target weight), Add, Subtract and, as separate brush types, Blur, Average and Smear.
- Return to Pose Mode and test again.
The Armature modifier normalizes weights automatically, so you do not have to keep them perfect. Still, the manual offers Auto Normalize (keeps deforming weights adding up to one while painting) and Multi-Paint (treats several selected bones as one) for when a vertex is shared between several bones. The Blur brush smooths the weighting of adjacent vertices, so try it, with a lower Strength, where the weights change abruptly at a joint.
Common rigging problems
- A bone moves but the mesh does not. Check the bone's Deform panel under Bone properties. The manual says turning the checkbox off stops that bone from deforming geometry and excludes it from automatic weight calculation. Also check the mesh has the Armature modifier with the right armature in its Object field.
- The mesh deforms in the wrong places. The manual says overlaps can occur with automatic weights on more complex armatures and meshes. Repaint those vertices in Weight Paint Mode.
- Joints lose volume when they bend. The Armature modifier has a Preserve Volume option. The manual says it can be better in many situations, but it also produces a discontinuity at 180 degrees from rest.
- The pose looks wrong after you edited bones. Edit Mode changes the rest position, so every existing pose changes too. Finish the skeleton before skinning.
Learn this in order with The Blender Launchpad
A rig is only useful once you animate it, and that is easier after the basics of modeling and the interface feel familiar. The Blender Launchpad is a members app with a roadmap of hand picked, free YouTube lessons in six stages. Stage 1 assumes you have never opened Blender, and the stages run through hard surface modeling, UV and PBR texturing, lighting and rendering, animation, and Geometry Nodes.
It is a curated playbook, not original video lessons, and it is one payment with no subscription. To see where rigging fits, read our Blender animation tutorial, the beginner modeling tutorial, and how to learn Blender software. If you wonder how big the climb is, see is Blender hard to learn, and for a study plan, the best way to learn Blender.
Questions people also ask
How do I rig a character in Blender?
Add an armature, build bones in Edit Mode, parent the mesh with Ctrl+P and Armature Deform with Automatic Weights, then pose in Pose Mode and fix weights in Weight Paint Mode.
What is a rig in Blender?
A rig is the set of controls that lets you pose and animate something. In Blender it is an armature object made of bones, plus the weights or parenting that tie a mesh to it.
What is the difference between Edit Mode and Pose Mode for bones?
Edit Mode changes the armature's rest position. Pose Mode transforms bones to create poses, measured as offsets from that rest position.
What does With Automatic Weights do in Blender?
It parents the mesh to the armature and fills a vertex group for each deforming bone, with weights based on distance from the bone. You can edit them afterward in Weight Paint Mode.
How we checked this
We did not run Blender while writing this. We read these pages of the Blender Manual (5.2 LTS) on November 4, 2026: Armatures introduction, Adding Bones, Bone Editing (introduction, Extrude, Parenting, Naming), Bone Structure, the Deform panel, Posing (introduction, selecting, Clear Transform), Skinning (introduction and Armature Deform Parent), the Armature modifier, Object Modes, and Weight Paint (introduction, Brushes and Options).
We did not confirm how to select a bone's vertex group by clicking a bone in Weight Paint Mode, so Step 5 says to pick the active vertex group instead. We also did not confirm differences between Blender 4.x and 5.x for these tools.


