
To animate in Blender, you set an object's pose on one frame, press I to insert a keyframe, jump to another frame, change the pose, and press I again. Blender fills in every frame between your keys, and you refine the timing in the Dope Sheet and the shape of the motion in the Graph Editor. This Blender animation tutorial for beginners walks through that loop with a simple bouncing object, then shows how to play it and render it.
Everything here follows the Blender 5.2 LTS manual. You need no rig, no armature and no add-ons, only one object and about ten minutes.
How animation works in Blender
The manual defines animation as making an object move or change shape over time, and says it is typically achieved with keyframes. A keyframe is a marker of time that stores the value of a property. For example, a keyframe can say a cube sits at 3 m on frame 1. Add another at frame 10 with a different value, and Blender works out every frame in between using the chosen interpolation method.
That interpolation is stored as an animation curve, also called an F-Curve. The X axis of the curve is time and the Y axis is the value of the property. You can animate almost any property this way, from an object's position to the transparency of a material.
Sources: keyframe
Animate a bouncing object, step by step
Use the default cube or any object. This exercise uses one property, height, and teaches the whole keyframe loop.
- Open the Animation workspace. The manual describes the Animation workspace as the one for making properties of objects dependent on time.
- Set the frame range. The manual says a scene starts at frame 1 and ends at frame 250 by default. For a short bounce, change End in the Timeline header to 24. You can also set it in Output properties, in the Frame Range panel.
- Key the top of the bounce on frame 1. With the playhead on frame 1, select the object, press G and move it up (press Z to lock the move to the vertical axis). With the mouse over the 3D Viewport, press I. The object's name in the upper left of the viewport turns yellow, which the manual says means the current frame is a keyframe for that object.
- Key the ground on frame 12. Click in the Timeline's scrubbing area to move the playhead to frame 12 (or hold Alt and scroll the mouse wheel to step frames). Move the object down so it rests on the ground, and press I.
- Key the top again on frame 24. Move the playhead to frame 24, move the object back up to its starting height, and press I. Because the first and last pose match, the bounce can loop.
- Play it. Press Space to play and again to pause. The manual's own keyframe example uses the same Space shortcut.
You should see diamond shapes in the Timeline at frames 1, 12 and 24, and the object should drop and rise. At this stage the motion looks floaty, because the default interpolation is smooth at every key. The next sections fix that.
Use the Timeline and playback controls
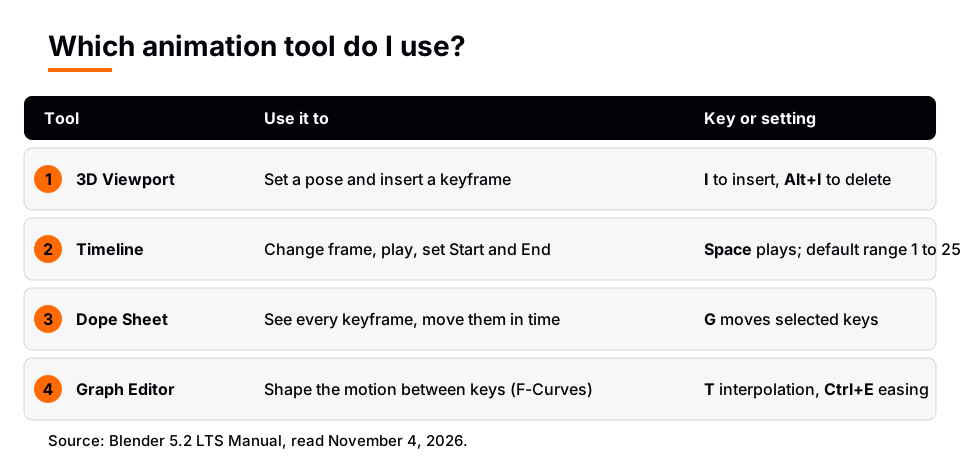
The Timeline is for jumping between frames, moving keyframes and controlling playback. The blue line is the playhead, and diamonds are keyframes. By default it shows keyframes only for selected items, so if your keys seem to vanish, check that the object is still selected or turn off View > Only Show Selected.
| Action | Shortcut | Note |
|---|---|---|
| Play or pause | Space | Rewind in reverse is Shift+Ctrl+Space |
| Next or previous keyframe | Down or Up | Also buttons in the transport controls |
| Jump to start or end | Shift+Left or Right | Uses the preview range if active |
| Loop a short section | P then drag | Sets a Preview Range; clear it with Alt+P |
The Playback popover has a Loop setting. Infinite jumps back to the first frame at the end, and Bounce reverses direction.
Sources: Timeline
Move keyframes in the Dope Sheet
The Dope Sheet gives a bird's-eye view of every keyframe in the scene, with a row for each animated property and the keys laid out along time. Click a key to select it and drag to move it. Selected keys are yellow and unselected ones are gray.
Use it for timing. To make the object hit the ground sooner, select the frame 12 keyframe and press G to slide it to frame 10. Scaling keyframes with S in the Dope Sheet moves them only along the time axis, with the playhead as the pivot, and does not change their values. A bar between two keys means the value is held, since the two keyframes are identical.
Sources: Dope Sheet
Shape the motion in the Graph Editor
The Graph Editor shows the F-Curve. Keyframes are discs, and each has two handles you can drag. The manual calls Bézier the default interpolation, smooth in both values and speed. That is why the bounce floats: the motion eases gently into and out of every key, while a real falling object keeps speeding up until it hits the ground.
You can change this with interpolation and easing, both documented in the manual:
- Select the first key. In the Graph Editor, click the keyframe at frame 1 (the top of the fall).
- Set the interpolation. Press T (Key > Interpolation Mode) and choose Quadratic. The interpolation mode sets how the curve moves from that key to the next one.
- Set the easing. Press Ctrl+E (Key > Easing Type) and choose Ease In. The manual says Ease In makes the value move slowly at the start of the segment and speed up toward the end, which is how a falling object behaves.
- Do the rise. Select the key at the ground, set Quadratic, and choose Ease Out. Ease Out moves quickly at first and slows toward the end, matching the object rising and losing speed.
Other options in the same menus include Constant, which holds the value until the next key (the manual says it is normally used for blocking), and Linear, a straight line between keys. The manual also lists Bounce and Elastic in the Dynamic Effects group, which imitate physics effects like bouncing. You can also press V to set the handle type of the selected keys.
Sources: Graph Editor
Common beginner mistakes
| Problem | Cause | Fix |
|---|---|---|
| Object snaps back when you change frame | You moved it without inserting a keyframe | Move, then press I on that frame |
| A property turns orange | Its value changed from the keyframed value | Press I again to key the new value |
| Animation stops at frame 250 | Default End frame is 250 | Set End in the Timeline or Frame Range panel |
| Keys missing in the Timeline | Only selected items are shown | Select the object or turn off Only Show Selected |
| Key inserted on the wrong frame | The playhead was not where you thought | Press Alt+I to delete keys on the current frame |
The manual lists property colors that help here: gray means not animated, yellow means keyframed on the current frame, green means keyframed on a different frame, and orange means changed from the keyframed value. You can also turn on Auto Keying with the record button in the Timeline header. The manual notes it works only for transform properties such as Location, Rotation and Scale, not for a material color.
Play it back and render the animation
Pressing Space only previews the animation in the viewport. To make a file, render it. Check the Frame Rate in the Format panel of Output properties, and the Start and End in the Frame Range panel. The manual gives an example: a 250 frame animation at 30 frames per second lasts about 8.3 seconds, so your 24 frame bounce lasts one second at 24 frames per second.
Set the File Path in the Output panel, then choose Render > Render Animation, or press Ctrl+F12. By default, animation renders are saved automatically, and the frame number is added to the file name with four digits, like image0001.png. For anything long, the manual recommends the frame sequence approach (image files) over rendering straight to a movie, because you can resume after an interruption. See the manual's Rendering Animations page for the details. Our guide to how to render an animation in Blender covers the full settings.
Sources: Rendering Animations page
Where to go after the bounce
Character animation adds rigging: the manual lists armatures, constraints, modifiers, shape keys and drivers as the usual building blocks. Read our Blender rigging tutorial when you want that, and keep modeling skills growing with the Blender 3D modeling tutorial. For the render side, see how to render in Blender.
Learn this in order with The Blender Launchpad
Animation is easier when modeling, materials and lighting are already comfortable, because you spend your time on motion instead of fighting the scene. The Blender Launchpad is a members app with a roadmap of hand picked, free YouTube lessons in six stages, and animation is stage 5, after Blender basics, hard surface modeling, UV and PBR texturing, and studio lighting and rendering.
Stage 1 assumes you have never opened Blender. The Launchpad is a curated playbook, not original video lessons. It is one payment with no subscription, and it includes 1,000+ CC0 assets, HDRIs and textures that are free for commercial use.
Questions people also ask
How do I animate in Blender as a beginner?
Place the playhead on a frame, pose your object, and press I in the 3D Viewport to insert a keyframe. Move to another frame, change the pose and press I again, then press Space to play.
Where do I start with a Blender 3D animation tutorial?
Start with one object and one property, like the bounce above. Once keyframes, the Dope Sheet and the Graph Editor make sense, move on to rigging with armatures and constraints.
What is the difference between the Dope Sheet and the Graph Editor?
The Dope Sheet shows when keyframes happen so you can move them in time. The Graph Editor shows the F-Curve between them so you can change interpolation, easing and handles.
How do I render an animation in Blender?
Set the frame range and output path, then choose Render > Render Animation or press Ctrl+F12. Blender writes the frames to the Output panel's file path.
How we checked this
We read these pages on November 4, 2026, in the Blender 5.2 LTS manual: Animation Introduction, Keyframes Introduction, Editing Keyframes, Animation Editors (playhead, playback, keying, transport controls), Timeline, Dope Sheet Introduction and Editing, Graph Editor Introduction, F-Curve Editing and Properties, Workspaces, Top Bar (Render menu), Rendering Animations, and the Format, Frame Range and Output panels. We did not run Blender while writing this. The frame numbers, the choice of Quadratic with Ease In and Ease Out for a bounce, and the tip to use Z to lock the move to the vertical axis are our own exercise design and general practice, not manual statements.


