

Before you install a retopology add-on for Blender, know that Blender already ships the pieces for manual retopology: the Retopology overlay, face snapping, the Poly Build tool and the Shrinkwrap modifier. Add-ons such as PolyQuilt, TopoPot and RetopoFlow wrap that workflow in dedicated drawing tools.
This guide shows the built-in method step by step with the exact menu names from the Blender 5.2 LTS manual, then lists the retopo add-ons whose own pages we could read, with the Blender versions each page states. Nothing here was run in Blender; every claim comes from the pages listed at the end.
What retopology means, and when remesh is enough
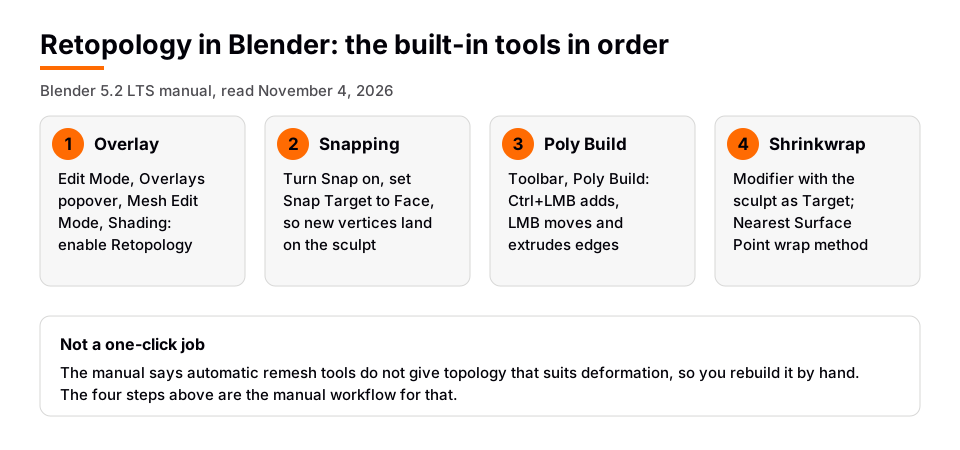
Retopology means rebuilding a sculpted or scanned mesh with cleaner, lighter topology that keeps the same shape. The Remeshing and Retopology page of the manual is blunt about the limits of automation. Its Voxel remesher is described as useful for cleaning up a mesh for sculpting or 3D printing, but not for creating topology on a mesh that will be deformed, such as an animated character. The Quad remesher (Quadriflow) is described the same way for final deformation topology.
The manual says no perfect automatic tool exists for deformable topology right now, so you do it by hand: you create a new mesh over the original and adjust it until it covers the shape. If you only need fewer faces on a mesh that is otherwise fine, the manual points you to Decimate instead.
Sources: Remeshing and Retopology page
Retopology tools built into Blender
The manual's retopology section names three helpers: the Retopology overlay, the Poly Build tool, and Snapping. A Shrinkwrap modifier is a useful fourth. Here is the order that works.
- Add a new mesh and enter Edit Mode. Put a plane or a single quad over the sculpt, select the new object, and press Tab. Keep the high-resolution sculpt visible in Object Mode behind it.
- Turn on the Retopology overlay. Open the Viewport Overlays popover and, in the Mesh Edit Mode overlays under Shading, enable Retopology. The manual says it makes the edited mesh see-through so you can see the sculpt underneath, and optionally draws it in front of nearby geometry. Its Offset value moves the edited mesh toward the camera so it is not hidden by other objects. The manual says this avoids the clutter from geometry on the other side that X-Ray causes.
- Enable snapping to faces. In the 3D Viewport header, switch Snapping on (the manual lists Shift+Tab as the shortcut, and holding Ctrl snaps temporarily). Set Snap Target to Face, which the manual calls useful for retopologizing: it snaps to the surface of the face under the mouse cursor.
- Pick Poly Build. In Edit Mode choose Poly Build from the toolbar. Hold Ctrl and click to add a vertex and a triangle against the nearest edge; Shift+click deletes the vertex or face under the cursor; dragging with the left mouse button moves a vertex or extrudes an edge into a quad. The Create Quads setting dissolves the shared edge when a new triangle touches an existing one.
- Merge as you go. The Poly Build page suggests enabling Snapping and Auto Merge while tweaking vertices so that they combine.
- Optional: tighten with Shrinkwrap. Add a Shrinkwrap modifier to the new mesh and set Target to the sculpt. The manual says the modifier moves each vertex of the modified object to the closest position on the target's surface, and the Offset value keeps a distance from it.
After each step you should see the retopo mesh sitting on the sculpt's surface, with the sculpt still visible through it. If new vertices float in space, the snap target or the Retopology overlay is the first thing to check.
Snap settings that matter for retopology
Three snapping options in the manual are worth knowing. Face Project snaps each vertex to the face found by projecting along your current view direction, which the manual says is useful for bending a flat sheet so it fits a curved surface. Face Nearest snaps each vertex to the closest face, and, unlike Face Project, it can snap to occluded geometry. Backface Culling excludes back-facing geometry from snapping, which can stop the far side of a head from grabbing your vertices.
Retopology add-ons for Blender
The table lists add-ons found by searching extensions.blender.org for "retopology" and by searching for retopology tools elsewhere. We only describe what each product's own page states, as read on November 4, 2026.
| Add-on | Where it is listed | What its page states |
|---|---|---|
| PolyQuilt Retopology Tool | Extensions platform | Version 1.46.8, Blender 4.5 LTS and newer, GPL v3 or later. A fork of PolyQuilt that speeds up manual retopology. |
| TopoPot | Extensions platform | Version 1.1.2, Blender 5.0 and newer, GPL v3 or later. Pen tool, brush tool and a select box. |
| Key Ops: Toolkit | Extensions platform | Version 0.2.53, Blender 4.2 LTS and newer. Lists a one-click toggle for the retopology overlay and settings. |
| RetopoFlow 4 | Superhive Market (paid) | Lists Blender 4.2 to 5.2, add-on type, "Blender Extension Compatible: Yes", license shown as GPL. |
PolyQuilt's page describes its tool as comparable to RetopoFlow and Quad Draw, and its Known Issues note says it works best on the OpenGL backend, with Vulkan and Metal not officially supported yet. TopoPot's page describes a reference collection for snapping and a quad-only mode, and says the add-on is free. RetopoFlow's product page names Orange Turbine as the seller and shows a price; check the page for the current one, because we do not quote it here.
We did not find a page on extensions.blender.org for RetopoFlow itself, so install it the way its product page describes. Other retopology tools exist on Superhive Market, but we read only the pages named above.
Sources: PolyQuilt Retopology Tool · TopoPot · Key Ops: Toolkit · RetopoFlow 4
Install a retopology add-on in Blender 5.2
For anything listed on the Extensions platform, the Blender 5.2 manual's Get Extensions page gives three routes: drag the installation URL from the website into Blender; open Preferences, go to Get Extensions, search the name and click Install; or use Install from Disk (the drop-down menu in the top right, or drag and drop a ZIP). The manual says Install from Disk puts the extension in a Local Repository, so no updates are offered for it.
An installed extension can be disabled and re-enabled in Preferences. If an add-on does not activate when enabled, the manual's tip is to check the Console window for errors.
Sources: Get Extensions page
Built-in tools or an add-on?
Start with the built-in set. It costs nothing, ships with Blender and teaches you what the add-ons automate. Move to an add-on when you retopologize often and want dedicated drawing tools or shortcuts for toggling the overlay and snapping. Whatever you pick, confirm that the page lists your Blender version; the tools above list different minimums, from 4.2 LTS to 5.0.
When retopology goes wrong
- You cannot see the sculpt through the new mesh. Enable the Retopology overlay and raise its Offset.
- Vertices snap to the wrong surface. Check Snap Target is Face, turn on Backface Culling, and use Face Project if you want snapping along your view.
- The result still pinches in animation. That is a topology problem, not a tool problem. The manual says deformable topology has to follow the flow of the geometry.
- You just need fewer polygons. Use the Decimate modifier instead of retopology, as the manual suggests for meshes without other problems.
For the rest of the modeling workflow, see our Blender 3D modeling tutorial, the list of best free Blender add-ons and the guide to the LoopTools add-on. If the character you are retopologizing needs a body to start from, see free Blender character models.
Learn this in order with The Blender Launchpad
Retopology is the end of a longer chain: you need to move around the viewport, edit meshes and snap with confidence before add-ons help. The Blender Launchpad is a members app with a roadmap of hand picked, free YouTube lessons in six stages. Stage 1 assumes you have never opened Blender, and the next stage covers hard surface modeling.
It is a curated playbook rather than original video lessons, with one payment and no subscription. It also includes 1,000+ CC0 assets, HDRIs and textures that are free for commercial use.
Questions people also ask
Is there a retopology add-on for Blender?
Yes. PolyQuilt Retopology Tool and TopoPot are listed on extensions.blender.org, and RetopoFlow 4 is sold on Superhive Market. Blender also has built-in retopology tools.
Does Blender have built-in retopology tools?
Yes. The manual names the Retopology overlay, the Poly Build tool and Snapping as aids for retopology. Shrinkwrap is a useful extra.
Is there a free Blender retopo add-on?
TopoPot's page describes itself as free, and PolyQuilt is listed on the Extensions platform under GPL v3 or later. Check each page for current terms.
Can Blender retopologize automatically?
Its Voxel and Quad remesh tools rebuild a mesh automatically, but the manual says they do not produce final topology for deformation, which you build by hand.
How we checked this
We read these pages on November 4, 2026: Blender 5.2 LTS manual pages for Remeshing and Retopology, Snapping, Poly Build, the Shrinkwrap modifier, the 3D Viewport overlays and Get Extensions; the extensions.blender.org pages for PolyQuilt Retopology Tool, TopoPot and Key Ops: Toolkit; and the Superhive Market product page for RetopoFlow 4. We did not run Blender or any of the add-ons, so we cannot say how well they work. Versions and compatibility change, so use the page of the add-on you install.


